
|
Brisbane Line Waltzing Matilda #4 |
||
|---|---|---|
| (Attacker) Japan | vs | Australia (Defender) |
| Formations Involved | ||
|---|---|---|
| Australia |  |
4th Infantry Division |
| Japan |  |
4th Tank Regiment |
| Japan |  |
5th "Carp" Infantry Division |

|


| Overall Rating, 1 vote |
|---|
|
3
|
| Scenario Rank: --- of 964 |
| Parent Game | Waltzing Matilda |
|---|---|
| Historicity | Alt-History |
| Date | 1942-08-01 |
| Start Time | 12:00 |
| Turn Count | 24 |
| Visibility | Day |
| Counters | 149 |
| Net Morale | 1 |
| Net Initiative | 1 |
| Maps | 4: 18, 25, 5, 9 |
| Layout Dimensions | 86 x 56 cm 34 x 22 in |
| Play Bounty | 190 |
| AAR Bounty | 167 |
| Total Plays | 1 |
| Total AARs | 1 |
| Battle Types |
|---|
| Delaying Action |
| Exit the Battle Area |
| Conditions |
|---|
| Entrenchments |
| Minefields |
| Off-board Artillery |
| Randomly-drawn Aircraft |
| Scenario Requirements & Playability | |
|---|---|
| Afrika Korps | Counters |
| Battle of the Bulge | Maps |
| Eastern Front | Maps |
| Elsenborn Ridge | Maps |
| Guadalcanal | Counters |
| Road to Berlin | Maps |
| Secret Weapons | Counters |
| Waltzing Matilda | Base Game |
| Introduction |
|---|
|
Just how the Allied command planned to defend Australia would become a controversial topic in mid-war elections, and continue to simmer into the next century. A supporter of John Curtin, prime minister in 1942, charged his predecessor, Robert Menzies, of scheming to fall back to a "Brisbane Line" that abandoned much of Queensland to the Japanese. There seems to have been no actual "Brisbane Line," and Gen. George Vasey of Northern Command told his subordinates that he expected them to fight "to the limits of human endurance" for every inch of their country. |
| Conclusion |
|---|
|
Australia's vast size would have demanded that her defenders give up something - the continent's small population base made that inevitable. But saying so out loud was anathema in a democratic society, and the Australian people were most definitely willing to back up their unreasonable demands with unreasonable fighting fury. Whether that would have been enough against a well-supported invasion was fortunately never tested. |

|
|
|---|
| AFV Rules Pertaining to this Scenario's Order of Battle |
|---|
|
| Army |
|---|
|


| Imperial Japanese Army |
|---|
|


| On to the Brisbane Line |
|---|
|
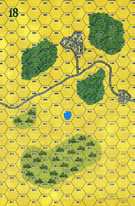
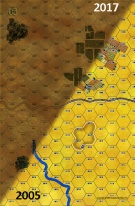
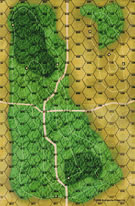
This is an enter-and-exit battle for the Japanese, a delaying action for the Australians. The Australians must defend a wide front, with two roads leading from the North (Japanese entry side) to the South (Japanese exit). I did apply one terrain mod not in the scenario instructions. The billabong ends at the western edge of Board 5. That looked odd to me, so I continued it onto board 18, through hexes 0717 and 0616 into the swamp at 0615. The Australians set up first, with most of their units and minefields on the eastern half of the battlefield where the terrain is more open. They are badly outnumbered, and hope to use their minefields and entrenchments to hold the line against the Japanese. They have no real reserves. The Japanese also set up heavily in the east, with all of their armor and two-thirds of their infantry. The Japanese plan is to use their tanks and engineers to break through the thin Australian defense and make a break for the south, while the smaller Japanese force prevents the Australians in the west from reinforcing their comrades. The Japanese advance on line to the minefields, and then deploy their engineers. Meanwhile, the tanks maneuver around the Australian right flank, losing two platoons to anti-tank guns before Japanese return fire takes them out. Japanese infantry assaults the entrenched Australians. It takes about two hours and some heavy losses, but the Japanese break through the Australian line, sending the few remaining Australians back to the woods in the south. The Australians manage to get a few units into the woods on the southern boards while the Japanese regroup after their assaults. The survivors set up a small line of defense, but are too few to do more than slightly delay the Japanese at this point. The Japanese get most of units off the southern edge for a major victory. In retrospect, I spread the defense too thinly along the front and tried to hold it too long. Once the Japanese broke through the line there was no stopping them. A defense in depth, with units concentrated along the road might have worked better. Still, a good scenario. |
| 0 Comments |