
 TaBa048

|
The Road to Raseiniai Raseiniai #1 |
||
|---|---|---|
| (Defender) Soviet Union | vs | Germany (Defender) |
| Formations Involved | ||
|---|---|---|
| Germany |  |
6th Panzer Division |
| Soviet Union |  |
48th Rifle Division |

|


| Overall Rating, 5 votes |
|---|
|
4
|
| Scenario Rank: 149 of 1093 |
| Parent Game | Raseiniai |
|---|---|
| Historicity | Historical |
| Date | 1941-06-23 |
| Start Time | 06:00 |
| Turn Count | 18 |
| Visibility | Day |
| Counters | 121 |
| Net Morale | 1 |
| Net Initiative | 4 |
| Maps | 2: 4, 6 |
| Layout Dimensions | 56 x 43 cm 22 x 17 in |
| Play Bounty | 180 |
| AAR Bounty | 152 |
| Total Plays | 4 |
| Total AARs | 4 |
| Battle Types |
|---|
| Exit the Battle Area |
| Inflict Enemy Casualties |
| Road Control |
| Conditions |
|---|
| Entrenchments |
| Off-board Artillery |
| Reinforcements |
| Scenario Requirements & Playability | |
|---|---|
| Fire in the Steppe | Maps + Counters |
| Raseiniai | Base Game |
| Introduction |
|---|
|
Maj. Gen. Franz Landgraf’s 6th Panzer Division took up positions on the right of 41st Motorized Corps, just east of the border city of Tauroggen. While the neighboring 1st Panzer Division became tangled in fighting for the city, the 6th Panzer Division had a much easier time. The Soviet 48th Rifle Division had been ordered forward from its station at Raseiniai on 18 June, but by the 22nd only the division’s recon battalion had deployed on the border. Sixth Panzer Division encountered the rest of the formation on the next day. |
| Conclusion |
|---|
|
A May 1941 inspection declared 48th Rifle Division’s state of readiness and training “worse than bad.” The entire division staff (86 people, including both Red Army and political officers) had been executed in the late 1930’s for crimes ranging from chronic alcoholism to treason, and their replacements seem to have been less than eager to be noticed for any reason. After the inspection the division was ordered to move to Raseiniai to build fortifications, which were not complete when the Germans attacked. Following devastating air attacks, 6th Panzer Division blew through the hapless division, but then halted to secure its supply lines. |

|
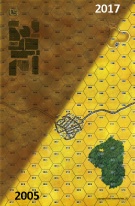
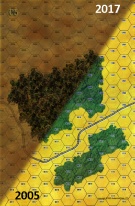
|
|---|
| AFV Rules Pertaining to this Scenario's Order of Battle |
|---|
|
| Heer |
|---|
|


| Army (RKKA) |
|---|
|


| 5 Errata Items | |
|---|---|

|
The reduced direct fire value of the Heer HMG became 5-5 starting with Fall of France. (plloyd1010
on 2015 Jul 31)
|

|
The morale and combat modifiers of German Sergeant #1614 should be "0", not "8". (Shad
on 2010 Dec 15)
|

|
All SPW 251s have an armor value of 0. (Shad
on 2010 Dec 15)
|

|
The reduced direct fire value in Kursk: Burning Tigers is 4-4. (plloyd1010
on 2015 Jul 31)
|

|
Kommissars never get morale or combat modifiers. Ignore misprints. (Shad
on 2010 Dec 15)
|
| A little more to the left... | ||||||||||||||
|---|---|---|---|---|---|---|---|---|---|---|---|---|---|---|
This was a tremendous game with my esteemed opponent Grognard Gunny. This is the first time we've played Raseinai and I don't normally play Russian front games so this was really a treat. I played the Germans and I played a pretty heavily motorized column with a solid recon element, including armored cars, and my mission was to clear the road through the forest and to Exodus many troops as I could. The Russian player placed a solid defense across the bottom of the forest where I had to enter the board. The road meandered slightly off center east through the forest, forcing the Germans to pass in front of the forest and the Russian defenses. I wasn't about to do that so I decided to run my motorized units and my recon unit up the right of the forest along a well prepared defense that the Russians had placed including a 76 mm gun. Over the first couple turns things went relatively well and then I got a very good role and knocked out the 76 mm. My initial plan had been to move around the east of the forest and then attack into the forest doubling back to the west to bypass the Russians and then clear that road. But the opportunity presented itself for me to wheel to my right and head directly into the forest itself with all my infantry where they just slowly went through couple hexes at a time and handled Russian defenders as they found them. The Russian player handled this well and did what they could, but frankly, this is the biggest force of German infantry I've ever commanded and they had a lot of fire power and so I would get clos, fire and then I would assault and the morale differences just made the day. So by the end of the game I cleared the forest on the on my left and cleared the road hexes fulfilling the objective. I like the scenario and I would love to play Grognard Gunny again, and I believe we are set to do that for the second scenario of of Raseinai. |
||||||||||||||
| 0 Comments |

| Secure the Road & Exit the North Edge of the Battle Map - Almost! | ||||||||||||||
|---|---|---|---|---|---|---|---|---|---|---|---|---|---|---|
This was another fun-filled, but slightly gamey, 5-session play-through with the tenacious & crafty, goosebrown leading defending elements of the Soviet 48th Rifle Division, in this 2-map, 18-game turn fight. We decided not to use the Russian entrenchment counter called for in the setup, and instead added a Soviet BT-5 light tank platoon to the counter mix. I led advancing elements of the German 6th Panzer Division. The German side drew better than average leaders, but the Soviet leadership draw was middling. We used the FOW, smoke/illum, excess initiative, hidden units (25% of the Soviets units), consolidation and strategic movement optional rules, as well as these FOUR experimental house rules: 1) Road Movement for Mechanized & Foot Units — All FOOT & MECHANIZED units may move on roads at the rate of 1/2 of a Movement Point (MP) per road hex, just like MOTORIZED units, 2) Standardized Movement for Mechanized Units — All mechanized units may move through clear hexes at a movement cost of only 1 movement point (MP) per hex, instead of 1 1/2. Add one to this cost if moving up, across, or down slopes hexes, 3) Voluntary Unit Reduction — Players may voluntarily reduce 2-step personnel units to 1-step (halved) units if they have at least one leader of Major or higher rank among their side’s assigned force. To do so, the unit to be halved must begin the player’s activation phase in the same hex or in an adjacent hex to a Captain or higher rank. The full-strength unit to be halved must be in good order and this action costs all the reduced unit’s movement points. Remove the full-strength unit, and replace it with 2 reduced strength units. Mark both — and the leader — as activated, and 4) Small Caliber AT & AA Rapid Fire Optional Rule — All small caliber (<48mm or less) anti-tank (AT) as well as automatic, anti-aircraft (AA) towed or self-propelled artillery units may fire twice in OPPORTUNITY FIRE (OPFIRE) against moving enemy formations using the same rules as apply for personnel units (INF, RIF, GREN, HMG, ENG, et al) when using OPFIRE. For example, British towed or portee 2-pdr AT guns, all 20mm, 25mm, 28mm, 37mm, 45mm, 47mm towed AT guns, and towed or self-propelled 37mm or 40mm AA guns may fire two OPFIRE missions at individual, moving enemy vehicular or personnel unit targets. Units firing OPFIRE may not move or be limbered and loaded in the same turn in which they OPFIRE. Happily, this rule set provided improved playability, tactical flexibility & simplicity throughout our play-through. Our intense first session (game turns 1-2) consisted of a step-by-step, Wehrmacht movement to contact as they advanced into the western woods from the south edge of Map 6. Both sides initially lost single steps as the encounter began. The fast-paced, second session (game turns 3-6) consisted of a methodical, tactical withdrawal of Soviet elements in the western woods on Map 6, closely pursued by German recon units. This action led to a number of adjacent-hex firefights, and a set of three successful German close assaults in the woods. German reinforcements began slowly streaming north into the western forest beginning in the 4th game turn, as Russian artillery concentrations began falling on Wehrmacht units advancing on the east and west margins of the woods. Eight Soviets steps were lost this session, as was an additional German infantry step. The measured, Soviet tactical withdrawal continued during the third session (game turns 7-8) and featured multiple adjacent-hex firefight and 3 close assaults in both patches of forest on Map 6. A cluster of wagon transports were captured north of the town on Map 4, by an advance party of German motorcycle infantry, total Russian step losses were now at 14. Soviet artillery emplacements were now appearing on the north margins of both woods as the Wehrmacht advance continued. The Germans continued their close pursuit of the stubbornly, withdrawing Soviets during our fourth session (game turns 9-12). The updated step loss tally was now: 18-4 in favor of the Germans, as Wehrmacht recon units began occupying the large town on Map 4. The last, besieged Soviet HMG unit in Hex 06-0905 was eliminated at the end of a lengthy, close assault. Our intense, fifth session (game turns 13-16) resulted in an additional 10 Soviet steps lost, and 2 more German steps – both SPW 251 Halftrack platoons – went to the graveyard. Only a pair of the German close assaults were successful in the eastern woods, the other two, were costly stalemates in the west wood that lasted until the very last game turn. At this late stage, the bulk of the Wehrmacht force were consolidated under cover in the east & west woods, and their MTC Recon Company was ensconced the 7-Hex town on Map 4. After further, very heavy fighting, the session ended as a German minor victory, when they failed to exit the 20 required steps off the north map edge, but we able to control the north-south road, and eliminate just over 4 times the number of steps that they lost, at 28-6. My opponent’s well-executed tactical withdrawal and excellent initial setup, nearly won this for the hard-fighting, Soviet side. Unexpectedly, there were only 3 FOW-shortened game turns of the 18 played. This was a slightly gamey, but fun-to-play scenario, with plenty of decision points and the opportunity for considerable maneuver by the Axis side. I give it a solid 5 and recommend it for both SHARED and SOLO play, though it is notable that the 3-part victory conditions for the Germans are quite difficult to pull off. Please note that the more experienced player should lead the attacking Wehrmacht force. |
||||||||||||||
| 0 Comments |
| #1 The Road to Raseiniai |
|---|
|
Purchased this campaign study to get me over the minimum for free shipping, decided to play the scenarios since I was playing Fire in the Step. This was an OK booklet, couple of decent scenarios, think there are others that are more worthy of your time and money. |
| 0 Comments |
| Utter defeat in the woods | ||||||||||||||
|---|---|---|---|---|---|---|---|---|---|---|---|---|---|---|
The Soviet Commander had decided to hold the woods in the South given the forces available, giving the Germans free access to the road to the North, but blocking complete control of the road from the South to the North. Thus, the Soviets could have stopped the German onslaught cold, if all went well. The Germans pulled a quick left flank through the bulk of the woods, as expected, as it was hoped that they would bog down there. Unfortunately, the Germans were buoyed up by their leadership and their greater morale that did them well in the close action in the woods and the Soviets didn't do nearly as well as could have been expected. It rapidly turned into a rout and the victorious Germans wrapped up the fight with ample time to go. (A good fight for a matched pair with the onus being on the defender.) |
||||||||||||||
| 0 Comments |