
|
Bitter End at Calais Road to Dunkirk #23 |
||
|---|---|---|
| (Attacker) Germany | vs |
Britain
(Defender)
France (Defender) |
| Formations Involved |
|---|

|


| Overall Rating, 3 votes |
|---|
|
4.33
|
| Scenario Rank: --- of 964 |
| Parent Game | Road to Dunkirk |
|---|---|
| Historicity | Historical |
| Date | 1940-05-25 |
| Start Time | 16:00 |
| Turn Count | 23 |
| Visibility | Day & Night |
| Counters | 86 |
| Net Morale | 0 |
| Net Initiative | 2 |
| Maps | 1: 119 |
| Layout Dimensions | 43 x 28 cm 17 x 11 in |
| Play Bounty | 153 |
| AAR Bounty | 167 |
| Total Plays | 3 |
| Total AARs | 1 |
| Battle Types |
|---|
| Bridge Control |
| Inflict Enemy Casualties |
| Urban Assault |
| Entrenchment Control |
| Conditions |
|---|
| Entrenchments |
| Minefields |
| Naval Bombardment |
| Off-board Artillery |
| Randomly-drawn Aircraft |
| Smoke |
| Terrain Mods |
| Joint Forces Battle |
| Scenario Requirements & Playability | |
|---|---|
| Road to Dunkirk | Base Game |
| Introduction |
|---|
|
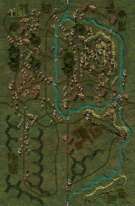
From the start, a withdrawal into the north of Calais to defend the docks appeared inevitable. The British made the decision to withdraw to a line of posts behind the three bridges over the canal de Calais separating northern and southern parts of the city. With their backs to the sea many of the defenders still believed evacuation a possibility but it was not to be. Almost every house overlooking the waterfront along the quays was turned into a defensive position. In late morning, the Germans tried to take Calais without a fight and asked for the formal surrender of the Allied forces. |
| Conclusion |
|---|
|
The British refusal to surrender was the signal for a thorough bombardment of the city’s remains, including Stuka dive bombers. After a second demand for surrender met the same answer, another bombardment pounded the citadel and the bridges. Since the OKH feared further tank losses, infantry led the attack and fought their way forward under heavy defensive fire. The three standing bridges witnessed some of the bitterest street fighting of the entire campaign. The situation became most critical at the western bridge and around the Citadel. Under cover of a heavy mortar barrage one tank forced the roadblock followed over by German infantry. But it was all in vain as the British fought on tenaciously. As it began to grow dark, General Ferdinand Schall of 10th Panzer Division decided to call it a day. |

|
|
|---|
| AFV Rules Pertaining to this Scenario's Order of Battle |
|---|
|
| Army |
|---|
|


| Armée de Terre |
|---|
|


| Fusiliers Marins |
|---|
|

| 4 Errata Items | |
|---|---|

|
All Bren carriers should have a movement value of 7. (Shad
on 2010 Dec 15)
|

|
Two British infantry have their full strengths printed on the back. They should both be "2-3" when reduced. (Shad
on 2010 Dec 15)
|

|
The Mk VIb in Road to Dunkirk were printed with a movement factor of 5. The piece should have a movement of 9. (plloyd1010
on 2024 Aug 15)
|

|
In 1940: Fall of France, the units show Direct Fire. All units are Indirect Fire. (rerathbun
on 2015 Jun 06)
|
| Thunder in Calais | ||||||||||||||
|---|---|---|---|---|---|---|---|---|---|---|---|---|---|---|
I know what you're thinking: how does he dare to give a "5" for one of his own scenarios ? Well, aside feeling a bit ashamed about this issue, I have to confess about pleasure or full satisfaction. Satisfied with the results of the design and pleased by intense play. Design. I especially like city fight PG scenarios and there are not many of them. Calais fighting in 1940 was an obvious candidate: I've drawn that map on purpose and it fulfills its role, quite complex with canals, bridges and town hexes everywhere. Railways markers through the city are good-looking. A lot of minefields, artillery at pointblank, a German demolition tank platoon, roadblocks, ruins, building on fire, engineers, a sIG platoon, casemates: wow ! I've included special events occuring when initiative dice rolls are equal and it works very well adding another touch of historicity to the scenario. In 23 game turns, we've had a sniper event, a mech breakdown event (my A13 tank lost a track and was immobilized) and two more allowing the players to have two action segments in a row. Play of the scenario. We play face-to-face with all optional rules except for Logistic shortfall. The scenario was a real nail biter going down to the last action of the very last turn. The final result was a draw with something like 39 (Allies)-40 (Germans) VPs. I remember firing my British HMG point blank on the sIG on the railway and forgetting to add 1 column for overstacking (Kfz13 and SK10/4 in same hex). It was a "X" on an open top vehicle ! I remember the Demolition tank (PzI with demolition charge) dropping its load on my French sailors and getting a "2X" right away in the middle of a big smoke column... I remember the extreme western corner of the canal - a narrow passage between the minefields - where the German player had 1 x Eng, 2 X Inf, 1 X HMG on the southern bank of the canal in smoking ruins and trying to cross the canal... 4 or 5 turns in a row... with no result...stuck on the canal vertical concrete walls. The British minefields all set up along the western part of the canal were deadly; Allied Naval artillery was harmless but the German one was a killer. There were assaults everywhere on the line with both sides constantly exiting/reinforcing the stacks. Intense ! Overall, I feel happy to get a draw in this one. It was "like a snail on a razorblade" as they say. |
||||||||||||||
| 0 Comments |