| Author |
Schoenwulf
|
| Method |
Solo |
| Victor |
Draw |
| Play Date |
2019-02-28 |
| Language |
English |
| Scenario |
Guad011
|
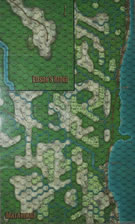
Battle Report: As dawn broke on September 8th, 1942, Units from B & C Companies of the 1st US Raider Battalion moved west along the coastal track to reconnoiter the Japanese troop buildup near the village of Tasimboko. At 0545 hours, they were fired on by elements of the Japanese 2nd Infantry Division. The recon Marine units took more fire as they approached Tasimboko at 0645. At 0815 hours, their APD support was withdrawn as the ground units were within 0.5 km of the village, but the Japanese defenders were tenacious and held their ground. Three American platoons went left to flank the defenders, and air support ramped up significantly; however, the Japanese received reinforcements from the 4th Infantry Regiment, 2nd Infantry Division at 1030. By 1100, hand-to-hand combat was rampant in the village itself, a battle that was to continue for 5 ½ hours. Noon brought paratrooper reinforcements for the US that moved eastward from the disembarkation point, while Marine Raiders moved west of the village to confront the Japanese HMG platoon that was staging there to enter Tasimboko. At 1245, a thunderstorm rolled in and soaked the area for the next hour as the US cleared the area west of the village and surrounded it. More Marine reinforcements landed at the LZ for the US at 1330 hours, and the paratrooper platoons reached the village at 1415. Then, one Japanese infantry platoon found a gap in the perimeter and headed southwest from the village to aid an embattled engineer unit, but they were cut off and eliminated. The last Japanese unit in the village fought to the last man and was finally eliminated by a combined paratrooper/raider force at 1630; the US troops then destroyed the supply base and returned to their encampment by nightfall. The battle was considered to be a draw as casualties were high on both sides.
Analysis: This 50-turn scenario, which involves either US or Japanese hex control and American step loss for victory, was played using 4th edition rules and village rules from the Kokoda campaign. Even though the US has significant firepower advantage, particularly with air support, the Japanese made them pay for every inch of advance. By the end of 16 turns, or roughly 1/3 of the game, the Japanese had eliminated the American six steps necessary for victory. Then, it became a slow but steady advance for the Americans, who no longer had to be cautious about losing steps. Over the next 29 turns, they systematically eliminated Japanese units through a series of air attacks and assaults. However, air support was not used on several turns since all Japanese units were either adjacent to or in assault with US ones. In the end, the Japanese had lost 38 steps to the Americans’ 14, but there were no Japanese units left to contest the village. This resulted in a draw.
|