
|
Naldurg Fort Indian Unity #3 |
||
|---|---|---|
| (Defender) Hyderabad | vs | India (Attacker) |
| Formations Involved | ||
|---|---|---|
| Hyderabad |  |
1st Hyderabad Infantry |
| India |  |
7th Infantry Brigade |

| Total | |
|---|---|
| Side 1 | 1 |
| Draw | 0 |
| Side 2 | 3 |


| Overall Rating, 6 votes |
|---|
|
3.67
|
| Scenario Rank: 277 of 913 |
| Parent Game | Indian Unity |
|---|---|
| Historicity | Historical |
| Date | 1948-09-13 |
| Start Time | 02:00 |
| Turn Count | 22 |
| Visibility | Night |
| Counters | 102 |
| Net Morale | 1 |
| Net Initiative | 1 |
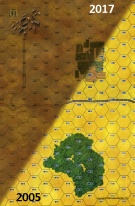
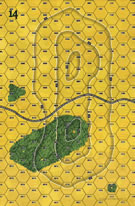
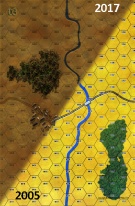
| Maps | 3: 1, 14, 3 |
| Layout Dimensions | 84 x 43 cm 33 x 17 in |
| Play Bounty | 180 |
| AAR Bounty | 153 |
| Total Plays | 4 |
| Total AARs | 4 |
| Battle Types |
|---|
| Bridge Control |
| Rural Assault |
| Conditions |
|---|
| Entrenchments |
| Off-board Artillery |
| Terrain Mods |
| Scenario Requirements & Playability | |
|---|---|
| Cassino '44 | Counters |
| Eastern Front | Maps |
| Indian Unity | Base Game |
| Road to Berlin | Maps |
| Introduction |
|---|
|
The Indian Army staff laid out an ambitious two-pronged invasion of Hyderabad, over the strenuous objections of army commander-in-chief Sir Roy Bucher. Bucher, a British officer left over from the colonial administration, warned Prime Minister Jawaharlal Nehru and his cabinet that starting a war with Hyderabad while Pakistan's stance in the ongoing Kashmir crisis remained unclear would be extremely dangerous. Nehru insisted the invasion go forward and Bucher angrily resigned, accusing the Indian politicians of forgetting both basic strategy and Gandhi's principles less than a year after the Mahatma's death. The first obstacle met by the invaders would be the massive, aged masonry fort at Naldurg. |
| Conclusion |
|---|
|
The Hyderabadis had been alerted to the coming invasion (probably thanks to the constantly raiding Razakars), yet when the Indians came the princely troops proved unable to stop them. An Indian flying column seized the bridge without opposition, capturing a British mercenary charged with blowing it up before he could set off his charges. With the bridge taken and the Indians streaming past and unimpressed by the fire of a Hyderabadi 25-pounder battery ensconced behind the crumbling walls, the Nizam's men abandoned the fort during the day. |

|
|
|---|
| AFV Rules Pertaining to this Scenario's Order of Battle |
|---|
|
| Army |
|---|
|


| Razakars |
|---|
|

| Army |
|---|
|


| 1 Errata Item | |
|---|---|

|
All Stags have an armor value of 1 (Shad
on 2010 Dec 16)
|
| For want of a nail... | ||||||||||||||
|---|---|---|---|---|---|---|---|---|---|---|---|---|---|---|
Oh, to be so close and then see it all come crashing down!! Played ftf with Hugmenot. I set my Hyderabadis with a strong hedgehog around the bridge, a significant force in the fort behind me and plenty of Razakars lurking in the forest to the front to delay the Indian advance. As I mentioned to Daniel the Razakars purpose was not survival but rather to delay the Indian advance and to get some LOS during the night turns to give the artillery something to fire at. Daniel suggested that I not tell them that... The Indian advance was monstrous in size and well coordinated. My Razakars were able to surprise the Indian engineers who promptly found it not worth their while to recover for significant stretches of the scenario. As time went on, the Indians began to close in on the bridge where a Hyderabadi major (morale 9) awaited with a lit fuse. Unfortunately the major also seemed to have a bad case of ADHD as he became disrupted from some artillery fire and proved incapable of recovering time after time. Ultimately I had to release some leaders from the fort to help the major try to blow the bridge. As the hedgehog began to crumble under extreme pressure from the hordes of Indians I retreated my men across the bridge, leaving a force in the bridge hex itself and with a masterful stroke set the fuse alight. Unfortunately, like Marvin the Martian, there was no earth-shattering "kaboom". I had rolled a three. Oh well, never mind we'll try again next turn. After the ensuing assault at the bridge cleared the Hyderabadis had only one leader left on the board, a Colonel who could not even get to the bridge as some intrepid Indians had actually run across the bridge while it was under assault. The demise of my leaders caught me by surprise (I imagine they were surprised as well as many of them were captured). As a result of my leaders' failure, the bridge stood and the Indians were able to cross. This turned out to be the key point in the battle. Had the bridge been blown, the Indians could have had to use their engineers one of whom remained incapble of recovery for nearly the entire second half of the battle, to cross the river. The engineers would have been prime targets for the artillery and HMGs and victory would have been mine. On the other hand if "if's" and "but's" were candy and nuts we could all have a party... The Indians swarmed across the bridge and although there was a significant fight yet for the fort with several Indian losses to occur, the ability of the Indians to at least contest the fort hexes was never in doubt and the ultimate score of the battle was 29-8 for an Indian victory. This is a tense scenario with a lot happening. The SSRs concerning the bridge and the fort lend some novelty to the situation and make for an enjoyable afternoon. I give it a "4". |
||||||||||||||
| 0 Comments |
| Patience Was Key | ||||||||||||||
|---|---|---|---|---|---|---|---|---|---|---|---|---|---|---|
Played ftf with Matt W in about 3.5 hours. Please see Matt’s AAR for a report on the action as I will restrict my post to just a few comments. Matt set several Razakars in the forest in the front to delay my Indians. While I did not think a few turns delay would have a huge impact on the final result, what I failed to consider is their ability to call artillery upon my engineers. My engineers spent a lot of time trying to recover (one is still trying) and that made it imperative we take the bridge intact. Matt won that round handily and it provided him with at least a 33% chance at an early victory. First lesson learned: Keep critical units out of line of sight. A slower advance is better than multiple failed attempts at recovery. Matt deployed troops around the bridge to ensure I would first have to blast a hole in his defensive line and be able to exploit it immediately if I were to have a chance of taking the bridge intact. I deployed large overstacked fire groups in front of the bridge with groups (including a couple of Bren) on the wings which could exploit any opening right away. I activated my fire groups before my artillery because I wanted bombard the bridge in the same turn I punched and exploited the breach in the defensive line. I thought I played that segment well as Matt only had one chance at blowing up the bridge. Second lesson learned: Patience was key. I correctly stopped my troops from advancing until I had the opening I needed. Taking the bridge intact was huge and taking three leaders prisoners on the same activation was just incredible luck. With just 1 leader left in the fort, I could maneuver my troops in good positions without Matt’s troops being able to react effectively. I rated this one a “4”. Not only was it a tense scenario, the SSRs for the bridge and the fort made it an even more interesting proposition. Highly recommended. |
||||||||||||||
| 0 Comments |
| Overwhelming Indian forces determine the day | ||||||||||||||
|---|---|---|---|---|---|---|---|---|---|---|---|---|---|---|
Played over two Skype sessions with Wayne Baumber. In this, our 4th game of the Indian Unity module, we continued our campaign started over 2 years ago. SETUP The Hyderabadi setup with Razakars on the edge of both forests on board 14 and a few platoons of Infantry at the top of the mountain, straddling the road to the fort. 3 platoons of Rifles and HMGs dug in and set in each hex of the bridge and both flanking hexes and the remaining units were setup in the fortress. The Indians massed the rifles, HMGs, Mortars and a SAP unit on the edge aimng towards the road and spread out along the entire mountain south of the forest. Finally, the Stags and a SAP platoon with a leader set up to skirt the mountain and make a dash for the river north of the bridge. THE BATTLE The Indians swiftly moved units in large groups over the mountain, keeping a chain of command relatively intact while the Hyderabadi attempted to pick off units. THe main thrust moved over the mountain and down the road and within a couple of hours (9 turns), were able to sweep the main RIF units off the mountain with 3 assaults and positioned themselves on the western edge of the mountain. In addition, the leader of the Razakars in the forest on the mountain was killed in a mortar barrage, rendering them ineffective for the time being. Meanwhile the Stags and ENG in the north raced around the mountain to try and create a bridgehead for units should the bridge be destroyed. At this point, The Indians attempted to move some units with the other SAP unit through the lower forest to try for another bridgehead there while the main army began to slowly move just outside of visible range of the bridge. During this time, the SAP in the north established a bridge and was able to assist a LT, the Stags and a Bren over the bridge before being demoralized by the 25-pdr spotted by a LT. Near the bridge, a CAPT decided to get into a position to spot for artillery fire directly on the bridge. The battle at this point became a maneuvering exercise, with the Indians attempting to get into spotting and eventual launch positions, actually getting units within firing range of the flank units, and the Hyderabads trying to stem the tide. Finally, on turn 14, after an hour of fruitless shelling, the artillery finally found its mark and was able to disrupt the units in the bridge hex. combined with fire on both flanks, an opportunity was realized to storm the bridge and hopefully take it intact and move on to the fort. This was the turning point of the battle as the realization sunk in that if the bridge was blown up, there would not be enough time for the Indians to cross via the SAP units. There were eight RIF and 3 HMGs present along with several leaders that could assist in combat. The Indians rushed in and were able to clear the north flank and maintain a presence on the bridge with a single demoralized, reduced infantry unit defending. As this assault proved successful, the SAP unit south of the bridge assisted an RIF unit in assaulting the south flank of the bridge and were able to destroy the RIF unit and reduce and demoralize the remaining HMG. After all these battles, the one thing that surprised me was that the step losses were at Hyderabadi 12, Indians 0 at the end of 15 turns. After looking over the board for a while, Wayne decided to concede the game as the next few turns were guaranteed to remove at least 4 more steps for Hyderabad an secure the bridge for the Indians, leaving the Step loss count at 24 - 0 in favor of the Indians (both assaults only had demoralized Hyderabadi units and the Indians were rolling on the 24 or 30 column, hence the unlikely loss of any steps for the Indian. AFTERMATH Despite the score, the game was close and tense at points, and had the Hyderabad Captain on the Bridge been given the chance (and succeed) to blow the bridge, an Indian victory would have almost been impossible. The remaining units would have stayed on their side of the bridge and there would have been no chance for getting the required margin in step losses. In all, it was a fun game to play but at the point we were at, I agreed that the remaining few turns would have been anti-climatic. |
||||||||||||||
| 0 Comments |
| Just one more turn | ||||||||||||||
|---|---|---|---|---|---|---|---|---|---|---|---|---|---|---|
This game played using Skype was played against Tony "Bully Boy" Langston over tow longish sessions. Tony has written his AAR which covers the set up and action well. I will just add a few words of wisdom?? This scenario is a night river crossing, the Indians have a large force, better morale and good OBDA support (can you tell which side I was yet). The brave rebel Hyderabad units have a few cards up thier sleeves, most of the battle is at night, thus reducing the effect of the Indian artillery and MTR units, most units set up dug in or entrenched (in the Fort) and the can blow the only bridge over the river if a good order leader in the bridge can spot an Indian unit and roll 5,6 on a single die. I put my best officer there CPT Mustpha Khannot (9-1-1) and hoped that he could do the job when required. I also set up most of the RAZ units plus a few INF on the eastern boards in an attempt to disrupt and slow the Indian advance. Tony in fact made a very methodical advance across the board using his leaders to good effect. he did send some mobile forces to the North which managed to cross a Bailey Bridge but were unable to do mush else especially after the SAP got disrupted. The delaying force worked OK in as much as they did delay the Indians but they failed to inflict any losses and were almost wiped out the few survivors fleeing across the bridge. The RAZ threatened to over the Indian MTR batteries but Bren Carriers and reinforcements stopped that attack. Action moves now to the bridge and CPT Mustpha Khanot, having watched as Hyderabad INF stream flee past he spots a lone Indian Officer sauntering up the road binoculars in one hand, radio in the other and a sign above his head saying "Forward Artillery Observer" (the last bit may be poetic licence). Now was his chance to blow the bridge and retire to the Fort for a cup of tea and a biscuit, but no a quick scan at his orders said he could not blow the bridge until he had spotted a combat unit. So following hos orders he did nothing. The Indian office settled down on his deckchair and proceeded for the next hour and a bit to lay down a heavy but mainly ineffective fire of the bridge, surely now under such an intense barrage Mustpha would light the blue touchpaper and retire. But no he followed his orders to the letter with only 15 minutes to dawn the inevitable happened and a close shell knocked young Mustpha off his feet (DISRUPTION), when he came to his feet he was surrounded by jubilant Indian INF who had captured the bridge intact. GAME OVER. An excellent attack by Tony who had a plan and kept to it, even though another turn would have seen the visability increase and may well have led to the bridge being blown if that had happened he would have been unable to take the Fort in the time left, as it happened with the capture of the bridge and the casualties already inflicted Tony had enough VC to not bother trying to take the Fort so we called it then. Looking back I should have used my two spare RAZ to shoo the observer away and not used so may INF in the blocking force. However it was a close run thing, we had some laughs and that what its all about. |
||||||||||||||
| 0 Comments |