
|
Stymied Winter Soldiers #7 |
||
|---|---|---|
| (Attacker) Germany | vs | United States (Attacker) |
| Formations Involved | ||
|---|---|---|
| Germany |  |
1st SS "Leibstandarte Adolf Hitler" Division |
| Germany |  |
Kampfgruppe Hansen |
| Germany |  |
Kampfgruppe Peiper |
| Germany |  |
Schnellgruppe Knittel |
| United States |  |
30th "Old Hickory" Infantry Division |
| United States |  |
3rd "Spearhead" Armored Division |
| United States |  |
743rd Tank Battalion |

| Total | |
|---|---|
| Side 1 | 1 |
| Draw | 2 |
| Side 2 | 3 |


| Overall Rating, 8 votes |
|---|
|
3.88
|
| Scenario Rank: 140 of 913 |
| Parent Game | Winter Soldiers |
|---|---|
| Historicity | Historical |
| Date | 1944-12-21 |
| Start Time | 10:30 |
| Turn Count | 18 |
| Visibility | Day |
| Counters | 60 |
| Net Morale | 0 |
| Net Initiative | 1 |
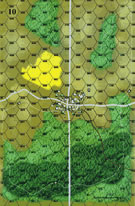
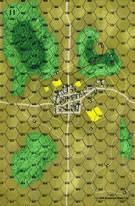
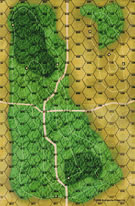
| Maps | 4: 10, 11, 24, 9 |
| Layout Dimensions | 86 x 56 cm 34 x 22 in |
| Play Bounty | 157 |
| AAR Bounty | 135 |
| Total Plays | 6 |
| Total AARs | 7 |
| Battle Types |
|---|
| Inflict Enemy Casualties |
| Road Control |
| Urban Assault |
| Conditions |
|---|
| Off-board Artillery |
| Scenario Requirements & Playability | |
|---|---|
| Battle of the Bulge | Maps |
| Elsenborn Ridge | Maps + Counters |
| Winter Soldiers | Base Game |
| Introduction |
|---|
|
While the bulk of Kampfgruppe Hansen forged toward Trois Ponts, one battalion infiltrated north in an effort to relieve the pressure on Kampfgruppe Peiper. The grenadiers managed to slip across the Ambleve River at Petit Spa but when the accompanying StuGs attempted to cross the bridge collapsed. The grenadiers continued their advance north sans armor support, trying to fulfill their objective and link up with Schnellgruppe Knittel. At the same time three American task forces were bearing down on the same group. |
| Conclusion |
|---|
|
Both the Germans and Americans were striving to reach Stavelot to turn the tide, but success also required securing the three villages just to the west. Fighting raged in and around the villages all day in this meeting engagement, with neither side gaining an upper hand. Tactically the Germans could claim a victory as the delay allowed the SS men isolated and holding out at Stavelot to live to fight another day. |
| Additional Notes |
|---|
|
SS transport counters are available as a free download from Avalanche Press. If not using these or other SS transport from other games, players should use regular German army transport as substitutes. |

|
|
|---|
| AFV Rules Pertaining to this Scenario's Order of Battle |
|---|
|
| Schutzstaffel |
|---|
|


")
")
")
")


| Army |
|---|
|


| 2 Errata Items | |
|---|---|
| Scen 7 |
Just to put things straight : * the bridge across the Amblève river is at Petit Spai * No StuGs there ; a PzJg IV/70 broke down the bridge and ended up in the river. * KG Hansen tried to relieve the pressure on KG Peiper by cutting off task force Lovelady. Reinforcing KG Knittel at Stavelot was easier. (leonard
on 2012 Jun 18)
|

|
The reduced direct fire value of the SS HMG is 5-5 in Beyond Normandy and Road to Berlin. (plloyd1010
on 2015 Jul 31)
|
| Hansen Holds Back Task Force Lovelady | ||||||||||||||
|---|---|---|---|---|---|---|---|---|---|---|---|---|---|---|
Played over Skype with Wayne Baumber in 2 short sessions. Chosen via our random selection system. Aim of the game, get as many points by controlling town hexes from 3 widely seperated towns on 4 boards and inflict damage on the enemy .... Oh yes, and sole control of one of the roads. The German company found itself between Pafondruy, Ster and Renardmont. Along with their Puma and Wirbelwind support, they needed to decide quickly where they would stand against the three-pronged US attack whilst they awaited reinforcements from the south. In the end, they forsook Ster in the north-west as undefendable and deployed in Renardmont in the north-east leaving one platoon in troop carriers to the south in Pafondruy to guard against a fast American advance from the west straight down the highway. All would depend on the entry times of the encroaching forces of both sides. At 1030 hours, two American task forces from the 30th infantry division advanced from the north, one each toward Ster and Renardmont. Those heading to Ster made an easy unopposed entry into the town. However, those heading to Renardmont soon found it defended by the SS and their armoured cars. As this early advance began, German reinforcements began to filter in along the road to the south-west. Fortunately for these German reinforcements, no US troops from Task Force Lovelady were any where near deterring them as they were still way back west. The Americans tried a tentative advance on Renardmont, and found themselves under accurate fire from the Leibstandarte Grenadiers. One platoon found a number of its men cut down and had to head backwards demoralized. The US tank platoon supporting dared not show itself as reports had come back of the presence of the Pumas. Taskforce Lovelady finally appeared around 1100 hours, but by this time, the reinforcing Kampfgruppe Hansen had taken control of the main southern east-west highway and this would forever prevent any chance of a speedy advance by Lovelady. The Americans, happy that Ster was secure, began to send some of their number towards Renardmont to assist those under pressure from the German defenders. Hansen’s troops also began pressing north to apply pressure to the Americans. Lovelady’s force and half of Hansen’s soon came to grips just south of Ster around midday. The Americans unleashed a whole squadron of M5’s at the SS infantry, supported by GI’s and M3’s as well as a heavy artillery capability. This artillery removed a lone German AT battery that had just deployed and seemingly left the M5’s free to roam? The M5 squadron (3 platoons) attacked a platoon of the enemy and failed to inflict any damage. The SS countered by throwing more men into the close battle. Armed with panzerfausts, these failed also to find their target, but other damage was inflicted placing the M5 squadron in disarray. The Americans pounded this hex twice with OBA in quick succession but as well as demoralizing the enemy, they also caused a lot of damage to their own armour too consigning them to their fate. Another German platoon entered the assault, whilst some of their demoralized comrades left or regained composure and this completed the destruction of American armour here. Suddenly, initiative had swung the Germans way. To the north-east at Renardmont, the Americans were struggling here too. Again they nibbled at the periphery of the town, but the Germans defending, plus the fast approaching HMG reinforcements transported in Hanomags put off any US ambitions here. The Americans began to drift away from their attack positions veering west in what seemed a plan to link up with other US troops. Whilst doing this, a platoon of M4’s had to run the gauntlet of the Pumas guns but survived. But one unlucky infantry platoon were rendered useless as German HMG fire tore them apart. Back over in the west south of Ster, word was coming through that more Germans were heading their way. Lovelady threw in his foot troops. A gun battle followed with casualties to both sides. But the killer blow came when the Americans saw their Engineers completely shot to bits and another half infantry platoon becoming casualties as their German counterparts aimed with deadly accuracy. Losses had become more than the American commander could stand and the battle was given up. Points totals had the Americans claiming 4 enemy steps and 9 town hexes for 13 pts. The Germans claimed 18 step equivalents and 15 town hexes for 33 points. Road control was not considered at this stage (1245 hours – Turn 10). I set up in the opposite town to the previous AAR. I thought this was more defendable and easily 'supportable' in that the Americans could only get one third of their force their in quick time. The rest would have to trudge towards it. This is one HOT scenario .... A huge amount of replay value because the small amount of Germans can set up in ANY town hex over the 4 boards and they are hidden. The American entry of each of the 3 task-forces is only 66% certain to come on each turn and the German reinforcements only a 50% chance. So the variables are huge. Add to this a string of German lucky rolls in turns 9 and 10 2, 12 & 12) and it is easy to see how this scenario can swing either way. Great entertainment 5 points Mr Perryman ! |
||||||||||||||
| 0 Comments |
| Watch the flanks, but don't leave the front door open. | ||||||||||||||
|---|---|---|---|---|---|---|---|---|---|---|---|---|---|---|
Probably one of best PG scenarios in the 000's of scenarios. This has all the components of a wonderful tactical game for two players. I must also emphasis that this should be played FtF or Skype. Do not play solo, you will not be able to enjoy the tactical issues. Before I start, I must acknowledge the good play by Hugmenot to read my mistakes on the setup and take advantage quickly and force me into action. The scenario matches American forces trying to push back probing German recon units over a wide area of battlefield. The Germans hold the ground to start the game, but no way has enough to cover all four boards. The Americans have three forces advancing from two directions on the Germans. The Germans get some reinforcements, but they are infantry without enough transports to get them around the board. As the Germans I needed for figure out what to do with the meager forces to protect two board sides. Typical tactics would be to setup close and pick off the Americans as they enter, but there is not enough units. The Americans can overwhelm quickly and losses will mount as well as the flanking force from the west. So the choice was to protect the flank and positioning most of the recon for on the road on board 9 and the town on board 10 and leave the towns open on board 11 and 24. I don't know of this was daring or just bad analysis on my part, I did regret doing this after the first couple of turns. The scenario starts with the Americans entering on board 9 with M5's and INF's. Avoiding the German blocking force at the crossroads, they move to advance onto board 11. The second turn has all the Americans advancing on board as well as the German reinforcements. The Americans move deliberately to main towns on board 24 and 11. Quickly moving in and finding no Germans they setup defensive positions and then begin to probe forward to board 9 and 10. The Germans solidify their positions at the crossroads on board 9 and begin to advance units forward to challenge the American advance. American OBA, which is a massive 48 factors begins to work over the advancing Germans, causing the first step loss of the game. The Germans press forward and advance onto board 11 and take the small town on the hill. The Americans lob some mortars and fire long range HMG, but the Germans remain in the town. Meanwhile the Americans continue to push forward for the road on board 9. A company sized force supported by M5 and M4's begins their advance. To slow them down the Germans have a company plus and HMG dug in on the hill. The Americans cut the road on board 9 and then challenge the Germans on the hill. American OBA continues to wreck the German troops, but the dugin HMG puts a stop to the advance. First, the M4 advancing to support the flanking Americans is demoralized by close range fire, then an INF and M3 are demoralized in an assault and harassed into demoralization. At this point the Americans pull back to recover, but two M5's and an INF try to go down the road after the German mortars. A radio by the mortars brings the German SK/231 out to help stop the M5's. GREN's advance over to force the infantry to move and blunting the American move. Back in the middle of the boards, several recon GREN's plus reinforcing units move between the two boards 11 and 24 to position for some sort of attack. The Americans look to blunt this by advancing INF and a leader in M3 to spotting range. But the Germans in the woods on the hill get daring and advance to attack them. Getting close before the Americans can react they charge into the hex to assault. Stick grenades and LMG's hit the M3's loaded with INF destroying them and the first American casualties. This also removes the threat to the Germans forces massing the the western wooded hill on board 24. In that western woods, several recon GREN's have assembled with SPW251's to threaten the main town on board 24. One American sortie by a lone INF tries to disrupt the attack, but as more units gather the Americans file back to the town. For the Americans this is heavily defended. a reinforced company with armor support against a reduced company of GREN's with and HMG to support. Continuing the to position to the west of the town another reduced GREN move to support. The Americans have not been just waiting for the Germans, their OP fire and OBA have been right on target and disrupted and demoralized several units, delaying any type of attack. As time wears on the Germans finally make their move for the town on 24. First, an experienced OSTFR takes two platoons to advance to the north of the town and try to get around to the northeast. The Americans react by moving more units to the north side of the town. The Germans react by positioning more to west to hold the M4's and INF's. Once all have been positioned, the Germans spring there only wildcard. On board 24, there is a little town on the hill in 1105. Out of that town comes a platoon loaded on SPW251, with a HPSTFR racing into the undefended southwestern town hexes. They capture one and throw off the American defense. The OSTFR to the north is able to swing his troops in to another town hex and now the Americans have the enemy on their flank. Reacting to this threat they fire without much effect and allows the western German force a bit of a window to close on the town. Piling into the western town hexes the Germans are able to destroy the American mortars and capture a leader. Fire from the eastern side of the town demoralizes the American HMG's and the INF's are shuffled to defend the town center. Forcing the American M4 away from the western edge, gives the still hidden SPW251/21 a chance to get into town to assault. The Germans are able to close and capture four and contest two town hexes reducing the American victory level, but with heavy casualties, nine steps, will make it impossible for a win for the Germans. The only chance is to keep the casualties down and hold to towns taken. But the Americans have a different idea. Looking for a weak spot, they focus on the small town on board 11. It is now defended by just one GREN and no leader. All have been thrown into the attack on board 24's main town. Pulling together a force of ENG, M5 and a leader they advance on the town. German OP fire misses and the Americans are ready for the assault. Piling in they are able to score a step loss and demoralize the unit on the last turn of the game. But the Germans demoralize the M5, a small consolation as the Americans control the town. Looking to finish off the Americans, the fire on town with mortars. Missing the Germans they force a morale check on their troops, which they demoralize, leaving the town in a state of flux. The Germans have one last hope, recovery of the demoralized GREN. They succeed and control the town again. This was the difference between a American victory and a draw. |
||||||||||||||
| 1 Comment |
Yeah Alan, an exciting game for sure and you've certainly had quite a few last turn result games what with Daniel, Wayne and I.
When I set up the Germans I left the hill town on board 11 undefended and defended towns 24 and 10. I left my reinforcements to secure the crossroads at board 9 and was lucky enough to get there before the Amis. Also, the town 24 group simply halted any serious American movement to their front. Thereafter, it was a matter of finding troops to just deal with the GI's in the middle of the boards.
If there ever is a PG tournament. Stymied has to be in there. At present, the results show it with balanced results.
Like you, I would implore anybody taking this one on to do so against an opponent rather than solo because there simply are so many variables.
| Aggressive moves cause disaster for one side ......my side naturally | ||||||||||||||
|---|---|---|---|---|---|---|---|---|---|---|---|---|---|---|
This is a gem of a scenario and would rate a 5 if (a) I had won and (b) If Herr Hughes last three shots were not as devastatingly accurate as they were. Played over four boards with variable reinforcements and hidden units this scenario has lots of replay value. Vince will no doubt set the scene far better than I could, so I will go straight to the action. The US forces come on in three separate groups I was going to us the two groups coming from the North to recce and hopefully take the two northern towns while while the 3rd Armoured units depending on when they arrive would support the attacks or race up the road to disrupt the German reinforcements arrival. This plan only half worked with one undefended town being secured but the town on board 24 was strongly held and repulsed the first cautious American attack. The 3rd Armoured units were delayed and arrived too late to disrupt the enemy reinforcements, so they moved to support the major attack on board 24. That was how we ended the first session of our game, I thought that Vince had the tactical edge, but it had been two (game hours) of interesting but uneventful play. However mulling over the position I though I saw a glimmer of a chance Vince had pushed his sole A/T gun forward and seeing this a leader moved forward to drop Artillery on the gun, thus Plan B would come into action. After destroying the A/T gun 3rd Armoured M5's would sweep round and flank a small force Vince had left guarding the road, combined with a M3 and INF attack I would eliminate this group and then threaten the German rear. The artillery did their job, the M5's swept round the half tracks moved forward and all looked rosy, I thought the German's would either dig in or retreat slowly back to the forest to cover the German lines of communication, but no our intrepid German leader counterattacked. This was now the pivotal point of the battle, as he advanced I had the option to move the M5's back or try and slug it out hopping that the artillery and US firepower would win the day. Well it did not and within one hour all the M5's had been destroyed with only 2 German steps lost, a mixture of bad luck and a bad decision on my part had Stymied my plan. Now the picture was bleak I had three task forces, one badly mauled, all too far from each other and was way behind in VP. I tried to consolidate the two most northern groups but in doing so fell foul of a very cleverly place HMG group in the board 24 village who wiped out a US platoon with one shot, another shot tool a further step from the PBI of 3rd Armoured and I called it a day. Although I was well beaten in this game it is an excellent scenario, I would play it again with either side, not against Vince though who apart from one error with the A/T gun played a great game. |
||||||||||||||
| 0 Comments |
| A Real Shocker | ||||||||||||||
|---|---|---|---|---|---|---|---|---|---|---|---|---|---|---|
Alan (campsawyer) wrote a good AAR so I will just give a brief overview of my (American) perspective of the flow of the game. The first few turns were spent determining where the Germans could hiding and taking defensive positions in two towns. Lots of tension. I then send a detachment towards the crossroad to establish a foothold on the east-west road (it's 10 VPs to the other side if you don't) and to threaten the south-east town. I quickly established a foothold on the road but one of my M4 suffered a demoralization to a lucky HMG shot and never recovered. I thought I could not lose at this point and would likely earn a victory. I advanced towards the SE using the east-west road but the advance was easily delayed by a SdKfz-234/2 and a few Grenadier platoons. Lesson learned no 1: Attacking along a road flanked by woods is not a good idea if you want to make quick progress. I broke off the attack when there was 5 or 6 turns left as I was not making quick enough progress, and expected the remaining hidden German units to assault my force as I got nearer to town. That's when Alan pulled a surprise on me and I found out the hidden units were in the one hex NE town. I never thought to investigate the town earlier in the scenario as I thought a small force there would be quickly overwhelmed forced to retreat. The game became very tense again. Lesson learned no 2: Check your assumptions. I was still in the lead at that point but it was now unclear whether Alan could pull a draw as my I could not bring enough reinforcement in time to retake whatever the Germans would gain with their initial assault. In the end, the Germans took just enough victory points away from my troops to earn the draw. I thought I was going to rate this scenario a "3" midway through the game but I increased my rating to "4" as the last few turns were really tense and interesting. |
||||||||||||||
| 0 Comments |
| Stymied indeed | ||||||||||||
|---|---|---|---|---|---|---|---|---|---|---|---|---|
As there are already quite a few AAR's, I shall only note significant play differences. (ADDED PS): Germans set up all in Renardmont, save for the Puma (see below). I felt this the most defensible town having clear (non-hill) terrain about it. Entry Rolls: Kampfgruppe Hansen: Turn 2 US Board 9: Turn 4 US Board 24: Turn 3 US Board 11: Turn 2. (Yes, I rolled a 2, 1, 2 for the US entry on Turn 1!) Puma set up in 10-0710 races to 9-0608 to set an ambush for US recon force. This occurs on Turn 4 with the loss of one M5 step, the half-step being this scenarios "permanently DEM unit" - there is always one. Turn 5 US OBA thunders a kill on the 75/41 and a GREN step. A serious battle erupts between the set-up and (now) dug-in SS on board 9 and the US units moving south from 11 and west along 9. The PUMA goes for a pair of M3's, but then loses a key initiative and is taken out by an M4. Essentially the result at this end is the US armor holds the western end of the E/W road on Board 9, and the US infantry in turn blocks any German counter-attack into the mostly empty, but US controlled town of Ster. The key combat then takes place on board 24. The US force has the armor bonus in assault and the Germans must risk attacking in town if they hope to use the INF AT factors. End result here is that the US holds five hexes of Renardmont, the Germans two plus the hamlet. The US never threatens Pafondray which the SS held with 2xGREN and 2x81 (sent there from Kmpfgrp Hansen). So the final tally of VPs: US = 22 GER = 18. US narrowly misses out on a minor victory. |
||||||||||||
| 0 Comments |
| The Germans Are Stymied | ||||||||||||
|---|---|---|---|---|---|---|---|---|---|---|---|---|
The on-board Germans set up in the northwestern town. Both sides rolled well on their variable entry reinforcements, with the Germans and one U.S. group entering on turn one, and the remainder of the Americans entering on turn two. To account for the German hidden units, I had the lead U.S. M5 platoon advance along the road until they were in spotting range of the 'hidden' Germans, essentially giving them a 'free shot.' They took full advantage, wiping out the scouting platoon with AT fire. After that, it was downhill for the SS. The GI's used their off-board artillery and armor to wear down and assault the Germans in the northwest town before reinforcements could arrive. They easily held off the German counterattack and captured the entire town. They also used their armor's speed to pass through the northeastern town and occupy the southeastern town before the Germans could get there. Here, the Germans were more successful, taking half the town. At the end, the Americans held two towns to the Germans' half of one town, and inflicted more casualties on the SS than they suffered. Major victory for the Americans. Rated a 3. With the American advantages in armor and off-board artillery, the Germans will have a very tough time of it. In the scenario's favor, "It's fun to make Nazis cry." |
||||||||||||
| 0 Comments |
| Scenario 7 Stymied |
|---|
|
The Axis set up in the village on Board 11 and board 24 with the Sk234/2 in the village on Board 24. No Allied units entered on turn one failing their morale checks. The Axis units entering board 9 also fail their first morale checks failing to enter board 9. This stalled the whole column. Eventually everyone got going. The Axis armored car platoon in the village on board 24 failed to escape and the Allies captured the village and continued south toward the village on board 10. The allies were also successful, with the help of some very accurate OBA. By noon the Axis only controlled two of the village hexes. On board 9 around the crossroads is the only place where the Axis were able to get the upper hand. But not without losses. Also at noon the Allies were locked in melee with their Stuarts (M5)and 3 platoons of axis Grens with a decent leader. The Allies still maintained a position on the Southern east/west road with a platoon of Engineers. After securing the village on board 24 those units that entered there moved south. Their advance was assisted by 2 platoons on Halftracks (M3)from the board 9 force. These units then occupied the board 10 village and took up defensive positions at the crest in the heavy tree line facing board 9. Meanwhile on board 11 the Allies finally secured the village. They then moved south to threaten the east/west road. It was in this position the game ended at 1545, one turn early. The Axis reinforcements could never clear the road and nor could the Allies. But the Allies occupied all the village hexes at game's end. The Axis suffered 11 step losses and the Allies suffered 12 step losses but they possessed 21 village hexes for a major Allied win. |
| 0 Comments |