
|
Hot Time at Trois Ponts Winter Soldiers #6 |
||
|---|---|---|
| (Attacker) Germany | vs | United States (Defender) |
| Formations Involved | ||
|---|---|---|
| Germany |  |
1st SS "Leibstandarte Adolf Hitler" Division |
| Germany |  |
Kampfgruppe Hansen |
| United States |  |
505th Parachute Infantry Regiment |
| United States |  |
82nd "All American" Airborne Division |

| Total | |
|---|---|
| Side 1 | 3 |
| Draw | 1 |
| Side 2 | 1 |


| Overall Rating, 5 votes |
|---|
|
3.8
|
| Scenario Rank: 194 of 913 |
| Parent Game | Winter Soldiers |
|---|---|
| Historicity | Historical |
| Date | 1944-12-21 |
| Start Time | 10:30 |
| Turn Count | 16 |
| Visibility | Day |
| Counters | 71 |
| Net Morale | 0 |
| Net Initiative | 1 |
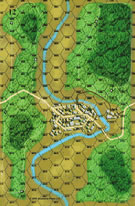
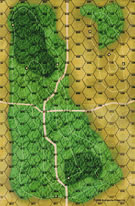
| Maps | 3: 12, 25, 9 |
| Layout Dimensions | 84 x 43 cm 33 x 17 in |
| Play Bounty | 156 |
| AAR Bounty | 165 |
| Total Plays | 5 |
| Total AARs | 2 |
| Battle Types |
|---|
| Bridge Control |
| Inflict Enemy Casualties |
| Urban Assault |
| Scenario Requirements & Playability | |
|---|---|
| Battle of the Bulge | Maps |
| Elsenborn Ridge | Maps + Counters |
| Winter Soldiers | Base Game |
| Introduction |
|---|
|
On the 20th of December the 504th Airborne Regiment dispatched a battalion to Trois Ponts tasked to keep the bridge there in friendly hands. Of course, this bridge distinguished itself by being the only one in the area capable of supporting tanks and heavy supply vehicles. Kampfgruppe Peiper, now dangerously low on fuel, planned to capture the town and bridge, grab the nearby fuel dump of 2 million gallons, and push on. It was only a matter of time before they made their play. |
| Conclusion |
|---|
|
Before the Germans arrived a large number of engineer personnel from various units in the area joined up with the paratroopers toting every unattended .50 caliber machine gun they could find. The extra machine guns were quickly incorporated into the defenses. But despite the added firepower, the paratroopers were slowly pushed back over the river at a great cost to both sides. Once across the river the engineers blew the bridge. German attempts to wade across were bloodily rebuffed — another way over the river had to be found. |
| Additional Notes |
|---|
|
SS transport counters are available as a free download from Avalanche Press. If not using these or other SS transport from other games, players should use regular German army transport as substitutes. |

|
|
|---|
| AFV Rules Pertaining to this Scenario's Order of Battle |
|---|
|
| Schutzstaffel |
|---|
|


")
")
")
")
")


| Airborne |
|---|
|


| Army |
|---|
|


| 2 Errata Items | |
|---|---|
| Scen 6 |
ENG's must be in good order to destroy the bridges (campsawyer
on 2014 May 18)
|

|
The reduced direct fire value of the SS HMG is 5-5 in Beyond Normandy and Road to Berlin. (plloyd1010
on 2015 Jul 31)
|
| If he has the time, Doctor; if he has the time. | ||||||||||||
|---|---|---|---|---|---|---|---|---|---|---|---|---|
Firstly, apologies are due as I made an error with the victor with my original play. Germany wins a minor victory here by one objective. Also, playing solo, the hidden units rules were in abeyance. I played that all US units in LT could only be spotted at range = 2. But this certainly does not equate to the German side having to "wonder" - assuming they care - where US units are located. This might have an effect on the US VC #3 as unlocated US units would allow for potential late turn road control per VC #3 for the US side. US set ups the 2xHMG "extras" south of the large hill on board #25; and the Board 25 company in the center and center north. The larger force including the ENG cover Trois Ponts including LTC superman 11-1-2 with a pair of PARA-HMGs in the hamlet to the east of the river. Germans split into a center and southern attack groups with both STUGs and 2xENG in the latter, whereas all the HMGs are in the former. The SS plan was to push the southern group along the board edge just missing the range=5 spotting limit to trigger US ability to blow the main bridge. Turns 1-4 mostly approach and assaults in the center hill of board #25. US 57mm just misses a rather shocked SPW+HMG (I tried playing that I didn't know it was there), but kills one SPW post-unloading. SS assaults go well with strong rolling. By turn 7, Germans finally clear the dogged PARA-HMG's holding the southern flank and clean up remaining US units in the center. Turns 7-10, Germans organize and push westwards. US OBA and the 3x81 stack begin a series of very accurate fire missions causing what, I think, in the end made the difference insofar as a sufficient number of DIS/DEMs to keep the German center from persecuting its attack until the last third of the scenario. The German southern force moves westward cut-off by a lone PARA+SGT! Unfortunately, the STUGs + a pair of SPWs prevent this unit from interfering, much, with pushing an ENG and other GREN units. US begins pulling blocking PARA units west over the bridges to set-up a blocking force in the western town hexes against this SS sortee. On turn 11 SS units cross the river in hex 0717. On turn 12 the US gets an aircraft - and what an aircraft, the P47. Drama unfolds as the '2' factor AT fire whiffs, but then rolls a '2' on the 22-col DF killing a step of STUGs (now moved up to support the center attack); a step of Gren; and DEM the Standartenfuhrer directing the center action! The southern sortee heads for Trois Ponts from the south. On turn 15, SS troopers overwhelm US blocking force with devastating DF ... US decides to blow the bridge (poof!). Despite one DIS from OF, the southern force now engages the 2xPARA holding the western town hexes. Germans control one town hex and contest another. Bridge blown and hex contested. 6 Germans step losses; 17 US. However, at game end there were several key German units (especially the HMG contingent) with DIS/DEM markers so the step loss differential is a bit misleading. So Germany has one VC (eliminate more steps than opponent). US has none. Even had I not "blown" the bridge on turn 15, the US would not have controlled it as an assault was in place. So a well-timed scenario in my opinion. The Germans are pressed for time. The US paid for time by separating out units rather than in a few more powerful groupings (save for the powerful stack in the village east of the bridge). So the step losses favored the Germans with their ability to concentrate firepower, but in doing so, ran a few turns short of achieving major victory. I'll leave it to the Star Trek geeks to place the AAR title. |
||||||||||||
| 0 Comments |
| The Three Bridges were indeed sizzling! | ||||||||||||||
|---|---|---|---|---|---|---|---|---|---|---|---|---|---|---|
The U.S. set up in three lines. On the 40 meter ridge on Bd. 25, in the woods just west on the crossroads on bd 25 in hex 0709. Also on bd 12 just east of the river with and Engineer platoon and a ATG platoon and a company of infantry. At the start the those units fall back through the town. The engineer digs in at the bridge and the infantry company to the woods on bd 12 in hexes 1209 and 1210. The Axis decide that a frontal assault on the 40 meter ridge is not practical so they opt for a frontal assault. By 1200 this line was showing signs of breaking but they were still holing out. On three occasions the Axis failed morale checks to assault. This more than anything held up the Axis advance. By 1245 the 40 meter ridge line was finally taken by the Axis. At this point the Allies had lost 9 steps to the Axis none but time was running out. At 0130 the bridge was finally destroyed, on the 4th try! All this while the Axis units were in the bridge hex in assault. But despite having the bridge blow up in their faces at 1:45, the Axis managed to knock out the ATG platoon and a step of infantry on a snake eyes roll. If the Axis engineer can force the Allies away from the river with direct fire they can assist a crossing by other units and take some town hexes. By games end the Axis controlled three town hexes the bridge hex and had eliminated more steps than the Allies. |
||||||||||||||
| 0 Comments |