
|
Flying Carp White Eagles #37 |
||
|---|---|---|
| (Defender) Poland | vs | Germany (Attacker) |
| Formations Involved | ||
|---|---|---|
| Germany |  |
4th Panzer Division |
| Poland |  |
7th Infantry Division |

| Total | |
|---|---|
| Side 1 | 0 |
| Draw | 0 |
| Side 2 | 2 |


| Overall Rating, 2 votes |
|---|
|
4
|
| Scenario Rank: --- of 913 |
| Parent Game | White Eagles |
|---|---|
| Historicity | Historical |
| Date | 1939-09-02 |
| Start Time | 08:30 |
| Turn Count | 24 |
| Visibility | Day |
| Counters | 128 |
| Net Morale | 0 |
| Net Initiative | 1 |
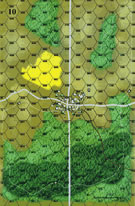
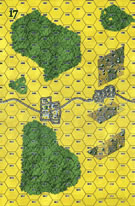
| Maps | 2: 10, 17 |
| Layout Dimensions | 56 x 43 cm 22 x 17 in |
| Play Bounty | 154 |
| AAR Bounty | 165 |
| Total Plays | 2 |
| Total AARs | 2 |
| Battle Types |
|---|
| Exit the Battle Area |
| Urban Assault |
| Conditions |
|---|
| Off-board Artillery |
| Randomly-drawn Aircraft |
| Reinforcements |
| Scenario Requirements & Playability | |
|---|---|
| Battle of the Bulge | Maps |
| Eastern Front | Counters |
| Road to Berlin | Maps |
| White Eagles | Base Game |
| Introduction |
|---|
|
The second day of the battle for Mokra saw the Poles' excellent defensive position outflanked, and the re-formed their line to the east. To help cover the retreat, they called desperately for air support while the panzers pushed forward to forestall them. After serious losses and panic in the ranks on the war's first day, the command staff at 4th Panzer Division was determined to improve their performance on Day Two. |
| Conclusion |
|---|
|
The Polish pilots knew the German column to be well supplied with light anti-aircraft weapons thanks to reports from spotters on the ground, but pressed their attack anyway. Five of their PZL.23 "Karas" ("Carp") attack planes were shot down over the German column while seven more crashed on landing due to battle damage, but they inflicted serious losses on the Germans - how serious is open to question. The German panzer division had been thwarted by Polish prepared positions, but showed the worth of mobility when the Poles could not fully occupy their new line before the Germans had driven in among them. That night the shaken Polish division pulled back again. |

|
|
|---|
| AFV Rules Pertaining to this Scenario's Order of Battle |
|---|
|
| Heer |
|---|
|


| Wojska Lądowe |
|---|
|


| 2 Errata Items | |
|---|---|

|
The reduced direct fire value of the Heer HMG became 5-5 starting with Fall of France. (plloyd1010
on 2015 Jul 31)
|

|
The morale and combat modifiers of German Sergeant #1614 should be "0", not "8". (Shad
on 2010 Dec 15)
|
| Goldfish Bite Back | ||||||||||||||
|---|---|---|---|---|---|---|---|---|---|---|---|---|---|---|
IntroductionThis was an interesting scenario, an admixture of meeting engagement and positional defence. More than many scenarios of it's type, Flying Carp comes down to time. For the Poles, a mobile defence is practically impossible, so everything depends upon their rearguard, the unseen elements of 7th Infantry Division that cause the German Player to enter by die roll. If the Poles get enough time, they can establish very strong positions on Board 10 (the Eastern of the two boards), both blocking the German exit points and holding the town hexes. If they don't, the Germans will roll over and past them. This was the last White Eagles scenario I played against this opponent. The PlansFlying Carp lends itself to replay, as there are a number of choices players have to make early that they really cannot recover from if those decisions are flawed, or if the enemy can adapt to them successfully. Consequently, planning for this scenario was particularly important. The Polish player, a veteran of many wargames (including the oft-cited PanzerBlitz and Panzer Leader), did not create a formal plan, having a "general idea" of intentions communicated verbally after the action. The German Player, being me, created a written plan outlining the commander's intent and the geographic or tactical objectives (as usual). The Polish PlanThe Poles understood the need to get clear of the German pursuit to establish a defence on the East board, and elected to combine mobility and static defence. Having learned that the German OC was conservative and, in the opinion of the Polish GQG, risk-averse, the Poles elected to hold the two villages in the West (hexes 1108, 1008, and hexes 0610, 0609, 0509, 0510) in some strength (first village held by 1x Infantry platoon, second village by 6x Infantry platoons, 1x HMG platoon, and 2x 37mm AT gun batteries), while moving the bulk of their forces Eastwards to the large crossroads town, using the small motor park available to the division (2x Trucks) in relays. The Polish command had no use for horse-drawn wagons, and these were left in the larger of the western villages to withdraw the eatern covering force if that should prove possible. The German PlanThe German plan again relied on fire and manoeuver. Elements of 4th Panzer's recce platton (3x Motorcycle platoons and 2x SdKfz 222 armoured car troops) would enter in two prongs, one in conventional pursuit along the East-West road, comprising the Motorcycle company (3x MTC), and another flanking any Polish foreward defences by entering along the narrow open corridor to the South (Hex 1203, as the first legitimate entry hex), comprising the armoured car troop (2x SK222) and striking for North-South corridor flanking the road (along the map spine). The bulk of 4th Panzer's lead elements would then enter along two flanking axes and reinforce the Motorcycle commpany. The first prong, comprising the 2nd Leichte Panzer Kompanie of the 1st Panzer Battalion (4x PzKpfw II) and a reinforced Rifle Company (3x Infantry platoons and 1x HMG platoon, with the two 81mm Mortar platoons, all mounted on Trucks) will strike along the southern route, moving into the woods in the East and deploying for an attack on the crossroads town. The second, comprising the remaining three Rifle Companies, reinforced (9x Infantry platoons and 3x HMG platoons, supported by 2x Engineer platoons, all mounted on Trucks) and the motorised FlaK company (3x 20mm FlaK-30, towed by Trucks), will strike into the northern flank of the Polish position, mvoing north across the field using the woods and the cultivated field in the East as cover, ultimately outflanking and rolling up the Polish position. The third prong, comprising the 1st Leichte Panzer Kompanie of the 1st Panzer Battalion (3x PzKpfw I) and the motorised Anti-Tank Gun company (2x 37mm PaK-36 towed by Trucks) will reinforce the Motorcycle company along the East-West road. Taken together, these forces are sufficient to freeze the Polish forces. The central thrust is along the expected axis of attack, and once reinforced is strong enough to hold the Polish covering forces in place or storm the villages in the West; if the Poles pull out, their position collapses, permitting a rapid advance along the road to threaten the crossroads town from the West. With the Southern prong threatening the crossroads town from the south, along the axis of the North-South road, and the Northern prong threatening either to encircle the entire Polish position or roll up the crossroads town, the Poles will be unable to react without giving up an objective. The BattleFor the Germans, the battle began slowly. Stubborn Polish rearguard actions held 4th Panzer's recce company up for more than an hour. By the time the recce force moved onto the board, it was 1000 Hrs., and the Poles had been running the "Polish Express" back and forth between the villages and the crossroads town, moving all of their heavy weapons and much of their infantry into defensive positions. The Germans had given up a great deal of time, making the race for the rear of the Polish positions doubtful. Nevertheless, the German OC ordered the plan adhered to, and the leading elements of the recce company engaged the enemy in the Easternmost village. Not surprisingly the Poles held. The armoured cars curling around their left flank did not seem to worry the Poles, but about the time the bulk of 4th Panzer began to join the battle, the armoured cars smashed the "Polish Express", shooting up an Infantry platoon and a 40mm Ack-Ack battery being transferred East. Using the narrow corridor between the forests, the German armoured cars continued to interdict Polish movements, and this, in turn, seems to have occupied overmuch of the Polish command's attention. Several attempts were made to eliminate the armoured cars by the Polish Air Force, eventually resulting in the loss of one troop of cars and scattering the other. By then, however, the Germans had sealed the fate of the Polish 7th Infantry Division. The flanking movements to the South and North did not provoke any Polish counter moves, and as the battle for the larger village was going well, the Poles made no move to withdraw. Indeed, Polish Anti-Tank guns took out several of the PzKpfw Is and scattered the remainder of one platoon. Without support from Division artillery or the Luftwaffe, the battle for the East-West road was looking like a Polish victory right up until the jaws of the trap closed. The Poles had even begun to advance in the West, when the Southern flanking group moved out of cover onto the North-South road above the crossroads town. The Poles, convinced the two flanking groups were diversions, were stunned by the power of the Kampfgruppe. Although the 40mm Ack-Ack weapon was able to beat the Germans back, the 75mm M.97 howitzers could not be brought to bear, and the Polish Air Force had expended too many sorties chasing armoured cars to be effective. The lack of planes, pilots, and fuel, ultimately meant that the Poles also could not attack the Northern Kampfgruppe effectively either. As a result, the last few sorties of the Polish Air Forces were spent harassing the two Kampfgruppe in the East, without managing any decisive results. Too late, the Poles realised the danger to their flanks and abandoned the villages in the West. This led to a collapse of the position, and the surviving PzKpfw Is and Motorcycle troops used their superior mobility to turn withdraw into route and then simply overrun the Poles. With their position hopeless, the Poles surrendered the remains of the 7th Infantry Division. The Germans captured nine Infantry platoons, two 81mm Mortar platoons, one 40mm Ack-Ack battery, two 75mm M.97 howitzers, two HMG platoons, and three wagons. The rest of the Polish forces were scattered or destroyed. ConclusionThe Polish player's lack of a clear plan really hurt him. He relied on an opportunistic "sense" of the developing battle and experience in me as an opponent. Although much was blamed on the game mechanics (these supposedly being inferior to PanzerBlitz), the real problem was that the Poles played to their weakness instead of trying to mitigate it. By taking up static positions in the crossroads town, they permitted the Germans to develop their blitz attack in depth. Given ample room to manoeuver, and not forced to fight their way into position, the Germans were relatively fresh (a loss of only four steps, two of which were a Pz. I step) at the mid-way point in the battle (Turn 14), while the Poles were exhausted, dispersed, and weak. With their Infantry pinned in the West, their powerful gun batteries had to fear an attack from the German Kampfgruppen. Long-range fire disrupted and even demoralized the Germans, slowing their advance but never seriously interfering with it. The Polish Player conceded because he believed that there was simply no way for him to win. In the strictest sense, this was probably true; the two German Kampfgruppen comprised more than enough units to exit the board and win a Major victory without any further fighting. The problem was, the Polish player could never decide which objective he feared the most; by holding the town hexes, he hoped to both prevent the exit of German units and inflict losses, but he never disposed his forces so as to do so. German feints drew him in every direction, and he focused on the maurading SK.222s far too long with powerful units that were best spent elsewhere. The German player stuck to her plan, stolidly moving her infantry foreward using the available cover, holding Polish forces in place with her more recce and light armoured units, and then mopping them up. The grim fight for the town hexes never materialised, but the Northern Kampfgruppe was formed just for this task. In the end, the Poles faced a difficult battle badly, and fared poorly. Although they could not hope to outmanoeuver the mobile German Panzer Division, their relative strength, and the vulnerability of those trucks to air attack and interdiction fire, should have made this a much tougher fight. For the Germans, it was the exact opposite. Although things went wrong fairly often, the Poles failed to take advantage of ocal successes. Having beaten back the Motorcycle company and the Pz. Is, the Poles advanced, rather than disengage and fall back in good order. Catching the Northern Kampfgruppe in the open, they pounded it with their 75mm Howitzers, but not with air strikes, and they let the Germans move through the woods at will. A German Major Victory. But What If...One cannot help but wonder how differently this fight might have come out had not the Polish player been so committed to a static defence of the Town hexes on Board 10. Using the roads to move troops and weapons into blocking positions---even with those disregarded wagons---would slow the German advance and inflict casualties, both key objectives for the Poles. The Town is worth 12 VPs. Slowing the German Panzer column is worth 15 by itself. The delta of VPs for the town is +2 to the Germans, but attrition in Town assaults should cover that, and anyway, drawing the German onto the Town is an excellent way to bog them down. One has to conclude that the Polish player made a dog's breakfast of the thing, and that played more carefully, and with more of the historical Polish dash, the game would have been much more interesting. |
||||||||||||||
| 0 Comments |
| White Eagles 37 - Flying Carp |
|---|
|
I thought my poles were holding tenaciously and that the Germans spent way too long dealing with my rear guard.....but, it was a crushing German victory with 61 vp to poland's 32. The hun got a point each for the 39 polish steps lost ( sounds bad when i say it out loud ) and 1 point each for 22 steps exited. They got none for town hexes, the poles concentrated too much here perhaps. The Poles got a point each for the 24 steps killed and 8 for the town. I think the very early & unlikely entry of the Germans handicapped the poles right at turn 2. They were forced to deploy the rear guard too far west. They deployed their ATGs there, which forced the Germans to lead with their infantry. It slowed them, but not much. The Luftwaffe was a huge factor, several times the stukas hit hexes for 2Xs This was a tense scenario with lots of maneuver AND lots of assault. The frequency of air support kept both sides aggressively moving and redeploying their AA guns. It was a running fight, both sides trying hard to move east as fast as they could. The German played a little tentative, the poles were more aggressive/desperate. |
| 0 Comments |