Panzer Grenadier Battles on April 27th:
Arctic Front Deluxe #40 - Children's Crusade Broken Axis #14 - Târgu Frumos: The Second Battle Scenario 3: Sledge Hammer of the Proletariat
Army Group South Ukraine #6 - Consternation Road to Berlin #73 - She-Wolves of the SS
Errors? Omissions? Report them!
Killer Koalas
Waltzing Matilda #9
(Attacker) Japan vs Australia (Defender)
Formations Involved
Australia 2nd Infantry Division
Japan 7th Tank Regiment
Japan Imperial Guard Division
Display
Balance:


Overall balance chart for WaMa009
Total
Side 1 1
Draw 0
Side 2 0
Overall Rating, 1 vote
5
4
3
2
1
4
Scenario Rank: --- of 913
Parent Game Waltzing Matilda
Historicity Alt-History
Date 1942-11-01
Start Time 07:30
Turn Count 26
Visibility Day
Counters 128
Net Morale 0
Net Initiative 1
Maps 6: 1, 17, 18, 20, 21, 3
Layout Dimensions 86 x 84 cm
34 x 33 in
Play Bounty 204
AAR Bounty 171
Total Plays 1
Total AARs 1
Battle Types
Bridge Control
Inflict Enemy Casualties
River Crossing
Rural Assault
Conditions
Off-board Artillery
Randomly-drawn Aircraft
Scenario Requirements & Playability
Afrika Korps Counters
Eastern Front Maps
Guadalcanal Counters
Road to Berlin Maps
Waltzing Matilda Base Game
Introduction

Australian Imperial Force soldiers referred to their Militia comrades as "Koalas" - it being illegal to either export or shoot the cuddly marsupial. Militia troops likewise saw no combat and could not leave Australian territory, and the AIF also resented their higher pay scale. But Militia troops did finally see combat in New Guinea and Bougainville, as the government loosened its definition of "Australian territory," proving themselves as capable as the AIF. As they would have had to, had war come to Australia.

Conclusion

Australia had proportionately fewer river barriers than European or Asian battlegrounds, but they would have formed important obstacles where they did exist. Australian forces would have to use every advantage of terrain to delay the Japanese long enough for American assistance to finally break through whatever barriers the Imperial Japanese Navy had interposed.


Display Relevant AFV Rules

AFV Rules Pertaining to this Scenario's Order of Battle
  • Vulnerable to results on the Assault Combat Chart (7.25, 7.63, ACC), and may be attacked by Anti-Tank fire (11.2, DFT). Anti-Tank fire only affects the individual unit fired upon (7.62, 11.0).
  • AFV's are activated by tank leaders (3.2, 3.3, 5.42, 6.8). They may also be activated as part of an initial activating stack, but if activated in this way would need a tank leader in order to carry out combat movement.
  • AFV's do not block Direct Fire (10.1).
  • Full-strength AFV's with "armor efficiency" may make two anti-tank (AT) fire attacks per turn (either in their action segment or during opportunity fire) if they have AT fire values of 0 or more (11.2).
  • Each unit with an AT fire value of 2 or more may fire at targets at a distance of between 100% and 150% of its printed AT range. It does so at half its AT fire value. (11.3)
  • Efficient and non-efficient AFV's may conduct two opportunity fires per turn if using direct fire (7.44, 7.64). Units with both Direct and AT Fire values may use either type of fire in the same turn as their opportunity fire, but not both (7.22, 13.0). Units which can take opportunity fire twice per turn do not have to target the same unit both times (13.0).
  • Demoralized AFV's are not required to flee from units that do not have AT fire values (14.3).
  • Place a Wreck marker when an AFV is eliminated in a bridge or town hex (16.3).
  • AFV's do not benefit from Entrenchments (16.42).
  • AFV's may Dig In (16.2).
  • Closed-top AFV's: Immune to M, M1 and M2 results on Direct and Bombardment Fire Tables. Do not take step losses from Direct or Bombardment Fire. If X or #X result on Fire Table, make M morale check instead (7.25, 7.41, 7.61, BT, DFT).
  • Closed-top AFV's: Provide the +1 modifier on the Assault Table when combined with infantry. (Modifier only applies to Germans in all scenarios; Soviet Guards in scenarios taking place after 1942; Polish, US and Commonwealth in scenarios taking place after 1943.) (ACC)
  • Tank: all are closed-top and provide the +1 Assault bonus, when applicable
  • Armored Transports: These are not combat units and are therefore not APC's, and they can transport all types of transportable units (5.6) so they are not Prime Movers. They suffer the same vulnerabilities in combat as open-top AFV's (7.61). All are mechanized. (SB)

Display Order of Battle

Australia Order of Battle
Army
Japan Order of Battle
Imperial Japanese Army
  • Mechanized
  • Towed

Display AARs (1)

Koalas Show Claws, Can't Hang On
Author rerathbun
Method Solo
Victor Japan
Play Date 2013-01-26
Language English
Scenario WaMa009

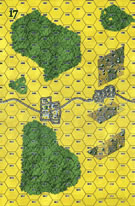
This is a good-sized river crossing scenario, with the Australians defending and the Japanese attacking.

The Aussies set up mostly behind the river, with two companies forward to slow down the Japanese approach. The force was split in thirds between the bridges on either flank and the narrower part of the river in the middle. They were dug-in, but did not have nearly enough troops to cover the entire river. The Japanese split their forces to approach on the two roads, with the heavier force in the north.

The Australian speed-bumps blocked the roads temporarily, but were soon overwhelmed by the Japanese armor and infantry. The Japanese came up the roads in a feint toward the bridges, then split off most of their forces to the unguarded sections of the river between the center Australian force and the roads. The Australians were forced to scramble to cover the crossing points, while leaving some troops dug in at the bridges.

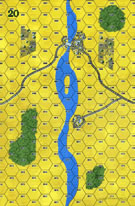
The Australian artillery (off- and on-board) did a good job of keeping the Japanese engineers disrupted and racking up step losses among the Japanese infantry. The anti-tank guns were less effective. They did get some of the Japanese tanks, but were often disrupted by the Japanese off-board artillery.

Once the Australian infantry had shifted to cover the river crossing points, the Japanese in the north shifted their tanks and an infantry company to the town in the north to try to force the bridge there. The Australians in the town were excellent in defense of the town, holding for two hours with few losses while their two-pounders plinked at the tanks from the edges.

The Australians were able to choke off the engineer-assisted crossings in the center. At scenario end, only three undemoralized infantry platoons remained west of the river.

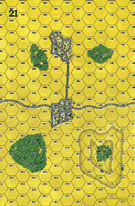
It looked like the Australians were going to win until the last hour of the scenario. Finally, the Japanese were able to break through the town in the north and cross the bridge with what was left of their tanks and a company of infantry. At the same time, they managed to force the southern bridge with one-and-a-half platoons of tanks supported by more infantry.

The final step-loss tally was 41 to 24 in favor of the Australians (tanks counted double). With 8 steps of tanks and 13 steps of infantry across the river and both bridges in Japanese hands, the Japanese earned enough points for a major victory.

This was my first river crossing scenario and I really enjoyed it. It was very tense and despite the outcome I do believe it could have gone either way. Before I started adding points at the end I assumed it would be a draw or a very narrow win due to the lopsided step loss totals. I was surprised that the Japanese got a major victory.

0 Comments
You must be a registered member and logged-in to post a comment.
Errors? Omissions? Report them!
Page generated in 0.521 seconds.