
|
Darwin's Theory Waltzing Matilda #1 |
||
|---|---|---|
| (Attacker) Japan | vs | Australia (Defender) |
| Formations Involved | ||
|---|---|---|
| Australia |  |
3rd Infantry Brigade |
| Japan |  |
2nd "Courageous" Infantry Division |

| Total | |
|---|---|
| Side 1 | 0 |
| Draw | 1 |
| Side 2 | 3 |


| Overall Rating, 4 votes |
|---|
|
3.75
|
| Scenario Rank: --- of 913 |
| Parent Game | Waltzing Matilda |
|---|---|
| Historicity | Alt-History |
| Date | 1942-05-01 |
| Start Time | 06:00 |
| Turn Count | 20 |
| Visibility | Day |
| Counters | 77 |
| Net Morale | 1 |
| Net Initiative | 1 |
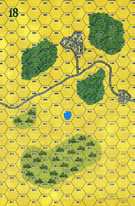
| Maps | 2: 18, 8 |
| Layout Dimensions | 56 x 43 cm 22 x 17 in |
| Play Bounty | 165 |
| AAR Bounty | 165 |
| Total Plays | 4 |
| Total AARs | 2 |
| Battle Types |
|---|
| Hill Control |
| Road Control |
| Urban Assault |
| Conditions |
|---|
| Off-board Artillery |
| Randomly-drawn Aircraft |
| Scenario Requirements & Playability | |
|---|---|
| Afrika Korps | Counters |
| Eastern Front | Maps |
| Guadalcanal | Counters |
| Road to Berlin | Maps |
| Waltzing Matilda | Base Game |
| Introduction |
|---|
|
While a full-blown invasion of Australia was at best a remote possibility, the Allied command had to take threats against the northern port of Darwin seriously. The Japanese did not actually contemplate a leap across the Timor Sea from Java, but did make a devastating air raid on the port in February 1942. Isolated from the rest of Australia, Darwin had only a small garrison to protect it from the Japanese. |
| Conclusion |
|---|
|
Protected by swamps and other harsh terrain to a small extent, Darwin offered port and airfield facilities that threatened the Japanese hold on the Dutch East Indies. Raids launched there would annoy the Japanese throughout the war, but they did not move to actually capture the Northern Territory's capital. All-weather roads would eventually be built to link Darwin with the rest of Australia, but in the war's early months reinforcing the area took a major effort. |

|
|
|---|
| Army |
|---|
|


| Imperial Japanese Army |
|---|
|


| Big Australian speedbump |
|---|
|
It is fun to play a scenario with the Japanese on lots of open ground. They're faster-moving MGs and wagons make infantry actions more fluid and allow support weapons to keep pace with aggressive attacks. In this scenario the Japanese must take a hill, some towns and a road from the Australian defenders. The Japanese have tough 9/8 morale, which along with their national assault bonus makes closing with the Australian defenders as fast as possible an attractive idea. The initial Japanese advance from the southeast rapidly overwhelmed the Australian outpost defending the forward hill. Japanese troops poured across the plain behind the hill and approached the town and woods that formed the main Australian defensive line. At this point the Japanese center seemed to stall, and two flanking forces made progress only by fits and starts. Eventually, the Australian center collapsed and the Japanese wings closed on the larger town in the rear. Here, a brave Australian company held out in the center of town against all attacks, handing out bloody noses to three waves of Japanese attackers. The remnants of the Australian center fell back and prepared a scratch defense of the western end of the road. A last ditch Japanese attack failed to clear them before the five hour time limit was up. A minor Australian victory. I really enjoyed this scenario, both for the highly fluid Japanese forces and for the tactical decision to be made with each assault: do the HMGs join in the assault and give up the column bonus for Japanese infantry, or do the HMGs hold back and the infantry get to make a Banzai charge? I was frustrated by the Australian pilots inability to find their targets, but their doughty infantry kept up a steady defense in the face of steady casualties. A nice, fast-moving scenario. |
| 0 Comments |
| Make haste quickly |
|---|
|
An invasion or raid on Darwin would have had to be accomplished quickly. As a result, much would have been demanded of the assaulting forces and delays of any kind could not be tolerated as it would leave the attackers at the end of a precarious logistical tightrope and force the IJN to defend a set location, something which, time and again, resulted in unsustainable losses to their fighting ability. So the idea of entering with an admittedly superior force of infantry and having to essentially clear out the entire board in order to have a win in this scenario seems fair. Unfortunately it also seems virtually impossible. There are too many objectives (a hill and two towns and two boards of roads) and the rare situation where the Aussies can put up even an hour long fight for a location will hamper the Japanese timeline too much to permit a win. It became apparent by the three quarter mark that the Japanese could not pull off the win despite ultimately winning every engagement they were able to initiate. There simply wasn't time as the hill had taken an extra hour to subdue right off the bat. They then moved to fight for the draw by denying the Austrailians a place on the road. There simply were too many surviving troops, however and by that time the Japanese had been whittled down enough to make it impossible to cover the road completely. Tactically I found the Japanese HMGs to be useful only in DF attacks. By using them in assaults you lose the Japanese infantry assault bonus which is worth a lot more than the extra 2 factors of DF they provide, and the Japanese force is amply supplied with leaders. A Japanese infantry assault of three INF will therefore go in on the "24" column at least, and if the leader has a combat bonus they will go in on the "30" column, barring any defensive shifts (they get morale, leader and Japanese infantry assault bonuses). In the final analysis both forces lost 18 steps but the Austrailian force remained coherent which simply was too much for the Japanese to acheive a victory or pull a draw. This is a tough test for the Japanes and one which will force a very aggresive approach to pull a win or draw. The Austrailian air force made itself felt with three steps to their credit, even the Wirraway (DF factor 6) bagging a demoralized gun. Despite the situation and fun forces I can only see this one carrying a "3". |
| 2 Comments |