
|
Bad Road to Hastenrath Spearhead Division #9 |
||
|---|---|---|
| (Defender) Germany | vs | United States (Attacker) |
| Formations Involved | ||
|---|---|---|
| Germany |  |
12th Infantry Division |
| United States |  |
3rd "Spearhead" Armored Division |

| Total | |
|---|---|
| Side 1 | 1 |
| Draw | 0 |
| Side 2 | 3 |


| Overall Rating, 4 votes |
|---|
|
3.5
|
| Scenario Rank: --- of 913 |
| Parent Game | Spearhead Division |
|---|---|
| Historicity | Historical |
| Date | 1944-11-16 |
| Start Time | 12:30 |
| Turn Count | 16 |
| Visibility | Day |
| Counters | 51 |
| Net Morale | 0 |
| Net Initiative | 1 |
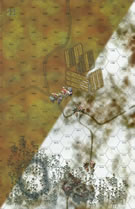
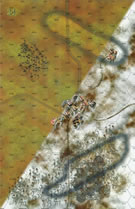
| Maps | 2: 22, 24 |
| Layout Dimensions | 56 x 43 cm 22 x 17 in |
| Play Bounty | 155 |
| AAR Bounty | 159 |
| Total Plays | 4 |
| Total AARs | 3 |
| Battle Types |
|---|
| Inflict Enemy Casualties |
| Urban Assault |
| Conditions |
|---|
| Anti-infantry Wire |
| Entrenchments |
| Minefields |
| Off-board Artillery |
| Severe Weather |
| Smoke |
| Terrain Mods |
| Scenario Requirements & Playability | |
|---|---|
| Elsenborn Ridge | Maps + Counters |
| Spearhead Division | Base Game |
| Introduction |
|---|
|
Second and Third Armored Divisions had already deployed to England when the rest of the American armored divisions reorganized. This was unfortunate, as their tank-heavy organization made it very difficult for them to form effective combined arms task forces. On this day Combat Command B sent out two task forces, each containing a full battalion of armor supported by a single armored infantry company. Task Force Mills’ mission required it to subdue Hastenrath. |
| Conclusion |
|---|
|
According to ordnance officer Belton Cooper, mines cost the Spearhead Division fifteen Shermans with the Germans destroying thirteen more. Despite the heavy tank losses and disappearance of their supporting infantry long before, four Shermans managed to reach Hastenrath but were unable to accomplish much. When fire from the town set another Sherman ablaze the tankers called it a day. |

|
|
|---|
| AFV Rules Pertaining to this Scenario's Order of Battle |
|---|
|
| Heer |
|---|
|


| Army |
|---|
|


| 3 Errata Items | |
|---|---|

|
The reduced direct fire value of the Heer HMG became 5-5 starting with Fall of France. (plloyd1010
on 2015 Jul 31)
|

|
The morale and combat modifiers of German Sergeant #1614 should be "0", not "8". (Shad
on 2010 Dec 15)
|

|
The movement allowance on the counters in Airborne is misprinted. It should be "3." (rerathbun
on 2012 Jan 30)
|
| Bad day for the Germans at Hastenrath | ||||||||||||||
|---|---|---|---|---|---|---|---|---|---|---|---|---|---|---|
The US Force mix is quite interesting ... and challenging. The American player (me !) has to control Hastenrath town hexes to win but with very few infantry and a rather large tank, TD and halftrack support. Add one 81mm mtr, one Priest and offboard art. Hastenrath is in the center of a board with one wooded hill to the west and a large field area on the east. The defender lays down a barbed wire barrier across the board in front of the town plus some minefields. 2 German infantry companies supported by 1 StugIV, 1 75 AT gun, 1 75 IG and 2 mortars defend Hastenrath. Since we play with nearly all optional rules (exc for Logistics shortfall), my opponent chose to hide the Stug and AT gun + some troops. Of course, I will use recon with I & R platoon and M8 armored car. I decide not to rush the assault : all tanks remain in ambush, the infantry use all covers to advance slowly and offboard artillery tries to kill the visible Germans. Oh and there’s mud ! So all the vehicles and infantry use a snail pace... Half the scenario goes like this ! M8 and I & R platoons discovered some infantry nests and the AT gun in the town eventually destroyed the courageous M8. Only the Jumbo was closing to the wire barrier. The M16 meatchopper and other halftracks were firing from 1 km away at German infantry and the full US infantry was flanking the city by the east slowly advancing in the fields. When my artillery finally succeeded to disrupt the defence, the US tanks moved to the hill west of the city. The Stug was hiding there but it only killed a half platoon of Stuarts. Some other tanks used move & fire to obtain cross fire bonus and the M10 TD killed the Stug. On the east flank, tank/infantry assault reached the city easily since all defensive fire missed the target. The rest of the game was mainly assaulting the city hexes with combined arms bonus. German dice rolls were not that good and except for some nasty panzerfausts, US victory was inevitable. Major US victory. Fun scenario. |
||||||||||||||
| 0 Comments |
| Hastenrath Smackdown | ||||||||||||
|---|---|---|---|---|---|---|---|---|---|---|---|---|
For my second run at Spearhead, I chose a scenario that took place in November 1944 (since we're currently in November): #9, Bad Road to Hastenrath. With the seven-hex town being the major prize, the Germans concentrated there (though with too few troops to secure every hex strongly) and placed the minefields, wire and entrenchment to cover as much of the outskirts as possible. The 75mm ATG was dug in on the southernmost projection of the ridge west-southwest of town, while the StuG took position in the one-hex town at the tip of the east-southeast ridge. The Americans set up warily, with as much as they could fit inside town hexes (including the M10 and both M4/76's in the easternmost town on Board 22, within range of the StuG. The Americans opened the ball by advancing a Sherman to within spotting range of the StuG, which of course drew fire. But the Sherman remained unscathed, and the fire from the more potent platoons in the town reduced and disrupted the StuG, which was eliminated by Turn 3 without causing any damage. But the other half of the forward German AT defense worked much better. A number of tanks were able to close on it with no damage, but when several charged in to assault (with a great deal of strength), somehow the gun - with one accompanying leader - held out the rest of the game, eventually blasting a couple of tank steps (by using its AT instead of assaulting.) Prior to being swamped, it had also destroyed a loaded M3, including a leader and one of the few ARM platoons. Although the continued existence of the ATG platoon defied all odds, at least it was kept busy, and with the StuG gone - and soon after that the 75mm IG, with its limited AT capability - the remainder of the armor, and the loaded M3's, were able to close on the town. (Thanks to the mud, all advances were slowed, and the wire and minefields also presented additional delays.) Tank platoons formed several strong stacks (some joined with halftracks). Because there was so little accompanying infantry (as it was, the ENG was lost and the HMG spent most of its time recovering from bombardment-induced demoralization), the tank stacks had limited success in assaults against German infantry in the town, but several stacks became lethal close-range DF combinations. Meanwhile, the M10 and a couple of M3 platoons went after the German mortars, but - although both eventually had to flee their dug-in position - both of them somehow survived as well. But that was close to all the Germans had left. At game's end, the Americans had worked their way through the wire, around the minefields and entrenchment, and had taken possession of 5 town hexes. A sixth was under control of a lone (albeit disrupted and reduced) GREN, and one hex was an ongoing assault between the remaining US ARM's and a reduced German HMG. Everything else, except the invulnerable ATG and the mortars, was gone, plus one leader. In fact, the Germans had as many surviving leaders (5) as combat units. The Germans got 12 VP for US losses and 2 VP for holding one town hex. But the Americans scored 17 for German losses and 10 for 5 town hexes. The resulting 13-point advantage was a major victory for the Spearhead boys. |
||||||||||||
| 0 Comments |
| Spearhead Division: scenario #9: Bad Road to Hastenrath | ||||||||||||
|---|---|---|---|---|---|---|---|---|---|---|---|---|
Spearhead Division: scenario #9: Bad Road to Hastenrath I needed to get a game in early this morning and picked what looked to be quick scenario from the Spearhead Division. I’ll make this a short AAR, as basically it is about controlling the Hastenrath town hexes on map 24 and step losses. The German setup defending on map 24, while American setup on map 22 in attack mode. The Germans have a small mixed force centered around a StuG IV and a 75mm gun, with minefields, wire and an entrenchment plus mud to slow the Americans down. The American have a large armor force but a small Infantry force and some good off map artillery. With only 16 turns in mud, the Americans can’t afford to wait around and probe deep into the German lines to expose their main defensive assets. This where the Americans took most of their losses but once they takeout the German Stug IV and the 75mm guns, they can chip away at the remaining German’s Infantry forces with a ton of fire power. By turn 16, the Germans were destroyed or retreating and Hastenrath was in American hands. The point totals were Americans 28 points to the Germans 12 points for and a American Major victory. Put that American M16 adjacent to any German Infantry stack with a couple more units and that hex is toast! |
||||||||||||
| 0 Comments |