Panzer Grenadier Battles on April 27th:
Arctic Front Deluxe #40 - Children's Crusade Broken Axis #14 - Târgu Frumos: The Second Battle Scenario 3: Sledge Hammer of the Proletariat
Army Group South Ukraine #6 - Consternation Road to Berlin #73 - She-Wolves of the SS
Errors? Omissions? Report them!
Behind the Beaches
Secret Weapons #3
(Attacker) Germany vs Soviet Union (Defender)
Formations Involved
Germany Marine Assault Brigade
Soviet Union 150th Rifle Division
Soviet Union 25th Tank Corps
Display
Balance:


Overall balance chart for SeWp003
Total
Side 1 1
Draw 0
Side 2 0
Overall Rating, 1 vote
5
4
3
2
1
4
Scenario Rank: --- of 913
Parent Game Secret Weapons
Historicity Alt-History
Date 1945-08-01
Start Time 06:30
Turn Count 24
Visibility Day
Counters 123
Net Morale 1
Net Initiative 2
Maps 4: 18, 20, 21, 3
Layout Dimensions 112 x 43 cm
44 x 17 in
Play Bounty 180
AAR Bounty 171
Total Plays 1
Total AARs 1
Battle Types
Bridge Control
Conditions
Off-board Artillery
Randomly-drawn Aircraft
Reinforcements
Terrain Mods
Scenario Requirements & Playability
Eastern Front Maps
Road to Berlin Maps + Counters
Secret Weapons Base Game
Introduction

Germany never developed a very advanced amphibious doctrine, and proposed to invade Britain in 1940 using unpowered Rhine River cargo barges. But the German Navy did deploy the world's first helicopter carrier, and used it for anti-submarine and mine-hunting missions in the Aegean Sea. Had more such carriers been available, they could have given the Germans a significant tactical advantage against Soviet coastal defenses on the Arctic Front.

Conclusion

The United States Marine Corps would eventually mate the helicopter with the sophisticated amphibious doctrine developed during the Second World War. Helicopters based on dedicated aircraft carriers would lift troops and equipment to key locations behind the beach defenses, unhinging them at minimal cost in blood.


Display Relevant AFV Rules

AFV Rules Pertaining to this Scenario's Order of Battle
  • Vulnerable to results on the Assault Combat Chart (7.25, 7.63, ACC), and may be attacked by Anti-Tank fire (11.2, DFT). Anti-Tank fire only affects the individual unit fired upon (7.62, 11.0).
  • AFV's are activated by tank leaders (3.2, 3.3, 5.42, 6.8). They may also be activated as part of an initial activating stack, but if activated in this way would need a tank leader in order to carry out combat movement.
  • AFV's do not block Direct Fire (10.1).
  • Full-strength AFV's with "armor efficiency" may make two anti-tank (AT) fire attacks per turn (either in their action segment or during opportunity fire) if they have AT fire values of 0 or more (11.2).
  • Each unit with an AT fire value of 2 or more may fire at targets at a distance of between 100% and 150% of its printed AT range. It does so at half its AT fire value. (11.3)
  • Efficient and non-efficient AFV's may conduct two opportunity fires per turn if using direct fire (7.44, 7.64). Units with both Direct and AT Fire values may use either type of fire in the same turn as their opportunity fire, but not both (7.22, 13.0). Units which can take opportunity fire twice per turn do not have to target the same unit both times (13.0).
  • Demoralized AFV's are not required to flee from units that do not have AT fire values (14.3).
  • Place a Wreck marker when an AFV is eliminated in a bridge or town hex (16.3).
  • AFV's do not benefit from Entrenchments (16.42).
  • AFV's may Dig In (16.2).
  • Closed-top AFV's: Immune to M, M1 and M2 results on Direct and Bombardment Fire Tables. Do not take step losses from Direct or Bombardment Fire. If X or #X result on Fire Table, make M morale check instead (7.25, 7.41, 7.61, BT, DFT).
  • Closed-top AFV's: Provide the +1 modifier on the Assault Table when combined with infantry. (Modifier only applies to Germans in all scenarios; Soviet Guards in scenarios taking place after 1942; Polish, US and Commonwealth in scenarios taking place after 1943.) (ACC)
  • Tank: all are closed-top and provide the +1 Assault bonus, when applicable
  • Armored Cars: These are Combat Units. They are motorized instead of mechanized. All have their own armored car leaders, who can only activate armored cars (6.85). Do not provide the +1 Assault bonus (ACC).
  • Reconnaissance Vehicle: 8.23 Special Spotting Powers Both foot and vehicle mounted recce units (1.2) possess two special spotting abilities. The first ability is that they can spot enemy in limiting terrain at one hex further than the TEC specifies for other units and leaders. For example, an enemy unit in town can normally be spotted at three hexes or less, but a recce unit can spot them at four hexes.Their second ability is that they can place a Spotted marker on any one enemy unit they can spot per turn, just as if the enemy unit had "blown its cover" by firing. Such Spotted markers are removed as described earlier.

Display Order of Battle

Germany Order of Battle
Heer
  • Foot
Kriegsmarine
Soviet Union Order of Battle
Army (RKKA)
  • Mechanized
  • Motorized

Display Errata (2)

2 Errata Items
Overall balance chart for 951

The reduced direct fire value in Kursk: Burning Tigers is 4-4.

(plloyd1010 on 2015 Jul 31)
Overall balance chart for 993

Kommissars never get morale or combat modifiers. Ignore misprints.

(Shad on 2010 Dec 15)

Display AARs (1)

Behind the Beachs or The other "Hells Highway"
Author PatC
Method Solo
Victor Germany
Play Date 2012-01-22
Language English
Scenario SeWp003

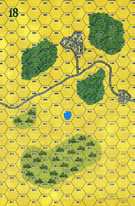
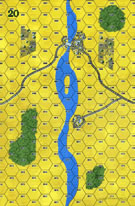
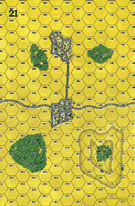
The Soviets set up with 5 platoons on Bd 3 in the village. The mortars on bd 20 in 0910 with infantry in the bridge hex and in the adjacent town. There were another 5 platoons on Bd 18 in 0804. This setup, though partly mandatory, turned out to be faulty on the Soviet part. More units should have set up west of the river.

The Axis entered loaded on helicopters from the west. The Axis had a dilemma. There were two soviet forces to be overcome, one west of the river and one on the river itself. The key being the bridge hex. These two forces had to be overcome before the Soviet reinforcements arrived. Because of their small force in infantry the Axis could not hope to clean up west of the river and attack the bridge hex and the nearby town at the same time once the Soviet reinforcements arrived. They had to have the bridge and the town before the Soviets were reinforced. So they had to attack both places at once at the start.

The Axis made good progress west of the river, but were having trouble at the bridge. If it were not for the Helos (and Axis Jets!)the Axis would not have had a chance. They would have had trouble just getting to the bridge if it were not for the helicopters. The cruiser guns also were a large factor through out the game firing against Soviet mortar and artillery positions. Because there is a 15 minute delay in the fire mission these were the obvious targets because they were not moving. It took time to clean up Bd. 3 but finally it was done and those units were quickly ferried up to the bridge sector and they and their helicopter support entered the fight for the bridge and the adjacent town.

This struggle lasted till 09:45. The Soviet reinforcements could arrive at any time now. Just as the last Soviet unit flees the bridge hex their reinforcements arrive. This is a powerful and mobile column. It could be on Axis units before they could dig in around the town in supporting positions. This forced all Axis units into the town right away. Good position, but there is no where to retreat to. The Axis already had a bloody nose, loosing one step of helos and two steps of infantry, they could not really afford that kind of attrition rate for long.

At the first appearance of the Soviet column the Axis helicopters were off like a prom dress after the mounted Soviet Infantry and tanks. Here is where the Soviets had the dilemma. If they stayed mounted they were very vulnerable to Axis air power. If they dismounted they would be less vulnerable but very slow. Time on the scenario would likely run out before most units could come up. The soviets decided to stay mounted and move as fast a possible to the objective. They would ignore losses and press through hoping enough would survive the ride to kick the Axis out of the bridge hex.

Needless to say this this did not work. Remember the pictures of the highway north of the capitol in Kuwait in the First Gulf War. Need I write more? Never in Panzer Grenadier have I seen so many steps lost so fast. As players know if the transport unit is lost the passengers suffer the same fate. One shot can produce a 3 step net loss and did, repeatedly. Not one unit from the column made it to the objective, not one, including the T34/85 which was incinerated early on. The Axis air did suffer several demoralized results (disrupted don't count vs helos) but no step loss. When they were not roaming up and down the column Axis Jets were shooting up Soviet Artillery and mortars. In the end the Soviet had suffered an amazing 54 step loss of all types to a 2 Inf and one helicopter step loss for the Axis.

Had the Soviet initial setup been different this could have bee a very different game. More units west of the river for the Soviet would have been the answer. Victory conditions state that the Axis had to eliminate all undemoralized steps west of the river and capture the bridge hex. Had more Soviet steps been west of the river it would have taken the Axis longer to clean up those units and thus given the relief column a better chance to win through. I gave this scenario a 4, not because it was well balanced but it was just plain fun executing "vertical envelopment". It was a real change of pace. Unless the Soviets can figure a strategy to overcome Axis air power this scenario should only be played solo.

0 Comments
You must be a registered member and logged-in to post a comment.
Errors? Omissions? Report them!
Page generated in 0.314 seconds.