| Author |
thomaso827
|
| Method |
Solo |
| Victor |
United States |
| Play Date |
2015-03-02 |
| Language |
English |
| Scenario |
Saip033
|
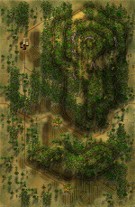
This small scenario has a small Japanese force on a large 40M hill holding 2 entrenchments, with anyone in appropriate terrain dug in. I placed the 2 full HMG platoons each in one entrenchment, the eastern one with a Sergeant. In the middle of the two, I dug in the single HMG step with the Japanese Captain, and I set up 2 infantry stacks with the remaining 6 units, 3 of which were single step, and placed them in the heavy jungle to north and south of the hill center as reaction forces that would have the +1 column shift for being Japanese infantry, even though the morale is low enough that they wont get the additional +1 for that. In fact, this one has a good enough morale for the US Army that they will get to claim that nearly every time. The US troops can enter from east, west or south. I brought in an assault engineer stack with the flame, the regular engineer and one infantry platoon with the best leader on the table, an 11-1-2, which made for a killer combination to go after those entrenchments. With him was one of the two US captains with an HMG and an Infantry, and another LT with the same. Further south but still from the west I brought in a lone LT with Infantry to either distract one of the Japanese forces or to assist in a flanking move once the Japanese had committed themselves. From the west came the LTC with an LT and one Infantry unit, another Captain with an Infantry and an HMG, and the Sergeant with the Mortars. I moved to place the mortars in the town hex where he could offer fire anywhere in the target zone. The US also got 2 OBAs of 16 points each and could draw 1 Army aircraft each turn. The US was lucky enough to get the P-47 with 24 DF points on turn 1 and it disrupted or demoralized leader and HMG in the eastern entrenchment, which stayed that way pretty much for the 4 turns it took the Army to crawl through the jungle and assault, taking the entrenchment quickly. In return, the single Japanese HMG step in the middle succeeded in demoralizing the Flame unit out of the assault stack but did little else before being destroyed by US OBA. The two Japanese infantry forces tried to assault US forces but were overwhelmed by the unusually high combination of DF, morale and good leaders, and it ended up being the Japanese failing morale and fleeing, even losing two Infantry steps when their attempt to flee failed to survive the Army's free assaults. As the Army forces encircled the remaining Japanese entrenchment, whose force had grown when demoralized troops fled towards it, became the focus of attention from 4 directions plus the OBA fire, it didn't last long. US maintained initiative and luck as the one friendly fire incident struck a US/Japanese assault hex, doing no damage to the US troops but demoralizing a single Japanese infantry step in the assault, which greatly helped the Army guys in their next assault. In the end of 12 turns, the US had taken the second entrenchment, the only surviving Japanese counter being a surviving LT who had succeeded in fleeing earlier and had finally regained his courage to try to get back into combat only to watch everyone else die. Great game.
|