
|
Punishment on Yellow Beach Saipan 1944 #5 |
||
|---|---|---|
| (Defender) Japan | vs | United States (Attacker) |
| Formations Involved | ||
|---|---|---|
| Japan |  |
47th Independent Mixed Brigade |
| United States |  |
25th Marine Regiment |

| Total | |
|---|---|
| Side 1 | 4 |
| Draw | 6 |
| Side 2 | 2 |


| Overall Rating, 14 votes |
|---|
|
3.64
|
| Scenario Rank: 296 of 913 |
| Parent Game | Saipan 1944 |
|---|---|
| Historicity | Historical |
| Date | 1944-06-15 |
| Start Time | 09:00 |
| Turn Count | 14 |
| Visibility | Day |
| Counters | 67 |
| Net Morale | 0 |
| Net Initiative | 1 |
| Maps | 1: 81 |
| Layout Dimensions | 43 x 28 cm 17 x 11 in |
| Play Bounty | 132 |
| AAR Bounty | 117 |
| Total Plays | 12 |
| Total AARs | 10 |
| Battle Types |
|---|
| Inflict Enemy Casualties |
| Road Control |
| Entrenchment Control |
| Conditions |
|---|
| Entrenchments |
| Off-board Artillery |
| Randomly-drawn Aircraft |
| Scenario Requirements & Playability | |
|---|---|
| Saipan 1944 | Base Game |
| Introduction |
|---|
|
The 2nd Battalion, 25th Marine Regiment landed amid a heavy barrage of high explosives. However, the Devil Dogs pushed inland to the railroad embankment roughly 700 yards inland, driving the Japanese infantry back until the Japanese artillery and dual-purpose anti-aircraft guns, firing over open sights and augmented with mortars, unleashed a wicked bombardment to stop the Marine advance. |
| Conclusion |
|---|
|
In contrast to the behavior of the amphibian crews in the Blue Beach sector, here the LVT(A)'s of the Army's 708th Amphibian Tank Battalion spearheaded the Marine advance and deliberately tried to draw Japanese fire away from the rifleman and the troop-carrying tractors. But the Japanese position held until the Marines called in Navy planes to destroy the Japanese heavy weapons. Under incessant air attack, the Japanese rifleman and surviving gunners fell back. |

|
|
|---|
| AFV Rules Pertaining to this Scenario's Order of Battle |
|---|
|
| Imperial Japanese Army |
|---|
|


| Imperial Japanese Navy |
|---|
|


| Army |
|---|
|
| Marine Corps |
|---|
|


| 3 Errata Items | |
|---|---|

|
The A1 has an inherent leader and two combat steps. Its counter should have been given an amphibious armor symbol. (Shad
on 2013 May 06)
|

|
The A4 has an inherent leader and two combat steps. Its counter should have been given an amphibious armor symbol. (Shad
on 2013 May 06)
|

|
The 8-3 Marine Infantry counter appears in most of the Saipan 1944 and Marianas 1944 scenarios, replacing the 10-3 DF valued Marine counters for those scenarios and is currently published in the most recent Saipan printing. (JayTownsend
on 2015 Dec 26)
|
| Combate por la "Playa Amarilla" |
|---|
|
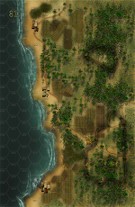
En este escenario una fuerza japonesa compuesta por dos compañías de infantería, tres secciones de morteros, una sección de cañones AA 75/88, una batería de 105 mm y dos baterías de la marina de 150 mm y 120/10, defiende un sector de la costa ante una fuerza invasora americana. Ésta está compuesta por un batallón de marines, con los consiguientes transportes anfibios LVT 4 y cuatro secciones de vehículos acorazados anfibios LVT A1 y LVT A4. Los americanos reciben el apoyo de dos escuadrillas de aviones por turno a partir del turno 5. Los japoneses defienden especialmente una zona delimitada por la carretera que discurre entre los hexes 0701 y 1213. Los defensores deben impedir el acceso a la zona al este y norte de la carretera citada. Tres campos atrincherados refuerzan las posiciones japonesas. Los nipones despliegan sus unidades de infantería a lo largo del perímetro, para impedir el acceso del enemigo a la zona. Las dos baterías de costa de la marina se sitúan en terreno elevado, aunque la abundante vegetación limita mucho la visibilidad. Los americanos se despliegan en los hexes de playa con las unidades de marines ya desembarcadas. Han tenido cuidado de situarse en los hexes de playa situados fuera de la vista de las baterías costeras del enemigo. De lo contrato los vehiculos anfibios habrían sido un fácil blanco. Una compañía de marines inicia el avance por el sur del campo de batalla, pero pronto es blanco del fuego de oportunidad de una batería costera, que destruye un step y hace retroceder al resto al lugar de partida. En el norte, los vehículos blindadoa anfibios inician el avance hacia el interior, sin reparar en que caen en el ángulo de visión de la otra batería costera japonesa, que rápidamente destruye dos steps de LVT A1 y pone en fuga al resto. Los americanos tiene ya bajas sensibles y el combate no ha hecho más que empezar. A partir de este momento los marines inician un avance mucho más cuidadoso. Al mismo tiempo entran en acción los aviones americanos, que destruyen una de las baterías costeras. Los marines se introducen en el interior del perímetro defensivo japonés asaltando lenta pero metódicamente las posiciones enemigas. La superioridad numérica y de potencia de fuego siempre está de lado de los marines, aunque los nipones venden cara su piel y siguen produciendo bajas al asaltante. Hacia el final de la partida los nipones consiguen destruir la octava step de enemigos, con lo que logran su condición de victoria. A partir de este momento los americanos sólo pueden empatar, en el mejor de los casos. Conscientes de ello los marines se lanzan a un ataque a la desesperada con todas sus fuerzas. En el último turno consiguen controlar dos de los campos atrincherados y situar 22 steps no desmoralizadas dentro de la zona que tenían como objetivo. Por tanto, los marines han conseguido empatar "in extremis", en uno de los combates más ajustados y emocionantes que recuerdo. |
| 0 Comments |
| Punished For Sure | ||||||||||||
|---|---|---|---|---|---|---|---|---|---|---|---|---|
The US has to take a stretch of road from north to south on the map. The Japanese are dug in and have heavy guns with infantry support. The US tried to mass in the north and turn the Japanese flank, which they did. The northern half of the map was taken fairly easily, but the Japanese guns were causing heavy losses, especially among the amtracs, which were very helpful in boosting the Marines assault FP. Even with air support though, the US could not clear the road or take a second entrenchment. The Japanese threw suicidal counterattacks (that worked), and hel the second entrenchment and the southern end of the US objective. The Japanese suffered very heavy losses and the US 11 steps. Japanese win. |
||||||||||||
| 0 Comments |
| Saipan, scenario five: Punishment on Yellow Beach | ||||||||||||
|---|---|---|---|---|---|---|---|---|---|---|---|---|
Disclosure, I am the Designer and feel all my scenarios fall into the range of 4-5, 90-100% or I wouldn’t have created them, so take my ratings with a grain of salt! The only reason any are a 4, is because they are more difficult to make from design to development. Saipan, scenario five: Punishment on Yellow Beach Mixed Japanese heavy guns of both the Army and Naval emplacements with Infantry support are assaulted by Marines and some Army LTV A’s and Naval Air-support. Both sides have different victory conditions but the trick to this scenario is achieving yours while denying the enemies. The Americans enter the battlefield either on the beach or water but must move in fast to assault all those big Japanese guns, the Americans spread out on a broad approach which exposed too many units to begin with but too late now! The Japanese have clumped together in two defensive areas again maybe a mistake on their part but again too late now! The first air strike against a Japanese gun entrenchment resulted in a dice roll of 12 with 28 points of direct fire with a +2 modifier for an artillery target but a -2 with the entrenchment target but the end result was still a 2X, totally wiping out one large gun. Not everything went the Americans way either, losing an Infantry loaded LVT and some LVT A’s and a few Infantry steps as well. But in little time the Americans had control of two entrenchments and had over 20 steps on or east of the main road but they also lost 9 steps. Both sides achieved a victory, resulting in a draw. Looking back, I was not happy with my American attack approach or my Japanese setup defense. This scenario has a small margin of error for either side to win out right, and more thinking in the details to make this puzzle workout in one side or the others favor. Next time, it will be more interesting to see if I can do better! |
||||||||||||
| 0 Comments |
| Heartbreaker |
|---|
|
This was a really nice puzzle of a game. The Marines need to preserve their force while knocking out entrenchments, always a tough task. It is particularly difficult when you don't have artillery to pound the trenches with first. It is even harder when a significant part of your force's firepower relies upon lightly armored LVTs, and the enemy has heavy AA and artillery in the area, well sited on hills overlooking the battlefield with few blind spots. In my play, the Japanese positioned their three trenches in an area of open ground and light jungle just behind the north-central beach. Further north and farther behind, some Heavy AA and a company of mortars had good visibility covering the trenches. To the south east, another big hill with artillery and AA on it could also cover the trenches. The Japanese infantry occupied the trenches and a second position to the south, covering the flank and southern approaches to the trench complex. The Marines chose to attack in two forces, one in the far north to take one trench and silence the covering guns on the northeast hill, and a larger force to attack in the central beach area and block the Japanese units to the south. The plan worked very well, with loaded LVTs lurking in the jungle and cagily approaching the trenches. By turn 2 the first marine units were ready to begin the trench attack, unloading before exposing themselves, but the LVTs stuck around to lend their firepower. By turn 4 two trenches were captured and one gun silenced, for the loss of 4 steps of LVT-a1s and -a4s, and 3 steps of LVTs. So they were just under their step loss limit, they had accomplished their objectives, they had pulled back all their LVTs into positions where they were safe from the remaining Japanese guns. All they had to do was ride out any counterattacks from the scattering of Japanese infantry remaining and artillery strikes. Unfortunately a lucky Japanese bombardment killed a Marine step and turned a very successful American attack into a draw. |
| 0 Comments |
| 50th Game Report | ||||||||||||
|---|---|---|---|---|---|---|---|---|---|---|---|---|
And still it holds true, the best way to have a win is to really read the victory conditions. The Japanese set up 2 of the heavy guns on the southern hill facing the western edge and entrenched, with the third gun, the Japanese army gun, entrenched on the smaller northern hill, again facing the shore. Japanese outposts were spread out between the two hills, with the Major holding the village with one platoon, a security platoon at northern and southern guns and the HMG with the remaining gun. Intent was to not only have direct fire at targets but to have at least somebody each turn to call in OBA. Marines decided to land fully on the northern half of the board and got troops across the road and into the area northwest of the road quickly. A strong force assaulted the Japanese entrenchment on the northern hill after hill a brief softening up by direct fire and air assets, but the entrenchment was extremely difficult to take, and wore down a lot of Marine assets for several turns before a few good die rolls destroyed the gun and demoralized the infantry and leaders with it. Direct fire from the southern hill was ineffective as the Marines stayed out of sight as much as possible, and several Japanese troops died trying to keep the Marines in sight for OBA missions. In the end, it looked like a good US win, the Marines having stopped taking losses at 7 steps, and having taken the one entrenchment and having more than 20 steps inside the northwest area of the road. And then I found that one line. Control 2 or more entrenchments. Well, it is a good scenario, and there was a more than fair chance for the Marines to move on to the southern hill and take one of the entrenchments had I remembered the full details of victory conditions. So, with the Japanese not taking 8 or more steps of Marines, and the Marines not controlling 2 or more entrenchments, game ends a draw. Good scenario. And a good 50th game of PG. |
||||||||||||
| 0 Comments |
| Punishment on Yellow Beach or Taking the Medicine |
|---|
|
The Allies set up on the 20 meter hill in the northeast with entrenchment in triangular mutually supporting positions. The SNLF were on the right flank and the artillery and mortars were dug in behind the hill. The Allies advance and loose 5 steps right off the bat, mostly LVTs. Despite this the Allies infantry gain assault positions and begin the dirty business of digging the Axis out. The Marines then ground the Axis down with assaults while suffering repeated body blows in return. By 11am all entrenchments were taken but the Allies had lost 10 steps in the process and were nauseous from all the punishment. The Rikusentai collapsed at 1030 and both the Axis artillery and flak rout. But it did not matter because the Allies had lost those 10 steps and despite having inflicted 58 step losses, were feeling a bit queasy. It was like drinking Castor oil. It will make you better but it is hard to swallow. |
| 0 Comments |
| Bipolar | ||||||||||||||
|---|---|---|---|---|---|---|---|---|---|---|---|---|---|---|
Let's start by saying that, if played conservatively by both sides this scenario will come out a draw. The Japanese will be deployed in one or two carefully established bases which will be designed to provide plenty of sightlines and ample fire possibilities to increase the likelihood of exacting casualties from the Americans. The Americans will advance cautiously, keeping their flamethroweres away from Direct Fire until the last moment and then assault into the entrenchments using the flamethrowers to eliminate the first fire and the firepower of the general Marine units to clean up the rest. If anything the scenario leans slightly to the American side. Unless, of course, the American player decides that once the losses are too high that you might as well engage with your armor. Then you end up losing so many LVT4s that you don't have 20 steps within the bounded area, like me... Daniel placed his Japanese in one large entrenched camp on the hill in the southeastern corner of the objective area. It was well sited to provide for good fire lanes into the fields, making a direct approach, across the objective area a poor choice. I landed in three spots, one well north of the Japanese camp, one directly to the west and one to the south. The group in the south moved to get onto the less defended are of the hill with the idea that they would be the force to engage the Japanese guns. Once the guns were involved in assaults the armor could move up. The force in the center was to take the village at the base of the hill and use that as a covered marshalling area for the assault on the entrenchments. The flamethrower hid nearby, mounted in an LVT4 out of sight of any Japanese waiting for the chance to advance and dismount to facilitate the assault on the entrenchments. The third force was to demonstrate in front of the Japanese base to draw fire. For the first several turns the plan was working quite well, although annoyingly my Marines in the demonstration force had feet of clay and failed several morale checks from artillery fire. I then made the error that precipitated the fall. I left some of my LVT A4s in range of the AT guns and watched as they turned into a flaming pyre. Having drawn the fire of the AT guns (the SNLF ones) I decided that my losses were too high and to get the show on the road. This was a rash decision as I had already been able to climb the mountain, take the peak and was developing the artillery position (my naval air assets were virtually worthless in the jungle, unfortunately), the flamethrower aided assault was prepared to move forward and would take the entrenchments and the demonstration force had drawn sufficient attention to enable the other two forces to get into position. To cut to the chase I decided to use the LVT4s for additional firepower. This led to a semicircle of flaming wrecks surrounding the Japanese base. In the end I had 19 undemoralized steps in the objective area and one disrupted reduced Marine step one hex away on the final turn. I had easily taken the two entrenchments and could possibly have taken out the entire Japanese position had I the desire but the late game revolved around recovery and maneuver to acheive the victory condition. Unfortunately for the Americans, but fortunately for the scenario balance statistics, that disrupted, reduced Marine (accompanied by the Colonel, no less) failed a morale check and became demoralized on the last turn, prior to activation, only one hex out of the objective zone. I moved from cautious to rash to cautious during the play and had I remained cautious and not let those tanks come in range I might even have won the scenario, but I didn't. The one significant oversight I made was in assaulting the SNLF guns I neglected to note the very high DF factor which permitted them to withstand the assault somewhat. Both Daniel and I felt that our play was such that we will be trying out some different things in solo play. The scenario is more a puzzle, though. As a ftf, shared play scenario I feel it lacks an opportunity for the Japanese player to be active. Mostly they will remain in base and fire along prepared fields of fire. The American has to put together a plan upon a quick perusal of the Japanese position. This is definitely a situation where the hidden unit option should be considered. As I mentioned previously, only my rash decisions and an inability to count to 20 led to the American defeat in this one. With some hidden units I believe the Japanese will have a real opportunity to win the game, or at least cause some fun surprises for the American. I rated it a "3" due to the high likelihood of a draw, however use of the hidden units may open that up substantially making it difficult or impossible for the American to acheive their victory conditions at all. I will try that out and see if a subsequent play increases the rating. |
||||||||||||||
| 0 Comments |
| Patience, Grasshopper! | ||||||||||||||
|---|---|---|---|---|---|---|---|---|---|---|---|---|---|---|
Played ftf with Matt W in 2.5 hours. As the Japanese commander, I felt it was very important how I setup my defense because I assumed I would not have many opportunities to counterattack. I surveyed the field the evening before the match and thought of three possible sites. Each had its pros and cons and I finally settled on the site just north on the trail at the board. I believe it was a reasonable setup but was not confident I could win this scenario. My strategy was very simple; stay put, shoot to kill and maybe assault if my troops have a local advantage. Very simple stuff, the Japanese do not have the firepower to do more than that. The Americans approached slowly onto 3 fronts, getting into position. I had a forward spotter and he called artillery onto a stack. When both platoons failed their morale check, I jokingly said American troops have low good order morale in ASL but recover. But this is PG and not ASL, and these Americans decided passing a morale check was an incredibly difficult task on this day. I think what happened next is Matt impersonated a young Caine and committed a few armor assets when he lost patience with his failed recovery attempts. The armor assets did serve to draw fire away from the carefully planned killer stack he moved towards my entrenchments but the cost in lost steps was very high. The killer stack, led by flamethrower unit, assaulted the first entrenchment on the 30 column and I had no response to it. I assumed it would take a second entrenchment, which it did easily, and then we would play it carefully to the end to ensure the draw. Only then did I notice the Americans did not have many units left. Matt still had to move one more step north of the trail to get a draw and I bombarded it until it was demoralized. Japanese victory! I rated this scenario a “3” because the Japanese do not have many decision points. I believe this one is a draw (likely) or an American victory (unlikely) if the Americans play patiently and only commit its armor assets late in the game, if necessary. I think this scenario is likely more interesting with hidden units if playing against another player. Being able to setup or surprise or two goes a long way towards disrupting the American timetable. Also, I think this one makes a good solo case study if playing. You setup the defense the same in 2 or 3 tries, and attempt different strategies with the Americans. I might do that actually because I don’t really understand the strategies to use in the Pacific. |
||||||||||||||
| 0 Comments |
| Punishment for the Japanese | ||||||||||||
|---|---|---|---|---|---|---|---|---|---|---|---|---|
With the new brighter Saipan maps in hand, it was back to give some of the scenarios a try again. I will make a pitch that the brighter maps are better than the old as you will be able to see those slight changes between light and regular jungle as well as see the hidden trail on one of the boards. I picked this scenario as it looked interesting as the Japanese have some very deadly AT guns to go up against the thin skinned American tanks as well as American tanks, FLM units and entrenched Japanese and it looked to be interesting. I thought this might be able to give a American Marines a run for their money. But once I did the leader draw, the hope had faded on this as I was surprised at the leader draw. The Americans were graced with 4 leaders with morale 10 or greater and with either bonus of 2-1 or 1-2. These were all at General, Major and Captain levels as well. Come to find out there is a good chance to getting some super leaders for the Americans in Saipan. I will need to remember this with any FtF games with this ;-) Well, after seeing this, I figured the Japanese would need some sort of good defense. Mass firepower would be key as the Americans were not going to stop for morale checks. Two approaches I thought about was to disperse the entrenchments behind thick jungle to try to strip off the American tanks in the jungle and slow the Marines or bundle them together to mass the firepower on the Americans as they advanced. I picked the later as the Japanese would be able to "3 stack" with lessor effects as the Americans did not have OBA. The question was where, and the best spot was the hill on the south east side of the board. On the hill the Americans would need to attack up hill as well as giving the Japanese AA guns good fields of fire. So the entrenchments were placed and stacked up with HMG and INF while the mortars and guns were massed behind the hill for an impressive 60 BF when needed. The only problem was they did not have enough to cover the flanks of the hill and that would be left to lone INFs and a SER. For the Americans, they setup on the beaches trying to take advantage of cover as the Japanese will have spotting on them starting on turn one. The tanks and LVT-4 take cover in or behind the jungle hexes next to the beaches. One group in the center of the board and one group around the village on the southern beaches. The southern group will try to get through the jungle and attack on the weaker flank while the main force will keep the center and northern Japanese forces occupied. The advance started with the Americans in the south. They move through the cane fields and get to the light jungle just south of the hill. Long range Japanese fire actually had and effect as a basic morale check is failed by one of the Marines. Maybe the morale would be a factor and the leaders would not be as big a help. Unfortunately, no this was the only failed morale check by the Marines. Back to the advance, the Americans reach the base of the hill and look to advance on the lone INF and SER dugin in the light jungle. The Marines are able to close on the Japanese and are able to reduce both and force them to demoralize and retreat, but one Japanese counter-attack is able to reduce a Marine INF. The Japanese are forced to commit the reserve INF to help hold the line, but the damage has been done and a way to the Japanese guns is cleared. To the north the American main force moves down the road and through the light jungle toward the cane fields. The Japanese dont have clear shots but their OBA comes down with no effect. The Japanese unleash the 60 BF but no step losses occur only morale checks and the Americans easily pass the morale 8+ checks. These guys are really tough to break. The tanks keep to the back as the Japanese AA guns are too strong at this point to advance and will let the grunts take the punishment. Slowly the Americans begin to cross the cane fields and the Japanese respond with HMG and AA fire only getting morale checks and the Americans press on. They are able to advance up the hill and get behind the Japanese. A quick assault and the Americans have cleared the northern flank. At this point the naval airpower arrives to help with the attacks. There first passes they cannot find there targets, but on the second pass the Hellcats and Wildcats find the Japanese guns scoring a double kill on the SNLF 105 and a 81mm mortar. It must have been a napalm attack with that type of destruction. This reduces the Japanese capabilities quite a bit. Next a Marine platoon moves in to finish them off. This demoralizes the remaining mortars and they flee and locking the army 105mm with the marines. That ends the on board threat to the Americans. The next step is to have both American flank attacks move on the entrenchments. This was a little more bloody for the Americans but not much. Two groups of 30+ DF advance and open fire on the entrenchments and some of the remaining Japanese begin to wither and the Americans assault. After three turns of assaults the Marines have the two required entrenchments with the loss of one Marine platoon. At this point the Japanese have no chance to win and the Americans have the game. It was a bit of a lopsided victory for the Americans with only 3 steps lost while the Japanese lost 12 INF steps, all the mortars and AA guns as well as the 105mm guns. I found myself liking the scenario, but disliking the overwhelming firepower of the Americans and the fact the most of their morale checks there was a low chance of failure. I believe the worst morale check they had to roll was a M2 with a reduce platoon but a 1-2 leader was right there to help. So in the end it left me wondering how to balance this out in the next scenario I play. |
||||||||||||
| 0 Comments |
| Festung Yellow Beach |
|---|
|
This was an interesting little puzzle, but it seemed like there is an optimal solution for placement of the Japanese entrenchment "Festung" that made it pretty much impossible for the Americans to meet their victory conditions or prevent the Japanese from meeting theirs. I set up the three Japanese entrenchments on the hill with the 40-meter peak, at the 20-meter level adjacent to the village at the base of the hill. I emplaced the guns with the high anti-tank factors with views overlooking the beach, so that if the Americans came in close to the hill the LVTs would get shot up, which is pretty much what happened after I decided to set up the Americans that way. Some jungle and marsh also helped to impede approaches to the hill. I had an option of landing the Americans far from the entrenchments, where some jungle cover would protect the landing transports. If I had set up down there, I could march the Marines overland to get to the hill while letting the air units whittle down the guns so that the transports and armor LVTs could then approach. The other benefit of that approach would have been to get everyone "onside" of the road that the Americans needed to be north/east of. By placing the festung mostly "offside", it meant that the Americans had to take two entrenchments AND THEN move northeast to get onside. As it was I was able as the Americans to contest two entrenchments at the end of the game, but couldn't take them, and I only had 13 steps "onside". At the end I barely had enough American steps on the whole map to satisfy the 20 step onside victory condition (about 23 or 4 I think) anyway, even if I had enough time to get them onside. It didn't help the Americans that the Japanese had significantly hotter dice, but I don't think that was the ultimate reason that Japan won. So I learned quite a bit about setting up a defense, and enjoyed the scenario, but what I see as an issue with the victory conditions limits it to a "3" rating. |
| 0 Comments |