
|
Gialo Oasis South Africa's War #10 |
||
|---|---|---|
| (Defender) Italy | vs |
Britain
(Attacker)
India (Attacker) New Zealand (Attacker) South Africa (Attacker) |
| Formations Involved | ||
|---|---|---|
| Britain |  |
Long Range Desert Group |
| India |  |
3/2nd Punjab Regiment |
| Italy |  |
VIII Battaglione Bersaglieri |
| South Africa |  |
6th Armoured Car Regiment |

| Total | |
|---|---|
| Side 1 | 0 |
| Draw | 0 |
| Side 2 | 3 |


| Overall Rating, 3 votes |
|---|
|
3.33
|
| Scenario Rank: --- of 913 |
| Parent Game | South Africa's War |
|---|---|
| Historicity | Historical |
| Date | 1941-11-24 |
| Start Time | 06:30 |
| Turn Count | 60 |
| Visibility | Day & Night |
| Counters | 63 |
| Net Morale | 1 |
| Net Initiative | 3 |
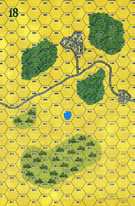
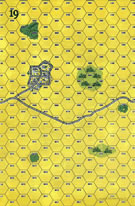
| Maps | 5: 1, 18, 19, 8, DR5 |
| Layout Dimensions | 88 x 58 cm 35 x 23 in |
| Play Bounty | 165 |
| AAR Bounty | 171 |
| Total Plays | 3 |
| Total AARs | 1 |
| Battle Types |
|---|
| Airfield Control |
| Rural Assault |
| Urban Assault |
| Conditions |
|---|
| Entrenchments |
| Off-board Artillery |
| Randomly-drawn Aircraft |
| Terrain Mods |
| Scenario Requirements & Playability | |
|---|---|
| Desert Rats | Maps + Counters |
| Eastern Front | Maps |
| Road to Berlin | Maps |
| South Africa's War | Base Game |
| Introduction |
|---|
|
To the south of Operation Crusader's battleground, a force of mixed nationalities moved out across the harsh ground to attack Axis airfields, escorted by the famous Long Range Desert Group. Their prime objective was the oasis of Gialo, which had a fort and an airfield. Unknown to Brigadier Denys Reid who led the raiders, a full battalion of elite Bersaglieri had been detailed to protect the key site. |
| Conclusion |
|---|
|
The Italians managed to hold off the Allied advance throughout the day, but when the sun set the Indians took the town with a bayonet charge and resistance crumbled quickly afterwards. A supposedly elite battalion, the VIII Bersaglieri had been detached from the Trento Division for this isolated post and did not fight nearly as well as its two sister battalions then engaged just outside Tobruk. Despite long experience in the region fighting Sanusi guerillas in the early 1930's, the Italians do not seem to have expected a thrust across the deep desert, believing the Allies lacked their own hard-earned skills. |

|

|
|---|
| AFV Rules Pertaining to this Scenario's Order of Battle |
|---|
|
| Army |
|---|
|

| Army |
|---|
|


| Regio Esercito |
|---|
|


| New Zealand Army |
|---|
|


| Army |
|---|
|


| 1 Errata Item | |
|---|---|

|
All Bren carriers should have a movement value of 7. (Shad
on 2010 Dec 15)
|
| South Africa’s War, scenario #10: Gialo Oasis | ||||||||||||
|---|---|---|---|---|---|---|---|---|---|---|---|---|
I played another scenario outside the box of the normal PG realm and headed to East Africa 1941 this time. This scenario uses 4 standard maps plus 1 large desert map, which don’t line up exactly but you can make them work without too my difficulty. The Allies include: South African, Indian, New Zealand & British units against the defending Italians. The Allies have 5 victory objectives and must obtain 4 out of five for a major victory and 3 out of five for a minor victory, below this and Italians start receiving victory levels. The Italians have a force of mainly Infantry and some 47mm AT-Guns, 20mm AA-Guns & 65mm Guns but the entrenchments and the one Fort with a -3 modifier is the real asset. The Allies have Infantry with Indian APCs: (ACW) India Pattern Carriers, British Brens and two types of South African Armored Cars: MHII & MHIII. They also have three levels of morale by nationalities and some off board artillery. Both sides have some random air-support. But most important for the Allies, the Surrender Rule is in effect. The Allies come on the map from three directions and the Italians were only defending on two maps, so instead of making my typical mistake of trying to go after too many victory objectives at the same time, I let my forces cover the distances of the maps and concentrated on one objective at a time in force as I had 60 turns, so no time pressure. In the beginning, the Allies decided to tackle the easier airfield hexes and targets on map 19 before hitting the more difficult entrenchments, town hexes and Fort on map 18. The only highlight of this selection of the battle for the Italians, was that they took out a loaded Bren Carrier, which had a full step Indian infantry unit and a British Leader. Those Italian 47mm AT guns are very dangerous in 1941 especially against APC unit types with 0 Armor factors and ACs. The Allies cleared the Airfield North, thanks mostly to the Surrender Rule. The next phase was for the Allies to regroup and hit all the difficult targets in the south. They hit the town hexes without too much difficulty but then came the Entrenchments and that Fort with the -3 modifier, all manned with Italian leaders with higher morale and morale modifiers. Not to mention another 47mm AT-Gun. This was murderess for the Allies, that 47mm AT-Gun took out step after step of Armored Cars & APC’s that tried to request a surrender and these Fortifications took out many steps of Infantry with Fire-first in assaults. This quickly eliminated one of the Allies victory conditions of not losing more than 10 steps. At first I thought about just giving up the idea of a major Allied victory and settling for a minor victory of just three conditions achieved, as I didn’t know if I would have enough Allied strength left but I pushed forward and thanks to the surrender ruler finally overcame the Fort and entrenchments, but at a much higher price then historically I am sure. The Allies had a Major Victory but not an easy one! Another fun scenario but without the Surrender Rule, this would have been a much closer match. |
||||||||||||
| 0 Comments |