
|
South African Armour South Africa's War #1 |
||
|---|---|---|
| (Defender) Italy | vs | South Africa (Attacker) |
| Formations Involved | ||
|---|---|---|
| Italy |  |
193º Battaglione Coloniale |
| Italy |  |
8º Gruppo Dubat |
| South Africa |  |
1st South African Light Tank Company |
| South Africa |  |
Duke of Edinburgh's Own Rifles |

| Total | |
|---|---|
| Side 1 | 0 |
| Draw | 1 |
| Side 2 | 6 |


| Overall Rating, 7 votes |
|---|
|
2.86
|
| Scenario Rank: 791 of 913 |
| Parent Game | South Africa's War |
|---|---|
| Historicity | Historical |
| Date | 1941-02-14 |
| Start Time | 07:00 |
| Turn Count | 30 |
| Visibility | Day |
| Counters | 73 |
| Net Morale | 1 |
| Net Initiative | 1 |
| Maps | 3: 3, 4, 6 |
| Layout Dimensions | 84 x 43 cm 33 x 17 in |
| Play Bounty | 151 |
| AAR Bounty | 165 |
| Total Plays | 7 |
| Total AARs | 2 |
| Battle Types |
|---|
| Airfield Control |
| Bridge Control |
| Inflict Enemy Casualties |
| Rural Assault |
| Urban Assault |
| Conditions |
|---|
| Entrenchments |
| Hidden Units |
| Off-board Artillery |
| Terrain Mods |
| Scenario Requirements & Playability | |
|---|---|
| Desert Rats | Counters |
| Eastern Front | Maps |
| South Africa's War | Base Game |
| Introduction |
|---|
|
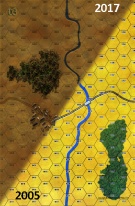
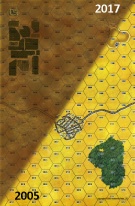
At the mouth of the Juba River, the fortified village of Gobwen boasted one of the few bridges over the Juba and an airfield as well. Twelfth African Division ordered 1st South African Brigade to seize both objectives with a dawn attack, and allocated South Africa's lone tank company to support them. Brigadier Dan Pienaar's men left their encampments at about 0345, but reached their starting points late and the attack went off in full daylight. |
| Conclusion |
|---|
|
The South African attack was slowed by ambushes laid by the tough Somali Dubat irregulars, but backed by tanks they finally stormed the town and captured the bridge. The Italian Colonials began to lose heart, and the town of Jumbo on the opposite bank eventually fell as well. The Juba line was collapsing, and Gobwen yielded many abandoned vehicles and a large stockpile of ammunition. |

|

|
|---|
| AFV Rules Pertaining to this Scenario's Order of Battle |
|---|
|
| Regio Corpo di Truppe Coloniali |
|---|
|


| Regio Esercito |
|---|
|


| Army |
|---|
|


| Somali defiance: thorn forests and boogeymen. | ||||||||||||
|---|---|---|---|---|---|---|---|---|---|---|---|---|
It had been a while since I last played with suicidally brave Italian colonials and they didn't have the best track record in past 'Desert Rats' scenarios but here in Jubaland they did quite well holding out against overwhelming numbers of South Africans invading their homeland. This should have been a relatively easy victory for South Africa; not just because they had an overwhemling advantage in numbers but that the colonials had poor morale overall ( apart from from one 75mm gun) and were prone to surrender. The South Africans are charged with keeping control of a town east of the Juba river or the bridge and have to take all of the airfield hexes as well. Taking the bridge is essential as it was assumed that the river was a major one although nowhere in the scenario book does it mention whether it is major or minor, nor are there any crossing numbers listed. The Somali colonial force has to place it's Bande units east of the river on the westernmost map and are allowed to begin hidden as long as they are placed in thorn forest hexes. Other than that, the rest of the colonial units have a lot more flexibility with their deployment on the central and eastern maps and are allowed to place three entrenchments wherever they wish there and have all other units dug in. I chose to place 3 FAN (INF) in the town, triple stacked but had no intention of holding it for long but just to delay South African forces as the town is surrounded by thorn forests and foot units (except for Bande) and mechanized units can only move one hex per turn through them. At the east end of the bridge I placed one of the entrenchments with two MIT(HMG)units. two spaces behind, on the west side of the bridge I placed the second entrenchment with the 75mm and one FAN, establishing a roadblock. The remaining 6 units of FAN were placed at the airfield dug in along with 2 of those units inside the third entrenchment. The airfield hexes give a natural (-1) defense against direct fire so this increased the dug-in units defenses to (-2) and gave the entrenched ones a (-3) modifier. This defensive deployment actually worked keeping over half the defending force at the airfield and especially with one of the entrenchments there. Another thing that helped the Somalis was that they recieved a good mix of Italian leaders. 3 out of 4 leaders had a morale modifier which was well recieved as the colonial morale was at 7/5 on their own. From 07:00-07:45 South African forces coordinate as best they can approaching the eastern town and bridge, all the while aware that at any moment Dubat irregulars (Bande) may charge out from the thorn forests at any moment to exploit any weaknesses in the rearguard areas. The Dubat units are patient though and wait for the right moment to charge at the Springboks. The first South African casualties come from the FAN units left to defend the town and with opportunity fire eliminate a step of advancing INF at 08:00/turn 5. Soon after, at 08:15 the bande make their first charge. South African opportunity fire from MkII tanks disrupts one unit along with the tenente but three BAN still get through and successfully demoralize the two INF units. This early success for the colonials was shortlived however but it did slow the advance towards the bridge down. Soon the bande would scatter after failing the next assault round and two of the defending town units were sent fleeing across the bridge after failing to recover from demoralization. Eventually the town was secured at 10:00/turn 13. At 10:15/turn 14 an assault is made on the bridge entrenchment and at 10:45 the Traansvaal Scottish succeed in taking it and are the first to cross over to the west side. All that was left for the South Africans then was to take the airfield and contend with a roadblock while protecting the bridge. This is where things just stop working. The units in the roadblock entrenchment not only refuse to surrender but rally back to good order. This roadblock would also hold out along with the 75mm until the battles end. The Dubat bande units had also regrouped and at 12:00 another charge was made on the MkII's and they succeed in eliminating a step of them, most likely by flipping them over and tossing some red devil grenades underneath. Once again the bande are driven off back to the thorn forests or town hexes which had been abandoned but they were good for two good calvary charges which was not so bad for horseless cavalry units wearing white dresses. Things get more bloody for the Springboks at the airfield. The best Italian leader, a Tenente with a (10-1-1) rating combined deadly opportunity on advancing units there. Though the three defended airfield hexes would be entirely surrounded, the South Africans would continue to take unacceptable losses. Both the dug-in positions fell from assaults eventually but the entrenchment would not give in. Time was starting to run out for South Africa and it seemed like the best time to assault was at 13:00 while the defenders were disrupted. Unfortunately it doesn't work. Not only do the attackers fail to get any results but they are actually backhanded by the disrupted and disgruntled defenders with 2 of 3 of the attacking units demoralized. The next turn those defenders are restored to good order as well. By 14:00/turn 29 the situation is so desperate that South Africa calls in artillery fire in on their own troops in the assault hex in hopes that the entrenched defenders will at least demoralize and hopefully surrender. This goes horribly wrong and the only damage is done to a South African HMG unit which loses a step and is demoralized. 15 more minutes pass, nothing changes and the battle ends in a draw. There were too many Italian colonial step losses compared to South African to claim a victory. losses were: Italian: Maggiore(8-0-1), 12 steps of FAN (4 surrendered), 4 steps of MIT and 3 steps of BAN. Soth African: 7 steps of INF, 3 steps of HMG, 1 3-inch and 1 step of MkII. I'll just say this was quite an adventure to play and have rated it high with a '4'. I never had so much fun playing with colonial units before. I loved the terrain mods as well, thorn forests remind me of something from middle earth. There is a lot going on in this scenario and was really surprised that this ended in a draw. An Italian victory is probably highly unlikely though. I am looking forward to the next Somaliland scenario from 'South Africa's War' which for me will be 'Battle on the Equator'. |
||||||||||||
| 0 Comments |
| South Africa’s War, scenario #1: South African Armour | ||||||||||||
|---|---|---|---|---|---|---|---|---|---|---|---|---|
South Africa’s War, scenario #1: South African Armour This looked like and interesting scenario and I got to use my homemade airfield counters and one of my homemade Italian Wagon counters as well. The South Africans have more then twice the unit count plus armor and off-board artillery. The Colonial Italians have a 75mm gun, some entrenchments and a few hidden BAN units to go with their FAN Infantry and a few Machine Gun units. However, they have to defend a Town, a Bridge and a huge airfield, which will really spread their units out. I put my Colonial Italians entrenchments blocking the bridge on either side and by the town, hoping maybe to slow the South Africans down before the Airfield, their main objective. I am not sure what good the Hidden BAN Infantry units did, as the South Africans didn’t come close to the thorn forest and to engage the South Africans, the Somali Dubat had to leave their hidden positions to fight, which didn’t go over well. The South African dealt with them, then handled the entrenchments, the Town and then finally the Airfield. The only real problem they had; was at the bridge. The South Africa won this without too many problems but I am not sure my Colonial Italians defensive positioning was up to par! South Africa losses: 1 step of MKII & 2 Steps of Infantry. Colonial Italians losses: 17 INF, 1 75mm Gun, 2 HMG, 1 Wagon & 2 Leaders. |
||||||||||||
| 0 Comments |