

| Total | |
|---|---|
| Side 1 | 1 |
| Draw | 2 |
| Side 2 | 1 |


| Overall Rating, 4 votes |
|---|
|
4.25
|
| Scenario Rank: --- of 913 |
| Parent Game | Road to Dunkirk |
|---|---|
| Historicity | Historical |
| Date | 1940-05-23 |
| Start Time | 14:15 |
| Turn Count | 10 |
| Visibility | Day |
| Counters | 45 |
| Net Morale | 1 |
| Net Initiative | 0 |
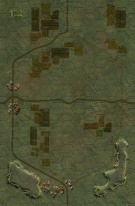
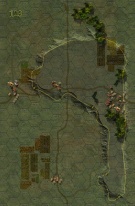
| Maps | 2: 122, 123 |
| Layout Dimensions | 56 x 43 cm 22 x 17 in |
| Play Bounty | 151 |
| AAR Bounty | 171 |
| Total Plays | 4 |
| Total AARs | 1 |
| Battle Types |
|---|
| Exit the Battle Area |
| Inflict Enemy Casualties |
| Meeting Engagement |
| Road Control |
| Urban Assault |
| Conditions |
|---|
| Reinforcements |
| Severe Weather |
| Smoke |
| Terrain Mods |
| Scenario Requirements & Playability | |
|---|---|
| Road to Dunkirk | Base Game |
| Introduction |
|---|
|
The British 3rd Royal Tank Regiment disembarked in Calais harbor on 22 May amid a scene of utter devastation. The docks were cluttered with abandoned rations, the dockside cranes had no electricity, the workers were exhausted, the ship’s crew went on strike and the captain tried to leave port without unloading – a situation resolved by a 3rd RTR officer holding a pistol to the ship captain’s head. Once ashore, Lt. Col. Reginald Keller commanding 3rd RTR faced shaky supply arrangements, weak collaboration with the French and a motley collection of partially-assembled tanks that were either unfamiliar or obsolete – or both. Handed an array of contradictory orders, Keller eventually decided to move out along the road to Boulogne with all the tanks available. |
| Conclusion |
|---|
|
While assembling his squadrons, Keller received reports of a German column moving from the south-west. This was the leading edge of 1st Panzer Division under Oberst Kruger. The British moved off in a drizzling rain to try to pass ahead of the Germans. They had not gone far when they sighted and evaded two light tanks, but soon they spotted a large mechanized force on top of a wooded ridge. A confused, chaotic and rambling battle followed in the open fields, by-roads and sunken tracks near the village of Hames-Boucres. Thanks to their numbers and field artillery, the Germans gained the upper hand and the British soon withdrew, some of their machines putting down a smoke screen as cover. Although losses were about even on both sides - about 10 vehicles destroyed each - the British were in a state of shock realizing the enemy was so strong and so close. |

|
|
|---|
| AFV Rules Pertaining to this Scenario's Order of Battle |
|---|
|
| Army |
|---|
|


| Heer |
|---|
|


| 3 Errata Items | |
|---|---|

|
Two 105mms (ID#s 1204, 1205) have "16-31" fire values in black (direct fire), when they should be in white (indirect fire). (Shad
on 2010 Dec 15)
|

|
The reduced direct fire value of the Heer HMG became 5-5 starting with Fall of France. (plloyd1010
on 2015 Jul 31)
|

|
All SPW 251s have an armor value of 0. (Shad
on 2010 Dec 15)
|
| Road To Dunkirk, scenario #20: Fresh off the Boat | ||||||||||||
|---|---|---|---|---|---|---|---|---|---|---|---|---|
Road To Dunkirk, scenario #20: Fresh off the Boat At first I wasn’t sure about this scenario but it turned out to be a blast, no pun intended. There are a lot of decisions for the German player, do I simply try an exit units, giving up British objective hexes but if I lose too many steps before that I might not have enough points compared to them. Both sides get points for eliminating enemy steps but only the British get town and crossroad victory points and only the Germans get exit unit points. Forget the far northern town hexes, as I assume them to be in British control. Also the scenario say to ignore 40-meter elevation hexes and sense there are only 20-meter hexes, I’ll assume it meant to ignore those. The Germans have two combat groups, one arrives on the first turn and the other on turn two. The British start on the northern map, map 122. First initiative means a lot each turn, as this is a mobile or movement heavy scenario. The Germans activated first by dice roll and send two Pz II units to block the British from entering map 123 from map 122 as their Infantry units try to truck east as fast as they can. The British in turn, try to send a Dingo Armored Car unit around the flanks to block those German units. On turn two a larger German force enter the action. The British only have four Tank Leader, so are kind of handicapped to four groupings plus an independent Armor car unit. Also, only the German armor have efficiency, so even though the British have more armor, it feels like the Germans have more than they actually do, being able to fire twice. The German decide to keep control of the many of the town hexes on the southern map as well as the crossroad there and exit infantry and weapons units off the eastern edge and engage the British armor, as now they have some Pz IIIE units and a big 105mm gun unit. The British try to block German units, control victory objectives and fight the enemy units when possible, so they have a balancing act and many decisions to make as well and can’t just sit back, as they will not have enough points. I won’t go into all the details and combat situations, as there were many, including a German stack of units; two Infantry, two halftracks and a leader who assaulted a British A10 armor unit on the way out, rolling a two on the dice. In the end, the Germans had 18 point for eliminating British steps and 14 points for exiting units off the east edge of the map for a total of 32 points. The British had 10 points for eliminating German steps and 11 points for controlling victory objective hexes for a total of 21 points. Comparing the totals, the Germans win a Major Victory. With the above mentions, it really was closer than it looks and a few dice rolls differently and a few activations/Initiative dice rolls going the other way and the British could have won. The scenario went back and forth and was interesting and fun to play, with lot of decisions and possibly many outcomes. With only 10 turns, it plays out pretty fast and hit the spot for me tonight! |
||||||||||||
| 0 Comments |