

| Total | |
|---|---|
| Side 1 | 7 |
| Draw | 3 |
| Side 2 | 1 |


| Overall Rating, 10 votes |
|---|
|
4.1
|
| Scenario Rank: 78 of 913 |
| Parent Game | Road to Dunkirk |
|---|---|
| Historicity | Historical |
| Date | 1940-05-14 |
| Start Time | 14:45 |
| Turn Count | 15 |
| Visibility | Day |
| Counters | 74 |
| Net Morale | 0 |
| Net Initiative | 2 |
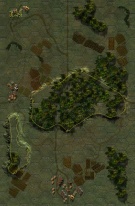
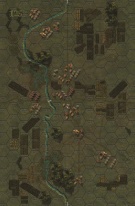
| Maps | 2: 124, 125 |
| Layout Dimensions | 56 x 43 cm 22 x 17 in |
| Play Bounty | 155 |
| AAR Bounty | 159 |
| Total Plays | 11 |
| Total AARs | 3 |
| Battle Types |
|---|
| River Crossing |
| Prisoner Capture |
| Conditions |
|---|
| Anti-infantry Wire |
| Scenario Requirements & Playability | |
|---|---|
| Road to Dunkirk | Base Game |
| Introduction |
|---|
|
Following a well-rehearsed maneuver, the BEF infantry divisions entered Belgium on May 10th and took up positions behind the Dyle River between Louvain and Wavre. While the infantry dug in along the river line, light tank companies were sent to the east to collect information and watch over the Cointet anti-tank obstacle line. Long files of refugees and battered Belgian troops fled to the west as the sounds of battle drew closer. All of the main bridges across the river had been destroyed except for one at each battalion boundary. |
| Conclusion |
|---|
|
At 1500 came the campaign’s first contact between British and German armored vehicles. One Pz JgI was destroyed but the combined force of German infantry and vehicles pushed the British armor back to the river. When 37mm AT guns joined the fray, the British soon lost one of their tanks along with one Bren carrier. The British tanks crossed the bridge at Florival just before their engineers blew it up. Later in the afternoon, further fire fights occurred between the advancing German troops and the last British infantry companies on the eastern bank of the river. At night a slow infiltration began all along the line. |

|
|
|---|
| AFV Rules Pertaining to this Scenario's Order of Battle |
|---|
|
| Army |
|---|
|


| Heer |
|---|
|


| 6 Errata Items | |
|---|---|

|
All Bren carriers should have a movement value of 7. (Shad
on 2010 Dec 15)
|

|
Two British infantry have their full strengths printed on the back. They should both be "2-3" when reduced. (Shad
on 2010 Dec 15)
|

|
The reduced direct fire value of the Heer HMG became 5-5 starting with Fall of France. (plloyd1010
on 2015 Jul 31)
|

|
Two German PzJr. 1 counters have their full strengths printed on the back, and reduced strengths on the front. (Shad
on 2010 Dec 15)
|

|
The morale and combat modifiers of German Sergeant #1614 should be "0", not "8". (Shad
on 2010 Dec 15)
|

|
The movement allowance on the counters in Airborne is misprinted. It should be "3." (rerathbun
on 2012 Jan 30)
|
| Rush to the Footbridges. | ||||||||||||
|---|---|---|---|---|---|---|---|---|---|---|---|---|
This is an excellent scenario; on e that makes PG shine. There are plenty of options for both sides and the brits have to conduct a good screen with their weak armor to have a chance. The Germans can attack in many ways I chose a main attack around the south side of the woods with a supporting attack going around the north end. At first the Brits did slow the Germans but losses to their armor finally caused the screen to collapse. I made a mistake in the Brit set up by defending the bridge too heavily and the Germans took advantage of this and went for the foot bridges. They were successful in getting across with only losing two steps. Decisive German victory. |
||||||||||||
| 0 Comments |
| Just pulled it off! | ||||||||||||
|---|---|---|---|---|---|---|---|---|---|---|---|---|
The British set up a defensive line EAST of the river, in the hopes that a retreat to the west bank would not be needed. The Mobile Forces set up on either side of the woods on board 124 with the idea of slowing down the German advance. At first the Germans were not aggressive enough and the woods held on board 124 for an hour and a half. The South end of the line collapsed first and the rest went into retreat shortly thereafter. That left a thin line along the town on board 125 fronting the bridge (carefully roadblocked) which held back the Germans. South of the town was another story, however. The Germans pushed back the British and left a gap in the line that the Germans quickly inserted their Bicycle Co.(Of all people!) into. It was here that the strategy of the British setting up on the East bank of the river was found to be in error. The British could not get back enough troops to the West bank to seal the gap and push back the Germans. The fact that they WERE on the east bank of the river made all the difference. A BAD Command decision! Game, set and match! |
||||||||||||
| 0 Comments |
| You Can't Win When You Don't Have Bullets |
|---|
|
All optional rules were used. And there lay the unhinging of the scenario. The British became hamstrung after rolling 3 and 4 on successive turns on Fog-of-Waar rolls sending them into a loglistics paralysis. Up to turn 8, the Brits were doing quite well. They had discovered how to use the LBoys AT. Although weak, the Boys weapon was supplied to almost all British units. Thus the entire army. By turn 8, the British had destroyed 3 German steps causing a loss of initiative. The German plan was to go around the big forest on board 125. However, the British moved their units up to bottleneck the Germans. If the game would have continued, I believe the British would have won. The 15 turn length also put pressure on the German plan. With the bottleneck, the plan went out the window. |
| 0 Comments |