
|
Rautenkranz Bridge Road to Berlin #61 |
||
|---|---|---|
| (Attacker) Germany | vs | Soviet Union (Attacker) |
| Formations Involved | ||
|---|---|---|
| Germany |  |
32nd SS "30.January" Grenadier Division |
| Soviet Union |  |
184th Guards Tank Regiment |
| Soviet Union |  |
4th Guards Cavalry Division |

| Total | |
|---|---|
| Side 1 | 5 |
| Draw | 0 |
| Side 2 | 0 |


| Overall Rating, 5 votes |
|---|
|
3.4
|
| Scenario Rank: 480 of 913 |
| Parent Game | Road to Berlin |
|---|---|
| Historicity | Historical |
| Date | 1945-04-16 |
| Start Time | 22:00 |
| Turn Count | 24 |
| Visibility | Night |
| Counters | 34 |
| Net Morale | 1 |
| Net Initiative | 1 |
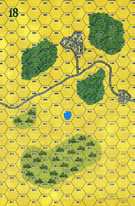
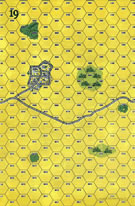
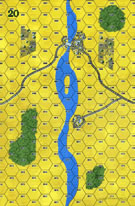
| Maps | 3: 18, 19, 20 |
| Layout Dimensions | 84 x 43 cm 33 x 17 in |
| Play Bounty | 94 |
| AAR Bounty | 153 |
| Total Plays | 5 |
| Total AARs | 4 |
| Battle Types |
|---|
| Bridge Control |
| Meeting Engagement |
| River Crossing |
| Scenario Requirements & Playability | |
|---|---|
| Road to Berlin | Base Game |
| Introduction |
|---|
|
The German stand at Wiesenau represented one extreme of fanaticism: the SS troops continued to counter-attack the Soviets in the town despite their lack of training and experience, at least as a formed unit. But fanatics are often hazy on details; behind the town, the bridge over the Oder-Spree Canal remained intact. The SS commander had probably hoped to leave a retreat route for his force, but the stand at Wiesenau did not cover all approaches to the bridge. Both sides realized this oversight at about the same time, and raced to grab the span before it was too late. |
| Conclusion |
|---|
|
The two sides reached the bridge at about the same time, and a confused firefight broke out in the darkness. After several hours of fighting the Germans finally pushed the Soviets back far enough to allow their engineers to wire and then blow up the bridge. |

|
|
|---|
| AFV Rules Pertaining to this Scenario's Order of Battle |
|---|
|
| Schutzstaffel |
|---|
|


")
")


| Guards |
|---|
|


| 3 Errata Items | |
|---|---|

|
The reduced direct fire value of the SS HMG is 5-5 in Beyond Normandy and Road to Berlin. (plloyd1010
on 2015 Jul 31)
|

|
Direct Fire values should be 5-1. Ignore misprints. (danradz
on 2011 May 04)
|

|
All Guards T-34/85 tanks should have AT fire values of 7-7. (Shad
on 2010 Dec 15)
|
| Road to Berlin, Scenario #61, Rautenkranz Bridge | ||||||||||||
|---|---|---|---|---|---|---|---|---|---|---|---|---|
The German Armor (Hetzer, Sdkfz 234/2 & the SPW250 with Engineer & Leader will always get to the Town east of the river and the bridge first, as they should setup in the Eastern board 18 town hex. The Soviet units will enter from the East edge of board 19, so even the T-34/85's won't make it before the German odd assortment of armor does. The German armor blocked the Russian armor from approaching the bridge and took out one of T-34/85's steps but on the next turn, the three remaining steps, took out both steps of Hetzer and both steps of armored car; SdKfz 234/2. In the next two turns, most of the German Infantry, coming from the nearest forest hexes on board 18 beat most of the Soviet Cavalry to the East side town hexes and reinforced the Engineer & SPW250 bridge hex with two more infantry units, not to mention the Stbunfr Leader counter. The remaining T-34/85's were taken out in foolish town hex assault without Infantry support and the Infantry Anti-Tank rolls were a real killer on the Russian armor. It took me 6 attempts to blow the bridge when I wasn't being assaulted. The first five, I rolled 0ne's believe it or not, each time, talk about frustrating! This gave the Soviets time to assault the bridge hex, but from only one hex away, with Cavalry. I have more Infantry units against their weaker Cavalry units, their only hope was to take out my Engineer but this proved too difficult, as he was never alone. On my sixth bridge blowing attempt by the Engineer unit, I rolled a six and it was game over, as the Soviet force had been mauled and had no was steam left. Both sides lost some Infantry/Cavalry steps but the Soviets took the worst of it and lost a leader as well. Other then the SPW250, there wasn't any armor left on the board. The game lasted only about 12 turns with a clear German Victory and the German army remained pretty much in good order accept one HMG and two GREN units, with step losses, of course their armor was gone, it had to buy the time and was thus sacrificed. Really a pretty cool short scenario! The Russian don't have time to waste and must get to the bridge fast and fight it out right away, must not give the German Engineer time to blow the bridge. The German must protect the engineer unit and push a delaying force in front as fast as possible and no one will reach him before he is reinforced. This is a night scenario but the Cavalry can still assault from two hexes away; special rule 3 in this scenario. I enjoyed it. |
||||||||||||
| 0 Comments |
| And the Gods of the Dice smiled... |
|---|
|
This a neat little sudden-death scenario where a German SS force must blow a bridge while Soviet Guards cavalry with tank support try to stop them. I started by setting up the German mech units, including the engineers and the best leader I had, as close to the bridge ad I could, meaning by the end of Turn 1 , the engineers were on the bridge, and by Turn 3 they were making demolition attempts. Meanwhile, the armoured cars and Hetzers moved into a blocking position. The Sovier T-34s arrived moments later, and a bloody slugging match ensued. The Hetzers were eliminated without getting a shot off, but the armoured cars managed to destroy one T-34 step before being eliminated. The sacrifice was not in vain - no sooner had the last armoured car gone up in flames, the engineers rolled a 6 for thier demolition attempt and dropped the bridge. German victory was secured in just 5 turns. Neither the Soviet cavalry or German infantry had a chance to get into action. This might have been more fun if it had gone on a few turns longer - but I think that after another 5 turns or so, the Soviets probably would have cleared the bridge and taken out the engineers. The Germans could still have won by keeping the Soviets on the east bank, but this would probably have proved a tough proposition. 4/5 for this being a nice, tense little scenario, with plenty of replay value. |
| 0 Comments |
| The Hetzer dominates | ||||||||||||
|---|---|---|---|---|---|---|---|---|---|---|---|---|
The Germans were placed in the woods and towns in the Western half of the board. The Russians began in the Northeast and quickly attacked the towns in the center. However, the German armor had already reached the bridge and fended off the T-34s for two turns until reinforcements arrived. The Hetzer went on to claim two kills on T-34s and the German infantry held against suicidal Russian cavalry charges. In a make or break moment, the German engineers destroyed the bridge, just before the Soviet cavalry broke through to the town and river bank. Overall, the Germans would have won, even if they were thrown out of the town at first. The Russians should have one or two more tanks , or some more cavalry to make this scenario fair. |
||||||||||||
| 1 Comment |
| Don't blink |
|---|
|
As mentioned in Jay's AAR, the Germans will always get to the bridge first. By loading the engineer on the SPW250 with a leader the engineer can be in the bridge hex on turn one and start trying to blow it on turn two, before any Soviet units can enter the hex. I tried the high risk strategy of keeping my armor units with the engineer so as to deter the Soviets from closing too quickly but they didn't listen and the T34/85s moved directly into the town on turn 2. It was good that they did because the engineer got the chance to try to blow the bridge that turn and immediately rolled a six. One can only assume that many choice words were mentioned in the Soviet force that night. A good fun scenario is in here but it depends on a couple unlucky rolls during the early going on attempts to blow the bridge. If the engineer is as competent as mine you will find this to be a quick bloodless scenario. Given my result I can only give it a "2". |
| 0 Comments |