
|
Favoritenstrasse Road to Berlin #53 |
||
|---|---|---|
| (Defender) Germany | vs | Soviet Union (Attacker) |
| Formations Involved | ||
|---|---|---|
| Germany |  |
124th Panzer Pioneer Battalion |
| Germany |  |
3rd SS "Death's Head" Division |
| Soviet Union |  |
18th Guards Tank Regiment |
| Soviet Union |  |
1st Guards Mechanized Brigade |
| Soviet Union |  |
9th Guards Tank Brigade |

| Total | |
|---|---|
| Side 1 | 0 |
| Draw | 0 |
| Side 2 | 1 |


| Overall Rating, 1 vote |
|---|
|
4
|
| Scenario Rank: --- of 913 |
| Parent Game | Road to Berlin |
|---|---|
| Historicity | Historical |
| Date | 1945-04-06 |
| Start Time | 06:00 |
| Turn Count | 30 |
| Visibility | Day |
| Counters | 167 |
| Net Morale | 1 |
| Net Initiative | 2 |
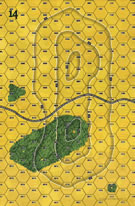
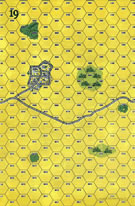
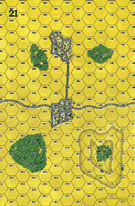
| Maps | 3: 14, 19, 21 |
| Layout Dimensions | 84 x 43 cm 33 x 17 in |
| Play Bounty | 135 |
| AAR Bounty | 171 |
| Total Plays | 1 |
| Total AARs | 1 |
| Battle Types |
|---|
| Hill Control |
| Inflict Enemy Casualties |
| Road Control |
| Rural Assault |
| Urban Assault |
| Conditions |
|---|
| Off-board Artillery |
| Randomly-drawn Aircraft |
| Scenario Requirements & Playability | |
|---|---|
| Road to Berlin | Base Game |
| Introduction |
|---|
|
In the open ground south of the Austrian capital, the shattered remnants of the panzer divisions that had launched the "Spring Awakening" offensive toward Budapest just three weeks earlier now faced the rapidly-advancing Soviets. Adolf Hitler sent reinforcements and ordered Army Group South to counterattack immediately. Ignoring the order, the German staff tried to set up a defensive line. |
| Conclusion |
|---|
|
Even the army group command had conceded the Vienna must fall, and when Hitler sent his "fixer," the SS commando leader Otto Skorzeny, to instill some fighting spirit into the city's defenders the Army ejected him without apparent fear of retribution. The SS tankers put up brief resistance to the Soviet advance, but only the time and date of the Imperial City's fall stood in doubt. |

|
|
|---|
| AFV Rules Pertaining to this Scenario's Order of Battle |
|---|
|
| Heer |
|---|
|


| Schutzstaffel |
|---|
|


")
")
")
")
")


| Army (RKKA) |
|---|
|


| Guards |
|---|
|


| 7 Errata Items | |
|---|---|

|
All SS 75mm IG guns are direct fire weapons (black), not indirect (white). (Shad
on 2010 Dec 15)
|

|
The reduced direct fire value of the SS HMG is 5-5 in Beyond Normandy and Road to Berlin. (plloyd1010
on 2015 Jul 31)
|

|
The Units in Beyond Normandy were misprinted with a movement factor of 5. The movement factor should be 8. (rerathbun
on 2012 Mar 21)
|
|
|
Liberation 1944's counters are mislabeled 'PzIVF2.' The counter's ratings are correct (Armor 5, Move 8, DF 11-6, AT 6-8). (rerathbun
on 2014 Feb 14)
|

|
All Guards JS-IIs should have AT fire values of 8-8. (Shad
on 2010 Dec 15)
|

|
Kommissars never get morale or combat modifiers. Ignore misprints. (Shad
on 2010 Dec 15)
|

|
All Guards T-34/85 tanks should have AT fire values of 7-7. (Shad
on 2010 Dec 15)
|
| Road to Berlin, scenario #53: Favoritenstrasse | ||||||||||||
|---|---|---|---|---|---|---|---|---|---|---|---|---|
Road to Berlin, scenario #53: Favoritenstrasse Posting # 1 I was having a hard time choosing the next scenario to play, as I wanted to about nine different ones from RtB and I have already played 10 or 11 from this games, as I love this time period on the Eastern front. I decided to good with a Soviet assault, where they have to control all the town, road and hill hexes and other result is a German Victory. The best part is that Casualties are irrelevant! The Soviet Forces are about twice in Infantry units, about 2.5 stronger in Tanks, about equal in on board support weapons and about 6 to 1 in their favor in off-board artillery. They are draw air-support. The Germans have the terrain benefit, town hexes and dug-in on the hills to the rear. They also have a little armor with teeth: Tiger II, Panthers, PzIVHs & Hetzers armor units but the Soviet have many more with: T-34/85s, JS-2s, JSU-152, SU-76 & light Ba64 armored cars. The Soviets have three towns and a large hill to take from the German and 30 turn to succeed or fail. They have divided into two groups, one going up the center, using the main road and the other going around the hill in a flanking move. Besides, there are too many Russians to attack in one group but once they get around the first hill and take the first town, they will rejoin. The Germans just need to hold on, as long as possible and reshuffle forces as needed. The key to their forces is defending the towns and large in on map board 21. As usually, as in most battle form the Road to Berlin, I have barrow forces from the two branches for both nationalities to fill the scenarios roster. No big deal, as it all comes from the same box. This should be a fun battle to simulate and presently the two forces are just making contact on the highway leading into the first town. Now back to the battle. Less posting and more playing! Posting #2 The battle was a classic Soviet late war offensive. First the Soviets concentrated their forces on taking the German town on map board #19, which wasn’t very well supported by other German Units. After this the Soviets move forward in mass to the big hill on map board 21 against the German dug-in Infantry, support weapons and Armor which includes a Tiger II unit and two Panther tank units. These were very tough on my Soviet armor units to takeout, specially with the dug-in bonus and took a large toll on the Soviets T-34/85s & JS-2s but fortunately the Soviets had a large quantity in this scenario and the cross-fire bonus helped with that monster Tiger II on the hill dug-in to boot. For I while my morale sank as my Soviet Armor burned but after a hard fought battle on the Hill and the German squashed, the Soviets moved on the other two towns on board 21, first taking one and then the other with an over helming forces of Infantry, Armor & Artillery. Finally I use my Soviet offensive army in the correct way, not going after all four objectives at once, thus making the mistake of spreading out my units to thin. The large amount of Artillery and Airpower worked to my advantage and I was able to clear and control all the town, road & hill hexes of Germans units. The Soviet a Victory and this was a fun scenario. |
||||||||||||
| 0 Comments |