
|
Guards Meet Guards Road to Berlin #47 |
||
|---|---|---|
| (Attacker) Germany | vs | Soviet Union (Attacker) |
| Formations Involved | ||
|---|---|---|
| Germany |  |
1st SS "Leibstandarte Adolf Hitler" Division |
| Soviet Union |  |
99th Guards Rifle Division |

| Total | |
|---|---|
| Side 1 | 1 |
| Draw | 0 |
| Side 2 | 0 |


| Overall Rating, 1 vote |
|---|
|
5
|
| Scenario Rank: --- of 913 |
| Parent Game | Road to Berlin |
|---|---|
| Historicity | Historical |
| Date | 1945-03-20 |
| Start Time | 07:00 |
| Turn Count | 34 |
| Visibility | Day |
| Counters | 196 |
| Net Morale | 1 |
| Net Initiative | 0 |
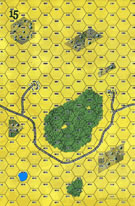
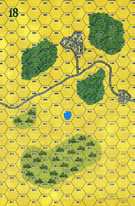
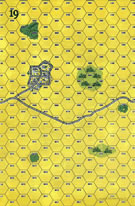
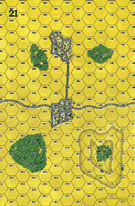
| Maps | 4: 15, 18, 19, 21 |
| Layout Dimensions | 86 x 56 cm 34 x 22 in |
| Play Bounty | 149 |
| AAR Bounty | 171 |
| Total Plays | 1 |
| Total AARs | 1 |
| Battle Types |
|---|
| Inflict Enemy Casualties |
| Meeting Engagement |
| Rural Assault |
| Urban Assault |
| Conditions |
|---|
| Off-board Artillery |
| Randomly-drawn Aircraft |
| Severe Weather |
| Scenario Requirements & Playability | |
|---|---|
| Road to Berlin | Base Game |
| Introduction |
|---|
|
The 1st SS "Adolf Hitler Life Guards" Panzer Division had been sent to Hungary to help spearhead a mighty new offensive against the Soviets. But heavy snow and thick mud slowed the panzer divisions, and when the Soviets made their counter-stroke, they spearheaded it with rifle divisions advancing on foot. |
| Conclusion |
|---|
|
The two divisions met head on and engaged in a fierce struggle, with both sides suffering heavy casualties. Despite Soviet advantages in firepower and air support, fanatical SS resistance held up the advance and enraged Soviet Marshal Fedor Tolbukin. For his part, the "Greatest General of All Times" fumed that his namesake division had failed him. Postwar SS apologist, apparently seeking to distance their heroes from the madman, would claim that the troops sent Hitler the severed arm of a comrade killed in this action, but like many tales of SS heroism this appears to be pure fiction (among other inconsistencies, this weird legend begs the question of just how they shipped a body part to the Fuhrerbunker when the Reich could not easily move supplies between Berlin and Hungary). |

|
|
|---|
| AFV Rules Pertaining to this Scenario's Order of Battle |
|---|
|
| Heer |
|---|
|


| Schutzstaffel |
|---|
|


")
")
")
")
")


| Army (RKKA) |
|---|
|

| Guards |
|---|
|


| 8 Errata Items | |
|---|---|
| Scen 47 |
All Guards RIF are actually INF. (PG-Tank Dude
on 2010 Apr 30)
|

|
All SPW 251s have an armor value of 0. (Shad
on 2010 Dec 15)
|

|
All SS 75mm IG guns are direct fire weapons (black), not indirect (white). (Shad
on 2010 Dec 15)
|

|
The reduced direct fire value of the SS HMG is 5-5 in Beyond Normandy and Road to Berlin. (plloyd1010
on 2015 Jul 31)
|

|
The Units in Beyond Normandy were misprinted with a movement factor of 5. The movement factor should be 8. (rerathbun
on 2012 Mar 21)
|
|
|
Liberation 1944's counters are mislabeled 'PzIVF2.' The counter's ratings are correct (Armor 5, Move 8, DF 11-6, AT 6-8). (rerathbun
on 2014 Feb 14)
|

|
Kommissars never get morale or combat modifiers. Ignore misprints. (Shad
on 2010 Dec 15)
|

|
All Guards T-34/85 tanks should have AT fire values of 7-7. (Shad
on 2010 Dec 15)
|
| Of Mud and Aircraft | ||||||||||||
|---|---|---|---|---|---|---|---|---|---|---|---|---|
There’s a particular excitement with a meeting engagement. I think it’s the uncertainty of how things are going to develop as the opposing sides prepare for battle. Will the fight wind up being small scale and be remembered as nothing more than a nasty little firefight? Or will it be the opening moves of an action far more epic? This scenario has enough size and challenges to make it more of the epic. The map layout and the victory conditions make this a tough scenario. The two unconnected roads means thinking in terms of two smaller simultaneous battles. Movement is hampered by the spring mud. Both sides also have enough OBA to make being out in the open difficult, and there’s plenty of open space that needs to be crossed. Both sides need to be at their most aggressive and most wily to have a chance at victory. The Germans decided to rapidly occupy the multi-hex towns in the north, as did the Soviets. Once occupied, the Soviets needed to consolidate and push forward. The Germans opted to move into the woods in front of their two towns, in a position shaped like a shallow horseshoe. Then they would wait. A Soviet attack of any size would have to advance into it at a great price. After the Soviets bled enough, the Germans could consider advancing. Meanwhile in the south, the Soviets occupied the multi-hex town on Map 18. The Germans demonstrated in the south with enough strength to siphon Soviet units from the action in the north. As the Soviets slowly formed up in the mud, the Germans stayed under cover and directed OBA. Losses and morale problems began early for the Soviets. Although they had superior OBA, they were hard put to bring it to bear. The Germans refused to come out from under cover, making spotting impossible for return fire. However, Soviet air superiority more than made up for the lack of artillery fire. Their aircraft sortied often and with horrific accuracy, especially against enemy armor. Tactics on both sides were defined by a marked lack of patience. In the north, believing that the Germans had been crippled by a devastating air strike on its panzers, Soviet armor moved without support to probe German resistance in the northernmost woods on Map 21. Determined survivors and murderous crossfire soon had the Soviets reeling back in disarray. Special commendation goes to the GRENS in those woods that took on Soviet tanks, inflicting losses to the enemy with none of their own. In the south, the Germans got greedy and overextended their smaller forces. The Soviets shifted air power to that sector, inflicting more losses on German panzers. The one hex village on Map 18 changed hands three times. In the end, the Germans withdrew to their jumping-off line and began to dig in. However, the tactic worked; it kept additional enemy units out of the fight in the north. The end of the action saw both sides rallying and consolidating their survivors, getting ready for the next push. The toll on the Soviet forces made this an expensive stalemate. I rated this scenario high not for its slam-bang pace (the mud made sure there wasn’t one!), but rather for the challenges it gave me. |
||||||||||||
| 0 Comments |