
|
Tank Battle at Bajna Road to Berlin #5 |
||
|---|---|---|
| (Attacker) Germany | vs | Soviet Union (Attacker) |
| Formations Involved | ||
|---|---|---|
| Germany |  |
3rd SS "Death's Head" Division |
| Soviet Union |  |
110th Tank Brigade |
| Soviet Union |  |
181st Tank Brigade |
| Soviet Union |  |
32nd Mechanized Brigade |

| Total | |
|---|---|
| Side 1 | 9 |
| Draw | 0 |
| Side 2 | 2 |


| Overall Rating, 10 votes |
|---|
|
4.2
|
| Scenario Rank: 36 of 913 |
| Parent Game | Road to Berlin |
|---|---|
| Historicity | Historical |
| Date | 1945-01-03 |
| Start Time | 09:00 |
| Turn Count | 40 |
| Visibility | Day |
| Counters | 197 |
| Net Morale | 1 |
| Net Initiative | 0 |
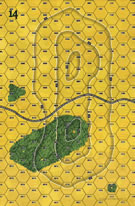
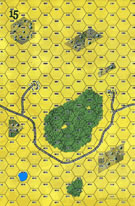
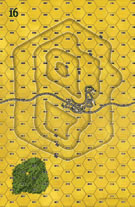
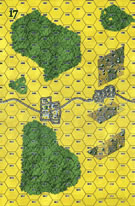
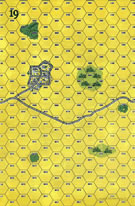
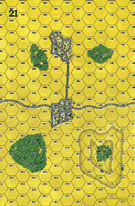
| Maps | 6: 14, 15, 16, 17, 19, 21 |
| Layout Dimensions | 86 x 84 cm 34 x 33 in |
| Play Bounty | 154 |
| AAR Bounty | 141 |
| Total Plays | 11 |
| Total AARs | 6 |
| Battle Types |
|---|
| Exit the Battle Area |
| Inflict Enemy Casualties |
| Meeting Engagement |
| Conditions |
|---|
| Off-board Artillery |
| Randomly-drawn Aircraft |
| Reinforcements |
| Scenario Requirements & Playability | |
|---|---|
| Road to Berlin | Base Game |
| Introduction |
|---|
|
The Soviet 2nd Ukrainian Front reacted to the German Operation Konrad by bringing up reserves to meet the panzer columns head-on. Eighteenth Tank Corps chose to await the enemy in the rough ground of the Pilis Hills. One of the corps' three tank brigades had been crushed on the offensive's opening day, but the3 others stood at full strength. |
| Conclusion |
|---|
|
The Soviet tankers stopped the German advance cold, in a savage tank battle fought at close quarters. But the SS had made more progress than the Soviets or their own immediate superiors thought possible (though much less than their supreme warlord desired), and a fresh attempt to relieve Budapest would be mounted as soon as possible. |

|
|
|---|
| AFV Rules Pertaining to this Scenario's Order of Battle |
|---|
|
| Heer |
|---|
|


| Schutzstaffel |
|---|
|


")
")
")
")


| Army (RKKA) |
|---|
|


| 7 Errata Items | |
|---|---|

|
All SPW 251s have an armor value of 0. (Shad
on 2010 Dec 15)
|

|
One Wespe (ID# 1201) should have an armor value of 1 on the front and back of the counter. (Shad
on 2010 Dec 15)
|

|
The reduced direct fire value of the SS HMG is 5-5 in Beyond Normandy and Road to Berlin. (plloyd1010
on 2015 Jul 31)
|

|
The Units in Beyond Normandy were misprinted with a movement factor of 5. The movement factor should be 8. (rerathbun
on 2012 Mar 21)
|
|
|
Liberation 1944's counters are mislabeled 'PzIVF2.' The counter's ratings are correct (Armor 5, Move 8, DF 11-6, AT 6-8). (rerathbun
on 2014 Feb 14)
|

|
The reduced direct fire value in Kursk: Burning Tigers is 4-4. (plloyd1010
on 2015 Jul 31)
|

|
Kommissars never get morale or combat modifiers. Ignore misprints. (Shad
on 2010 Dec 15)
|
| Très violent |
|---|
|
Gros scénario : six cartes ; une vingtaine de pelotons d'INF et une dizaine d'AFVs de chaque côté. Les SS doivent transpercer une ligne soviétique assez conséquente et sortir par le sud. J'en suis à mi-chemin, une vingtaine de tours. Les SS ont progressé de zones couvertes en zones couvertes et il y a une bataille farouche dans le bois avant la dernière ville plus au sud. Les renforts soviétiques sont arrivés et se sont séparés en deux : une partie va essayer de couper les arrières allemands au nord et les chars sont venus tenir la colline au sud. Après une première tentative russe pour éliminer les chars allemands en tirant sur la plaine depuis la colline, les chars allemands et les renforts soviétiques montent à l'assaut. Le choc va être frontal quand ils seront à portée ! Finalement, le choc frontal entre chars tourne à l'avantage des russes. Je pensais que les allemands pourraient éliminer la ligne de T34-85, en utilisant leur efficience (deux tirs d'affilée), mais rien à faire, une série incroyable de 3 et de 4, si bien que la ligne soviétique a tenu. Les renforts arrivés par derrière ont pris les allemands à contre-feu. Moralité : les chars allemands en déroute n'ont pas pu sortir au sud, l'infanterie a bien pris les bois, mais a perdu pas mal de plumes et ne se sent pas de passer à l'assaut de la dernière ville, et à l'arrière, les renforts soviétiques n'ont pas pu couper les arrières allemands. Victoire mineure soviétique car les 20 pas de perte allemands sont dépassés, et largement, mais ils sont quand même assez facilement établis sur la partie sud de la carte. |
| 0 Comments |
| tank battle at Banja |
|---|
|
First few turns started with the 3rd SS being rather bold and foolish. They rushed on the board transported, showing eagerness as well as inexperience. Big Mistake! RKKA aircraft and OBA, guided by well placed observers, made a mess of things right from the start. The lone Tiger unit moved exactly 3 hexes to enter the board, and was immediately killed by a rather lucky Ilyushin 2. This feat brought the German player to a cry of desperation, his first but not his last! The German plan to rush the table, to get the necessary troops off the table at the other side before the arrival of the Russian reinforcements, was easy enough on paper. But the Russians had other plans! They used their resources to perfection and guided the front of the main German assault to where they wanted to fight, the Pilis Hills. Here they awaited the onslaught with 10 dug in T34’s and a whole lot of supporting infantry and AT. By turn 14, when the reinforcements (another 12 T34-85’s and other stuff) hit the table, the first SS troops were exiting the board and claiming a minor victory. But the reinforcement breathed new life into the Russians, giving them an enormous amount of fresh firepower that engulfed the board like a tidal wave. Within a few turns, they bagged their minor victory condition as well. What happened next was pure slaughter! Still having to move off 2 steps to claim a major victory, the German Standfr led the first piercing move himself. The southeast attack was stopped dead at 2 hexes from the board edge by some extremely accurate Russian bombing! On the other side (south west), a PzIV and a PzV platoon tried to cut through an unguarded piece of the Soviet curtain as well. After a few turns of cat and mouse play, bloody cross fires and downright gung ho tank assaults, a crippled PzIV made it across to claim the major victory! (turn 29) All the German player now has to do is to consolidate the lead, and deprive the Russian of his major victory conditions by having some fighting troops on the Russian side of the table until games’ end. But at this particular moment, the Germans have very few tracks and troops left to hold out another 11 turns. All that is left is 1 StuG III, 1 PzIV, 2 PzV, 3 HMG, 3 81mm, 5 GREN and an SPW! These troops are scattered across the board with a large part of this rugged bunch desperately trying to defend a large wood. The Russians, although largely overpowering the Germans, have trouble as well. They still have an impressive lot of tanks, APC’s and infantry scattered all over the place, but only 3 commanders alive to lead them! Their quickly assembled assaults on the defending SS remnants, run badly and not as hoped for. On game turn 35, the Russian player recognizes that clearing the board will not happen and reluctantly tosses in the towel. A pyrrhic major victory for the 3rd SS! There are some play events that will get stuck into our memories for years to come: • A disrupted 2 step PzIV that misses a roll of 7 or less, to get rid of the disruption, for an amazing 17 turns in a row. • German artillery being superb in hitting their own troops • A Russian leader stepping in an adjacent wooded hex to spot for artillery, and dying seconds later when the adjacent troops occupy the same hex seconds later • A tenacious lone Russian infantry platoon that would not give up the highest hex on the board, it took several hundred points of artillery and 2 separate assaults to make it flee • The Tiger incident mentioned above • The sheer terror on the German players’ face every time an aircraft hit the board • The agony on the Russian players’ face every time that same aircraft turned out to be a waste of an action In the end, we both surpassed the 100 steps killed mark, which in my book stands for pure brutal slaughter. But the game was a blast to play! A near run thing, with every turn filled with excitement. Things hanging in the balance all the time. With both players having several bouts of desperation and defeatism during the course of this great scenario. A scenario I can’t recommend enough, you should try it one day! |
| 0 Comments |
| Un escenario inolvidable |
|---|
|
Acabo de jugar uno de los mejores escenarios que recuerdo de esta serie. La partida es gigantesca en todos los sentidos: tamaño del mapa, número de unidades, duración y objetivos. Cerca de una brigada de la división acorazada de las SS "Totenkopf" ataca sin contemplaciones a un regimiento de una división mecanizada y a una brigada de tanques del Ejército Rojo. El choque es dramático y alcanza una gran intensidad desde el tercer o cuarto turno. (Los alemanes entran por el borde norte del mapa y tardan dos o tres turnos en llegar a alcanzar con su fuego al enemigo). Los soviéticos establecen una tenue línea defensiva en la mitad meridional del campo de batalla, aprovechando las colinas y las ciudades. A partir del turno 13 entra una poderosa fuerza acorazada soviética, por lo que hasta ese momento los soviéticos están en una clara inferioridad y su tarea consiste en retrasar en lo posible el avance alemán. Los soviéticos de benefician de su poder aéreo, que les permite sacar en cada turno una escuadrilla de aviones. Los alemanes consiguen rápidamente ventaja y destruyen con relativa facilidad casi todos los tanques enemigos. No obstante, la infantería soviética resiste denodadamente en la mayoría de los sectores, retrasando el avance alemán. La entrada de refuerzos soviéticos podría equilibrar algo la balanza, pero se produce demasiado tarde y aunque causa daños a los alemanes no puede impedir que las líneas soviéticas se rompan de manera irreversible. La aviación soviética se comporta de un modo decepcionante y apenas tiene influencia en el resultado final. La partida acaba en el turno 19, cuando los alemanes consiguen sacar 19 "steps" por el borde sur. Los alemanes sufren 22 "steps" de bajas, lo que supone una victoria menor para los soviéticos, pero como los germanos consiguen todos sus objetivos, alcanzan una victoria mayor. Los soviéticos sufren tal sangría de bajas (93 "steps") que se ven del todo incapacitados para contraatacar y desalojar a los alemanes de las posiciones conquistadas. Por ello al final se produce una victoria alemana. ¿Por qué he puntuado con un "5" este escenario? Desde luego no es un escenario perfecto. Que los soviéticos consigan una victoria mayor es muy difícil, por no decir imposible. Además mi partida se acaba en el turno 19, aunque el escenario está previsto a 40 turnos. Sin embargo, la diversión ha sido de las mayores que recuerdo desde que empecé a mover las fichas de esta serie. Veamos por qué: 1) Hay mucho terreno donde maniobrar y los objetivos del escenario obligan a plantear la partida con cuidado, especialmente para los alemanes. 2) Hay decenas y decenas de fichas operando sobre el campo de batalla, algunas de ellas muy resolutivas (los tanques alemanes) y veloces, con lo que la partida da una gran sensación de dinamismo. 3) La partida es fluida. No hay resistencia en lugares inexpugnables, donde el defensor se enroca y el ataque repite una y otra vez innnumerables y baldíos ataques. Aquí, el atacante alemán aprovecha su moral superior y su artillería para reducir metódicamente las defensas enemigas. 4) Las batallas de tanques son espectaculares y continuas prácticamente a lo largo de toda la partida. 5) Al ser la duración del escenario larga, permite llevar a cabo la táctica planeada sin precipitaciones. Si el juego duró sólo 19 turnos se debió sin duda a que no empleé la regla "Fog of War", poco aconsejable -a mi juicio- a un escenario de estas dimensiones. En definitiva, una experiencia magnífica. |
| 0 Comments |
| Road to Berlin, scenario #5: Tank Battle at Bajna | ||||||||||||
|---|---|---|---|---|---|---|---|---|---|---|---|---|
Ok a lot of guys have played this in the last year with good reviews and it’s been on my must play list for a while now, so I played this one off and on most of the day today. The Soviets must eliminate German steps and control three boards they setup on. The Germans must eliminate Soviet steps and exit units off the Soviet controlled Southern maps. Both sides have an interesting mix of unit types but the Soviets don’t have their stronger armor reinforcements until after turn 13 or so depending on the luck of the dice rolls. The Soviets have to setup into two groups, the Infantry, AT-guns and support units on maps 21 & 16 and the Soviet T-34C’s and a few SMG units on maps 16 and 14. The Germans have a very large force of all types of armor including but not limited to Panthers and Tigers with Infantry loaded in both APC halftracks & soft skinned trucks. Both sides have off board artillery but the Soviet have the airpower including those nasty 3 factor, AT types. The Germans enter from the North on maps 19, 17 & 15 with 40 turns to rock and roll! The Germans decide to divide their forces into two groups to keep the Soviets guessing and keeping their lines thin spread out but also to find holes to push enough units off the southern end of the map. The Germans push their armor ahead of the APC’s which are followed farther back by the loaded trucks. With both German groups moving forward the group between maps 16 & 14 have the most luck, finding mostly dug-in Soviet T-34C’s which are fine tanks but not against the distance the Panthers, Tigers, PzIVHs and a few types can shot. Also The Germans have armor efficiency which gives them twice as many shots. They punch a hole through which lead to enough points/units getting through plus they eliminated more than their required amount of Soviet steps and the two achievements together would give them a major victory but the Soviets have also eliminated enough steps and their air-force took a toll on the some German units earlier. So if the Soviets can clear the maps: 21, 16 & 14 of Germans they would also have a major victory resulting in a tie. So the Germans only exit enough units south to fill that requirement and have taken full control of the hill and forest hexes on map 14, setting up both armor and Infantry units to await the Soviet reinforcements that seemed to take forever to entry the battle, giving the Germans the upper hand in being prepared. The remaining Soviets on maps 21 & 16 were too weak to attack on their own but once the Soviet reinforcements: T-34/85s, T-70s & SMG units entered from the east, they joined them in one big attempt to clear the Germans from the southern maps or in this case map number 14. Again the German armor efficiency took a large total on the Soviet armor and the large amounts of the off board artillery really hurt the Soviet Infantry as well. The German stop them cold one the second parts of this battle. The Germans get a Major victory and the Soviets a minor victory, so the Germans win this one! A fun scenario to play and difficult for the Soviets if the reinforcement take too long to enter the battlefield but that Soviet air-power really hurt at times, taking out two steps of Panther, two step of Tigers and one Infantry & leader loaded truck. What is interesting about this battle; is at first the Germans have to attack and then later the Soviets have to attack. Offense & defense for both sides to try! The German have the slight advantage in forces and morale but they have to do more. Again, a fun scenario to play and everything you need comes out of one box, Road to Berlin, one of my favorites! |
||||||||||||
| 0 Comments |
| The thin red line, bends, buckles and finally breaks. | ||||||||||||
|---|---|---|---|---|---|---|---|---|---|---|---|---|
Good scenario this. A strong German combined arms has to cross a two map long three map wide board in the face of a Red Army line which is thin in points but Soviet reinforcements are expected. The German commander puts his main strength in a central thrust, hoping the woods would cover his advance with two smaller forces to each flank. The Soviet general opted for a rear defense with mobile units doted along the east west road behind his main line to act as a fire brigade and snuff out each German thrust as it happened. The first few turns were quick and bloodless, the Red Air Force, which was ineffective for most of the game, failed to find any worthwhile targets, the Soviet artillery did cause minor casualties but nothing to slow the Nazi horde. It was to the western flank where the first real skirmish took place, here a bitter struggle between T34c and PZIV resulted in about 5 German unit steps slipping off the board the rest being destroyed, however the Russian left had been badly mauled and more importantly several T34/SMG groups had been rushed to that sector and would now have to redeploy. On the Eastern flank things were also happening, here the Soviet line had been brushed aside easily but the German sector commander had been killed in one of the few successful air attacks and his second in command was slow in realizing the way to the south was open but for one company of Red Army SMG and their M3s who threw themselves forward in a forlorn hope counter attack designed to keep n the SS of balance. Meanwhile the main force in the center swept over the first Russian lines with relative ease, however just as a major German breakthough looked certain the Soviet reinforcements arrived on time. In the east the new T34/85's swarmed around the Panthers and Tigers creating cross fires which caused damage even to the Tiger platoon although at heavy cost to themselves. There would be no German units exiting from this thrust, in the centre the German artillery was now blasting its way through the Soviet lines and although the attack was now a much more fragmented affair German units were slipping off the board in ones and twos not many but enough to see the VP total getting close to a German win. Both sides regrouped, rallying units etc. The German commander then moved forward to force the issue, using artillery to blast through the hastily reformed Soviet lines. Although T34s and T70 rushed to contain this new thrust their was enough gaps for the SS Gren units to slip thru and exit for the win. **This is an excellent scenario which would have rated a 5 but for the fact that I think this is just too hard to the Soviets to win specially now with the increased speed in movement of AFV's. However this was only apparent in the last few turns which considering this is a 40 turn game is in itself good value. There were some great little incidents in the battle, one Panther tank constantly failing to hit any of the T34's which surrounded it even when needing just 7's to hit, obviously straight out of tank school! One Soviet LDR and his company spent the entire game rushing to each threatened sector but never fired a shot. Just good solid fun ** |
||||||||||||
| 0 Comments |
| Anti-climax |
|---|
|
Shad's Note: I'm dumping in a bunch of my old BGG AARs. If you've followed my "work" on BGG then you've read these before... DeploymentAs the Soviets, the setup restrictions keep all my AT guns in the center or to the west, and all my armor in the center or to the east. From Turn 13 onward I have a 1/3rd chance of getting some real nasty reinforcements, but until then I'm fairly outclassed. Because armor is easily moved and guns are not, and because my reinforcements will enter from the east, I overloaded my west end with immobile guns and kept all of my armor to guard the eastern pass from the hilltops and forest. I knew from the start it wouldn't be enough to stop the Germans, but hopefully it would be enough to hold them until my reinforcements arrive to tip the balance decisively in my favor. As the Germans, I was entering from the north with enough transports such that no one had to walk. I decided to advance in 3 clusters: a spearhead with 90% of my armor, a heavy infantry convoy of SPW251s which are immune to light arms and (nearly so to) bombardment, and a large light infantry convoy of trucks bringing up the rear. My armor would quickly uncover the best avenue of advance while my transports waited just out of firing range, and then with the armor holding open a channel, the transports would quickly exit to the south before the Soviet fist arrived. Hour 1 - 0900~1000Total German Steplosses: 0 Total German Armor Steplosses: 1 Total Soviet Steplosses: 0 Total Soviet Armor Steplosses: 2 GERMAN PERSPECTIVEWe have cautiously entered the battlefield with every foot unit riding something. Most of the armor took the lead in the east, although small armored detachments guard all major force concentrations. Our heavy infantry are concentrated in the center (HMGs & ENGs), the mortars are in the east with a company of supporting infantry, and the bulk of the infantry is in the west. Two Soviet T-34C platoons were hiding on the edge of the central forest, and managed to damage a Hetzer platoon, but supporting Panther IVHs quickly returned fire - eliminating one entire platoon and driving the other off back into the forest. SOVIET PERSPECTIVEOne of our two armor scout groups managed to surprise some German Hetzers, but was quickly overwhelmed by Panther fire. The other took up a seemingly good ambush position, only to realize it was now sitting in the center of the German main line of advance. There are far too many units to engage with any hope of survival, and the T-34Cs will have to pull back and quickly. The rest of our positions must simply sit and watch. We're on defense until the reinforcements arrive... Hour 2 - 1000~1100Total German Steplosses: 0 Total German Armor Steplosses: 6 Total Soviet Steplosses: 1 Total Soviet Armor Steplosses: 8 GERMAN PERSPECTIVECautious advance in the center-left has resulted in the destruction of 2 Soviet armor platoons with few losses. Progress has been slower on the right, as Soviet armor on the edges of a hilltop forest is proving difficult to dislodge. Nevertheless, the battlefield commander is considering the possibility of an end-run between the two large hills in the east. SOVIET PERSPECTIVEOur scout forces have been lost, but not without inflicting significant armor losses on the advancing Germans. Even so, our armor will be badly outnumbered and outgunned until the reinforcements arrive. Why aren't the Germans pressing the attack? Hour 3 - 1100~1200Total German Steplosses: 2 Total German Armor Steplosses: 11 Total Soviet Steplosses: 4 Total Soviet Armor Steplosses: 24(!) GERMAN PERSPECTIVEFearing the imminent arrival of Soviet reinforcements, the battlefield commander gave the go ahead for an all-out advance. Soviet armor was well positioned on the edges of hilltop forests, but our superior crews methodically destroyed them with minimal losses. The infantry convoys have been ordered forward to follow behind the armored thrust, and aside from a few uncharacteristically accurate Soviet artillery barrages, good progress is being made. SOVIET PERSPECTIVEOur armor fought valiantly, but in vain. Only a handful of tanks remain and they will soon be destroyed. Several platoons of brave infantry are all that stand between the Germans and victory at this point. If our reinforcements don't arrive immediately, all will be lost. Play Note - Beginning now, on a 1d6 result of 5 or 6 the Soviet reinforcements arrive. The T-70s would be more than a match for a badly strung out German infantry convoy trying to quickly squeeze between two large hills. However, so few Soviet forces remain able to hinder the Germans that if the reinforcements don't arrive essentially immediately, the Nazis will dance right off the map and on to further glories to the south. Turn 13 - 1200Reinforcements will NOT be arriving. The German lead armor closes on the few remaining Soviet troops on either side of the pass. The last of the Soviet armor in the hilltop forest is destroyed. The German infantry convoy puts pedal to metal. Turn 14 - 1215Reinforcements will NOT be arriving. All Soviet armor eliminated, the left half of the German armored front rushes forwards to neutralize the frantically digging-in Soviet infantry. The right half heads for the eastern end of the road to take up defensive positions against any Soviet reinforcements. Turn 15 - 1230The Germans have committed to rushing through the pass. If we can get our armor onboard they'll be defenseless! We still have a chance! Reinforcements will NOT be arriving. The German player urges his convoy ever forward - faster! faster! We're almost there! Desperate to slow the Germans down at any cost, 2 platoons of Soviet infantry charge straight across open ground directly at the lead APC column! Turn 16 - 1245The brave (stupid?) Soviet infantry platoons run right into the face of the APCs and begin vicious hand-to-hand combat. The German convoy's progress is disrupted, but only for a moment. The rear elements break formation and begin to pass to either side of the small skirmish. German armor on the east flank now assumes defensive positions along the road. Even if Soviet reinforcements arrive, there's little they can accomplish now. Turn 17 - 1300The battle is all but lost. Even so, the Soviet commander refuses to give up. "REINFORCEMENTS!" he screams over the radio. "WHERE THE **** ARE MY REINFORCEMENTS?!?" Despite the ferocious assault still in progress to their immediate rear, the first wave of German infantry exits the battlefield. There is precious little the Soviet commander can do at this point, other than to watch. Turn 18 - 1315The rear half of the convoy is only minutes away from exit... The Germans scurry off the board and on to further battles. The remaining Soviet forces - exhausted and hungry - lay down their arms. SteplossesGerman: 15 Soviet: 40 Exited German Steps: 42 GERMAN MAJOR VICTORYShad's ConclusionObviously, the failure of the Soviet reinforcements to arrive in a timely manner was a major disappointment - both in terms of the Soviet player's ambitions and in terms of the gameplay satisfaction of the scenario. As the Soviets, I missed the 1d6 == 5 or 6 reinforcement roll six times in a row. Unfortunate, but these things happen. My initial deployment was based on the assumption that the reinforcements would be quick in arriving -- the greater strength of my forces was in the west. Had the Soviet reinforcements arrived on the first or second turn available this scenario would have been vastly different. As it went, the armor of both sides did the heavy lifting, although the German efficiency (2 shots per turn) and generally stronger armor gave the Soviets an impossible task. This is a very interesting scenario - and I've read other AARs where the Soviet reinforcements arrived on schedule and shot the hell out of the Germans - so there's definitely ample room for this to go either way. |
| 0 Comments |