
|
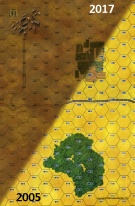
And Again Romanian Soil #9 |
||
|---|---|---|
| (Defender) Germany | vs | Soviet Union (Attacker) |
| Formations Involved | ||
|---|---|---|
| Germany |  |
24th Panzer Division |
| Soviet Union |  |
93rd Guards Rifle Division |
| Soviet Union |  |
9th "Bobriusko-Berlinskaya" Tank Division |

| Total | |
|---|---|
| Side 1 | 2 |
| Draw | 0 |
| Side 2 | 0 |


| Overall Rating, 2 votes |
|---|
|
4.5
|
| Scenario Rank: --- of 913 |
| Parent Game | Romanian Soil |
|---|---|
| Historicity | Historical |
| Date | 1944-04-13 |
| Start Time | 07:15 |
| Turn Count | 36 |
| Visibility | Day |
| Counters | 274 |
| Net Morale | 0 |
| Net Initiative | 1 |
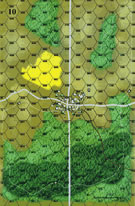
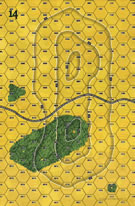
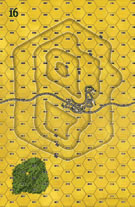
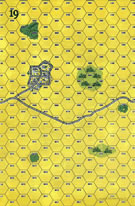
| Maps | 6: 1, 10, 14, 16, 19, 25 |
| Layout Dimensions | 86 x 84 cm 34 x 33 in |
| Play Bounty | 235 |
| AAR Bounty | 171 |
| Total Plays | 2 |
| Total AARs | 1 |
| Battle Types |
|---|
| Road Control |
| Urban Assault |
| Conditions |
|---|
| Off-board Artillery |
| Reinforcements |
| Terrain Mods |
| Scenario Requirements & Playability | |
|---|---|
| Battle of the Bulge | Maps |
| Eastern Front | Maps + Counters |
| Elsenborn Ridge | Maps + Counters |
| Red Warriors | Counters |
| Romanian Soil | Base Game |
| Road to Berlin | Maps + Counters |
| Introduction |
|---|
|
Marshal Konev had given firm orders to Lt. Gen. S.I. Bogdanov of Second Tank Army: the salient held 24th Panzer Division was to be eliminated. Having failed with one of his two tank corps, Bogdanov now committed his other, fresh corps and attached additional infantry for the assault. Twice as many tanks would be used, with the main thrust shifted slightly to the west to accommodate the larger forces. |
| Conclusion |
|---|
|
Though Bogdanov had sent in a larger force, Edelsheims's men were ready for them and the Soviets only made limited gains. The division's reserve attacked again, and restored the initial German line when threats against both of 3rd Tank Corps' flanks forced the Red Army formation to pull back. With Bogdanov clearly stopped, Konev consulted with Stavka and agreed the offensive should halt until two fresh armies could join 2nd Ukrainian Front. |

|
|
|---|
| AFV Rules Pertaining to this Scenario's Order of Battle |
|---|
|
| Heer |
|---|
|


| Luftwaffe |
|---|
|

| Army (RKKA) |
|---|
|


| 6 Errata Items | |
|---|---|

|
The reduced direct fire value of the Heer HMG became 5-5 starting with Fall of France. (plloyd1010
on 2015 Jul 31)
|

|
All SS PzIVH tanks should have a movement of 8. (Shad
on 2010 Dec 15)
|

|
The morale and combat modifiers of German Sergeant #1614 should be "0", not "8". (Shad
on 2010 Dec 15)
|

|
All SPW 251s have an armor value of 0. (Shad
on 2010 Dec 15)
|

|
The reduced direct fire value in Kursk: Burning Tigers is 4-4. (plloyd1010
on 2015 Jul 31)
|

|
Kommissars never get morale or combat modifiers. Ignore misprints. (Shad
on 2010 Dec 15)
|
| Blunt Force Trauma |
|---|
|
After playing through Scenario 8 one has to wonder about the mental acuity of Lt. Gen. Bogdanov of the RKKA. In essence the concept behind the Soviet advance on 4/13/44 was to repeat, in near lockstep, the Soviet advance of 4/12/44 but somehow the results this time would be significantly improved. It is moments like this that we can understand the terrible toll that the purges of the Soviet military caused. As noted in the conclusion to the scenario, the 24th Panzer was again able to retain its position and roll back the Soviets advance and retake their positions. I told myself that I would not fall into the same trap that I had fallen into as the Soviet commander in the previous scenario. I would husband my armor and use it to reduce the German positions and armor in ranged combat. I would be helped by having a much improved complement of T34/85s. It all worked beautifully for the first 2 1/2 hours. The Soviets advanced quickly through the central woods and fanned out flanking parties to keep the eventual counterattack honest. The hills on the center and left of the Soviet advance were cleared of German defenders on Turn 9 and Turn 16 respectively while a German company continued to hold out on the Soviet right flank throughout the 9 hours. The Soviets advanced heavily through the central boards getting to the fields to the northwest of the central town and then the German counterattack began (they arrived on the first possible turn again, while the Soviet Guards reinforcement took five turns to come on). The German counterattack was supported by halftracks creating a terrible direct fire and assault force which ran roughshod over the lightly supported infantry. Once the fields were cleared and the Germans moved into the light woods the halftracks came into range of the extensive AT capability of the Soviets (T34cs supported by AT guns) and were decimated leading to a stalemate in the center. The conflict here was the result of both centers of gravity colliding. The Soviets just didn't have the morale and weight to pull off the attack once the German reinforcements were on the case. The Soviets massed their remaining offensive capability to the east to see if they could penetrate to the town and perhaps grab an objective other than the German losses but the failure to maintain any pressure in the center permitted the Germans to move strong reinforcements to counter the push. In addition, unlike in the central position the advance had to cross open ground and the Soviet infantry was punished terribly. The German AT capability was simply too strong to fight as the Soviets lost 15 tanks in one 15 minute stretch of being in the open. At that point the Soviets conceded to the Germans. Another bloody mess but in this one the Soviets were able to establish a strong position in the northern hills that the Germans were less than anxious to attack. Certainly the capability existed to remove the Soviets from the high ground but the expected losses from such an effort were probably not warranted. A grand scenario to play (a 5) and a difficult one to "win" as the Soviets. I would suggest that the Soviets look to outperform history and pray, hard, that the German reinforcements are delayed. |
| 0 Comments |