
|
A Slow Response Romanian Soil #6 |
||
|---|---|---|
|
(Attacker)
Germany
(Attacker) Romania |
vs | Soviet Union (Defender) |
| Formations Involved | ||
|---|---|---|
| Germany |  |
Grossdeutschland Division |
| Romania |  |
7th Infantry Division |
| Soviet Union |  |
93rd Guards Rifle Division |

| Total | |
|---|---|
| Side 1 | 4 |
| Draw | 0 |
| Side 2 | 0 |


| Overall Rating, 3 votes |
|---|
|
4.33
|
| Scenario Rank: --- of 913 |
| Parent Game | Romanian Soil |
|---|---|
| Historicity | Historical |
| Date | 1944-04-10 |
| Start Time | 11:00 |
| Turn Count | 20 |
| Visibility | Day |
| Counters | 116 |
| Net Morale | 0 |
| Net Initiative | 2 |
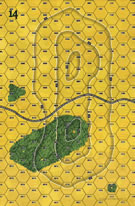
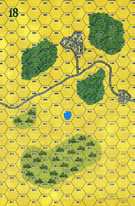
| Maps | 3: 14, 18, 5 |
| Layout Dimensions | 84 x 43 cm 33 x 17 in |
| Play Bounty | 171 |
| AAR Bounty | 165 |
| Total Plays | 4 |
| Total AARs | 2 |
| Battle Types |
|---|
| Exit the Battle Area |
| Urban Assault |
| Conditions |
|---|
| Off-board Artillery |
| Reinforcements |
| Scenario Requirements & Playability | |
|---|---|
| Eastern Front | Maps + Counters |
| Red Warriors | Counters |
| Romanian Soil | Base Game |
| Road to Berlin | Maps + Counters |
| Introduction |
|---|
|
After pushing aside a rifle division at Podu Iloaie, Grossdeutschland replaced the shock units with new ones and continued westward. Among the shock units were a group of Romanians with an attitude, riding on the lead tanks. Initially little opposition was encountered as the 93rd Guards Rifle Division was still trying to re-orient itself to meet this new threat. |
| Conclusion |
|---|
|
The Soviets still lacked the ability to respond rapidly to changing conditions on the battlefield. This led to the majority of 93rd Guards Rifle division being trapped behind enemy lines, leaving Targu Frumos inadequately defended. Most of the pocketed Soviet soldiers managed to work their way back to friendly lines over the next few days. |

|
|
|---|
| AFV Rules Pertaining to this Scenario's Order of Battle |
|---|
|
| Heer |
|---|
|


| Army |
|---|
|


| Army (RKKA) |
|---|
|

| Guards |
|---|
|


| 5 Errata Items | |
|---|---|
| Scen 6 |
PzVIe should be PzIVe (mike perryman
on 2011 Jan 29)
|

|
The reduced direct fire value of the Heer HMG became 5-5 starting with Fall of France. (plloyd1010
on 2015 Jul 31)
|

|
The morale and combat modifiers of German Sergeant #1614 should be "0", not "8". (Shad
on 2010 Dec 15)
|

|
All SPW 251s have an armor value of 0. (Shad
on 2010 Dec 15)
|

|
Liberation 1944's Tiger movement and armor ratings are backwards. They should be Armor 7 and Movement 5. (petermc
on 2014 Feb 14)
|
| Get Yer Dramamine, It's a Bumpy Ride | ||||||||||||
|---|---|---|---|---|---|---|---|---|---|---|---|---|
After I graduated from college I went to visit a friend on the Outer Banks of North Carolina. It was at this point that I learned that I was susceptible to motion sickness. If you are similarly afflicted, this AAR may be a tough read. Be sure to have the appropriate medication. But, PLAY THIS SCENARIO!! This appears to be a simple scenario. A blocking force of Soviets tries to hold onto some small towns in their immediate front and a large hill about two kilometers behind those towns. They set up in depth and have some reason to believe that they will receive reinforcements. They are heavily endowed with AT weaponry, unfortunately none of it of sufficient heft to harm the coming Panthers and Tigers so cross fire is necessary. The Germans enter in two waves. The first has the benefit of lots of halftracks and the second comes in trucks. Both groups have 15 (3 platoons) of armored nastiness. The first group has Panthers and the second Tigers. The have to clear the towns, kill some Russians, keep from being killed, clear the road and exit the board. At least three of those objectives gets them a victory. Usually when I play a scenario there is a tipping point. Let me emphasize that, A tipping point. In this one (thus the 5 rating), there were tipping points almost every other turn after contact. Permit me to explain. The Germans enter the board (with those daredevil Romanian tank riders) and move quickly to invest the first town which has a token force in place. Surprisingly, the tokens hold up for an entire hour, but no matter, there is plenty to move on to the second town, that is until they blow the advancing infantry out of the water (first tipping point, possible German losses too high). After that turn, however, the German leaders get everything back on track and the second town is taken with strong halftrack support (second tipping point, Germans acheive town clearance in only 2 hours, leaving three hours to pursue other objectives, losses high but not so high as to indicate they will lose this objective). On to the hill, which if you know your boards is a REALLY big hill. The Soviets have been firing away with their AT rifles carefully placed to guarantee that when the 76s and 57s fire they have cross fire bonuses. After a few turns of watching their shells bounce wildly off the Panthers they change targeting to the halftracks and find them to be a better general target (tipping point - here come the German losses again), but this also unmasks them for the German OBA which was particulary lethal (tipping point, the AT menace quickly passes - seasick yet?) Bereft (a significantly underused word) of their AT support the Soviets wail in despair as the Tigers come chugging up the hill but wait (tipping point alert) is that 2 companies of support coming up from the south? Of course, the Soviets roll a six for these variable reinforcements on the first two turns possible. The race is on for the hill's summit. The Tigers reach the summit first, followed closely by the Panthers and a motley assortment of Romanian and German infantry which came on the flanks to invest the remaining AT guns and supporting infantry. The Germans have now obtained both the town and Soviet loss objectives and have only lost ten steps with 7 turns to go and a crumbling Soviet position. It appears that the Soviet reinforcements have arrived too late. But (oh, you knew that was coming didn't you?). A Soviet captain rallied some of the reserve forces that were kept behind the slope for just such a purpose and they gamely assault the Tigers. They were slaughtered but they pinned the Tigers for the turn or two necessary to get the reinforcements in place. The Germans sensing yet another tipping point, desperately tried to get their infantry through to the Tigers which had penetrated to the reverse slope but we couldn't have a tipping point if they actually got through. The Soviet reinforcements arrive and enter the assault against the Tigers and (tip) destroy five of them (2 steps). We go from ten to fourteen losses in 15 minutes. The early arrival of the reinforcements for the Soviets has given them the chance to win the scenario! However (kind of like "but" in its literary effect, but with more letters), unnoticed in all of the seesaw occurences, the Soviets have not managed to get anymore of their reinforcements to enter the board and we are now late enough in the scenario that any that arrive may not have any effect anyhow. The Tigers remain trapped behind a wall of Soviet troops but are dealing out more damage by far than they are taking and the Russians begin to worry that they may not get that last two step losses on the Germans to take the victory away. Considerations of exiting German troops are now gone due to the little time remaining and the Soviets have no worries about the Germans clearing the road since they can just fall back (foreshadowing alert!). So the Soviets begin taking chances to gain that last step kill and (tipping point, again, and somewhat monotonous to type) throw in their last reserves on turn 17 (of 20) and see that "6" on the assault roll, giving them one more Tiger step (2 tanks) and what appears to be a sure victory (yes I said "appears" and the careful reader will have noticed who won the scenario). The remaining Soviets began leaving the hilltop to ensure that the road remained covered with undemoralized troops and the Germans, in a fit of pique, took a shot at the Soviet major with the OBA while their polyglot (German and Romanian) infantry raced after the Soviets in what appears to be a foregone conclusion. Of course, (tipping point,dizzy yet?) the OBA is tremendously effective and actually kills the major,decapitating the Soviet force, and consequently immobilizing it, while still in range of the German force, which proceeds to clean up the road, finally clearing the last Soviet disrupted infantry from the road with the last possible assault in the shadown of the hilltop with the damaged Tigers in full sight. There was a LOT going on in this one and I didn't even mention the early fog of war rolls in the early turns of the scenario that convinced me that the Germans didn't really stand a chance unless they kept their losses down. Like a good book, the story that was unravelling was too good to put down and I played the entire scenario in one sitting. Yes, it's a five, with oak clusters, or something. The whole GD series of scenarios seems incredibly well crafted and even has those goofy yellow pieces in play (anyone viewing my profile can seem my affinity for the Romanians). I can't say enough to recommend this one. Enjoy. And stock up on the dramamine... |
||||||||||||
| 0 Comments |
| Romanian Soil, scenario #6: A Slow Response | ||||||||||||
|---|---|---|---|---|---|---|---|---|---|---|---|---|
I played this one based on another gamers AAR & ranking over on PG-HQ. It has three nationalities, German, Romanian & Soviet. I really am drawn to scenarios that have more then two nationalities. The Germans have 5 objectives and the whole games victory conditions are based on how many they obtain. The Axis is the attacker and the Soviets are the defender with both sides receiving reinforcements dependant on the dice rolls. In my game the Axis first cleared the town hexes which took more then half the game, reduced the Soviet steps by far more then the required 10 steps and kept their own losses under 15 steps but only by one step. Both sides received some reinforcements, the Axis on turn 9 and the Soviets on turns 12, 14 & 19. The Germans were not able to clear the road due to the Soviet late reinforcements nor were they able to get 20 steps off the west edge of the board, so they achieved 3 out of 5 victory objectives for a minor victory. You know it is tough combat conditions when the Soviets even loss a BM-13 rocket launcher truck unit! Fun stuff, this scenario! |
||||||||||||
| 0 Comments |