
|
Trouble at Puffendorf Roer River Battles #6 |
||
|---|---|---|
| (Attacker) Germany | vs | United States (Attacker) |
| Formations Involved | ||
|---|---|---|
| Germany |  |
506th Heavy Panzer Battalion |
| Germany |  |
9th Panzer Division |
| United States |  |
2nd "Hell on Wheels" Armored Division |
| United States |  |
Army |

| Total | |
|---|---|
| Side 1 | 3 |
| Draw | 0 |
| Side 2 | 0 |


| Overall Rating, 3 votes |
|---|
|
3
|
| Scenario Rank: --- of 913 |
| Parent Game | Roer River Battles |
|---|---|
| Historicity | Historical |
| Date | 1944-11-17 |
| Start Time | 08:00 |
| Turn Count | 18 |
| Visibility | Day |
| Counters | 142 |
| Net Morale | 0 |
| Net Initiative | 1 |
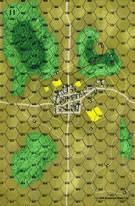
| Maps | 2: 11, 24 |
| Layout Dimensions | 86 x 28 cm 34 x 11 in |
| Play Bounty | 178 |
| AAR Bounty | 171 |
| Total Plays | 3 |
| Total AARs | 1 |
| Battle Types |
|---|
| Surprise Attack |
| Urban Assault |
| Conditions |
|---|
| Off-board Artillery |
| Severe Weather |
| Terrain Mods |
| Scenario Requirements & Playability | |
|---|---|
| Battle of the Bulge | Maps |
| Cassino '44 | Counters |
| Elsenborn Ridge | Maps + Counters |
| Roer River Battles | Base Game |
| Road to Berlin | Counters |
| Introduction |
|---|
|
Second Armored Division had blown through German defenses yesterday and not stopped until securing Puffendorf. This threatened to unhinge the entire German defenses west of the Roer River. Headquarters released both a panzer and a panzergrenadier division from reserve to correct the problem. Aided by the early morning mist, the Germans surprised the Americans as they were forming up for the day's advance. |
| Conclusion |
|---|
|
The heavier German tanks engaged the Americans in a long range duel they won handily, and only the timely arrival of 2nd Battalion, 67th Armor Regiment prevented a rout. The Germans stopped the American advance and drove them back to Puffendorf by the end of the day. |

|
|
|---|
| AFV Rules Pertaining to this Scenario's Order of Battle |
|---|
|
| Heer |
|---|
|


| Army |
|---|
|


| 3 Errata Items | |
|---|---|

|
The reduced direct fire value of the Heer HMG became 5-5 starting with Fall of France. (plloyd1010
on 2015 Jul 31)
|

|
All SS PzIVH tanks should have a movement of 8. (Shad
on 2010 Dec 15)
|

|
The morale and combat modifiers of German Sergeant #1614 should be "0", not "8". (Shad
on 2010 Dec 15)
|
| Trouble Indeed | ||||||||||||
|---|---|---|---|---|---|---|---|---|---|---|---|---|
The terrain modifications and “mud” rules make the area to the north of Puffendorf a quagmire of fields and some light woods. This has the effect of funneling the approach of the Heer (from the north B24) and/or an attack by the US either along the N/S road (center board) or along the east edge. Set-up restrictions likewise set the US player with an immediate log-jam of units. Lastly, lifting fog allows the Heer to make a good part of its initial approach without US artillery harassment. NOTE: I play with the winter (post harvest) field rules from Winter Soldiers. Thus, fields slow movement, but do not provide limiting terrain. This scenario would play very differently otherwise. US considerations: The US will lose the armor battle, but hopefully win the infantry battle. As the Germans have few VPs at start, they will be the aggressors in the early stage: they need to induce the US to commit its armor. Use INF/HMG and supporting units to hold the town and/or tie down German infantry and, hopefully panzers; hide the armor south of the town and swing it to either side to envelop. The bulk of the M3’s are parked on the (only) 20-m hill terrain for use hopefully in scattering and destroying German foot units after the panzers are eliminated. German considerations: the approach down the road is faster, but bottlenecked. A company will hold the road along with the 75mm ATG whilst the bulk of the INF forms a wedge moving along the eastern board edge towards the 1-hex farm/hamlet at the end of the trail (held by strong US forces). The panzers follow behind the screen of INF. Plan is to attack Puffendorf from the east along the narrow “point” of the town’s shape: this to avoid massive US DF/OF from HMG’s and INF support AFV’s. HMG’s are so slow that they will be placed in holding town hexes on B24 vs. possible US incursion. Intangibles: each side gets reinforcements that begin on Turn 1. The US contingent is much more significant in numbers (and signify offense/defense for the US posture), but those 3xPzIV-H’s are critical to shoring up the German western flank (board center). In essence, there are four possible variants: US early/German early; US early/German late; US late/German early and US late/German late. In this reality, the US gets its reinforcements on Turn 1, the Germans on Turn 2. German approach is as above and, with the quick reinforcements, those units move quickly south along the road to “fix” the German western flank (and those PzIV’s cover the road). The German main attack fixes on the single-hex hamlet and this is won by turn 5. With US reinforcing elements arriving early and fog lifting, traffic control is a challenge. This along with the German orientation (rather than attacking down the center) “forces” a change in US strategy. The INF will come out to “pin” German infantry at a range of 3+ hexes from Puffendorf. The M3’s will come forward to attempt to sway the infantry battle and force the panzers to use their fire actions to remedy this threat. US armor then occupies Puffendorf to await this development in the hope of avoiding what would be the fatal US move/german fire/ US lose init/ german fire sequence. The Germans have 2xTigerII and 4xPzV that are almost sure kills and they are now covered by the company of PzIV’s. The M5’s and M3’s pay heavily during approach and, by Turn 10, the US has, finally, turned the German east flank of INF cover making the German panzers liable to approach and assault. Turn 9, however, was the key. The US lost five steps of INF/HMG to extraordinary German shooting in that turn (both DF and BF). Additionally, a significant number of US leaders were DD’d (or lost). Because of this, the German infantry screen was able to hold (it helped having the 10-1-2 LT and the 9-2-2 SGT), the US could only induce 2xPzV’s to fire and the US tankers had to run a nearly full-strength gauntlet. Amazingly enough, German AT fire was about as bad as it could have been, rolling a ‘2’ and a ‘3’. That being said, every US M4/76 and M10 (those with the 6 AT value) were destroyed or DD’d. The US needed initiative on the next turn as perhaps the surviving M4’s can concentrate on the PzIV’s or V’s, but was at a -3 relative due to the massive step losses. Since the Germans had the Panthers and Tigers mutually adjacent it only took a +1: Germany +2 activations. That was pretty much it. The Germans then execute a withdrawal back to the high ground of B24 using their panzer’s DF to cover the extraction. |
||||||||||||
| 2 Comments |
Maybe its me feeling like a victim of 'fate', but how often does one roll a '2' and '3' for AT fire immediately followed by an 8 or 9 for bloody direct fire .... OOoooh, I'm so angry I could squash a grape !!! :-)
^ That, or rolling a '7' on the 30-DF col followed by a '12' or '2' on the 4-DF col with that left-over unit in the firing stack(s). Exasperating at times. Though, my favorite PGism is the '6' ( = M)on the assault col from a DEM reduced INF followed by pip-ermania (lots of high rolls) on the subsequent morale checks. Nothing like watching one's armor+ENG+INF stack gain a crown of black chits. When this happens I always think of the French "taunting" from MP&tHG.