
|
Return to the Donnerberg Roer River Battles #1 |
||
|---|---|---|
| (Defender) Germany | vs | United States (Attacker) |
| Formations Involved | ||
|---|---|---|
| Germany |  |
12th Infantry Division |
| Germany |  |
3rd Panzergrenadier Division |
| United States |  |
104th "Timberwolf" Infantry Division |
| United States |  |
750th Tank Battalion |

| Total | |
|---|---|
| Side 1 | 1 |
| Draw | 1 |
| Side 2 | 3 |


| Overall Rating, 5 votes |
|---|
|
3.6
|
| Scenario Rank: 327 of 913 |
| Parent Game | Roer River Battles |
|---|---|
| Historicity | Historical |
| Date | 1944-11-16 |
| Start Time | 13:00 |
| Turn Count | 24 |
| Visibility | Day |
| Counters | 113 |
| Net Morale | 1 |
| Net Initiative | 0 |
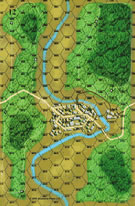
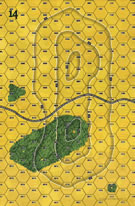
| Maps | 3: 12, 14, 23 |
| Layout Dimensions | 84 x 43 cm 33 x 17 in |
| Play Bounty | 175 |
| AAR Bounty | 165 |
| Total Plays | 5 |
| Total AARs | 2 |
| Battle Types |
|---|
| Inflict Enemy Casualties |
| Rural Assault |
| Conditions |
|---|
| Entrenchments |
| Off-board Artillery |
| Reinforcements |
| Scenario Requirements & Playability | |
|---|---|
| Battle of the Bulge | Maps |
| Cassino '44 | Counters |
| Elsenborn Ridge | Maps + Counters |
| Roer River Battles | Base Game |
| Road to Berlin | Maps |
| Introduction |
|---|
|
Bad weather had delayed the American offensive for almost a week when the skies finally lifted around noon on the 16th. The Allies immediately called in the largest close air support mission of the war, and American troops followed in the bombers' wake. The newly-arrived 414th Infantry Regiment had the toughest job of the day: recapturing an objective the Americans had won and then lost just two months before: Hill 287, known as the Donnerberg. |
| Conclusion |
|---|
|
Though 104th Infantry Division had been involved in some skirmishing while under British command, this was their first major action. With their supporting armor also unbloodied, it was no surprise that things didn't go well. First Battalion managed to gain all of 400 yards before calling it quits, and 3rd Battalion was thrown back every time it managed to edge forward. Second Battalion bypassed the Donnerberg to the right and continued on almost 1,000 yards before being stopped. Eschweiler remained a distant dream. |

|
|
|---|
| AFV Rules Pertaining to this Scenario's Order of Battle |
|---|
|
| Heer |
|---|
|


| Army |
|---|
|


| 6 Errata Items | |
|---|---|

|
The reduced direct fire value of the Heer HMG became 5-5 starting with Fall of France. (plloyd1010
on 2015 Jul 31)
|

|
The morale and combat modifiers of German Sergeant #1614 should be "0", not "8". (Shad
on 2010 Dec 15)
|

|
Strongpoints are single step units and can be eliminated with X results like any other single step unit. (Shad
on 2010 Dec 15)
|
|
|
The standard mix of strongpoints may be downloaded from Avalanche Press: http://www.avalanchepress.com/German_Strongpoints.php This is the standard mix found in Airborne, Airborne-IE, and Edelweiss Expanded. The strongpoint mix in Cassino '44 is different from that of other PG games. (plloyd1010
on 2012 Feb 01)
|
|
|
Strongpoints are affected by the terrain in their hex just like any other unit.
Even though they can't move, they can attack using Assault Combat if an enemy unit moves into their hex.
They may not dig in or benefit from entrenchments.
(rerathbun
on 2014 Apr 21)
|

|
The movement allowance on the counters in Airborne is misprinted. It should be "3." (rerathbun
on 2012 Jan 30)
|
| US 104th Improve on History but Take a Black and Purple Eye | ||||||||||||
|---|---|---|---|---|---|---|---|---|---|---|---|---|
The third of the "Donnerberg" triad, the first two being #9 & #10 of North of Elsenborn. A full regiment of the 104th US INF Division; its integral ENG company; and a company of M4's set up extremely tightly in the B12 town with overflow west of the river. The Heer's 12th INF, about a company depleted from two full-strength battalions, with a mixed bag of guns in support, set up in clusters about the Donnerberg. I made the minefield draw "blind" and scrambled the pieces so that I did not know what I had drawn or what was where (1x2, 2x1, 1xdecoy): also, I try to play minefields as "hidden." The Germans placed both entrenchments on the southern peak. The dense set-up packing and the mud conditions made the US approach slow, difficult from a command-and-control perspective, and quite "strung" out. Essentially, the US INF arrived first; established footholds (or tried) and waited for the heavy weapons and armor support. Even on a road, the HMG's can only move 1-hex, whilst INF can (along a road), move three. US approach was: (i)northern group and (ii) larger middle group with element (a) a blocking force to hold/pin the German units on the southern peak/slopes and (b) main group to occupy/clear the center and the northern peak/woods (linking up with the northern attack group). Group (ii-b): two companies attempt to exchange 2-3 hex DF with the dug-in or entrenched Heer. A series of DD's on US forces encourages a 2xGREN counter-attack; this is successful (3 steps of US INF), but is counter-counter attacked and forced to retreat back. This area then remains relatively stable. Group (ii-a): the road capture elements turn into the expected blood bath. US having lower morale faces the usual problem - payment in blood. Essentially though, by game end, this element has cleared the Donnerberg a hex or so south of the E/W road and seals the southern peak (with group ii-b) pressuring from the west. Two companies of this center group are most successful for the US: these units, with some good OBA/mortar support, thoroughly rout the German units holding the northern 60-m hill and woods ... thus, the German dug-in positions on the northern slopes are sealed off from the center. Group (i): took a while to overcome initial OF morale failures. Fortunately, the M4 + ENG support arrived (I sent two of the three of these elements that way) to assist in dealing with the dug-in HMGs + GREN here. With the drop of visibility as night fell, the US consolidated, finished off what assaults were remaining and held the 40/60m territory on a line from 0509-1006-1004-0703 (the Heer holding a kind of semi-circle about the 60-m southern peak. In game terms, the US eeks out a minor victory by 6 VPs. Historically, this is a far better result for the US. Yet, the Germans still held one of the peaks and, as an aside to Vince, I'm very thankful for the second set of "Black and Purple" morale counters - at one point, I was using every single one of both sets. The US held more territory, but they occupied it in a mostly disrupted and demoralized state. |
||||||||||||
| 0 Comments |
| Unfortunately Unfinished | ||||||||||||||
|---|---|---|---|---|---|---|---|---|---|---|---|---|---|---|
This is a typical Invasion of Germany scenario that was played against Joe Ladd. Game was very much on a knife edge with German defenders on high ground fighting against higher numbersof GI's. The Americans had managed to sneak under the German bullets and casualties were about even after 66% of the way through the game. Unfortunately, as real life things get in the way of gaming, this game was ceased right at the crux of the battle.A third session never materialised.. From what I have seen after the two long sessions we played, this is a well even scenario. Although shown as a draw without the actual final result played out, thegame was that close at the time. |
||||||||||||||
| 0 Comments |