
|
Punch Line with the Bayonet Power of the East #4 |
||
|---|---|---|
| (Defender) Japan | vs | Soviet Union (Attacker) |
| Formations Involved | ||
|---|---|---|
| Japan |  |
19th Infantry "Tiger" Division |
| Soviet Union |  |
40th Rifle Division |

| Total | |
|---|---|
| Side 1 | 2 |
| Draw | 0 |
| Side 2 | 0 |


| Overall Rating, 3 votes |
|---|
|
3.67
|
| Scenario Rank: --- of 913 |
| Parent Game | Power of the East |
|---|---|
| Historicity | Historical |
| Date | 1938-08-07 |
| Start Time | 07:00 |
| Turn Count | 40 |
| Visibility | Day |
| Counters | 168 |
| Net Morale | 1 |
| Net Initiative | 0 |
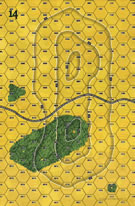
| Maps | 1: 14 |
| Layout Dimensions | 43 x 28 cm 17 x 11 in |
| Play Bounty | 193 |
| AAR Bounty | 165 |
| Total Plays | 2 |
| Total AARs | 2 |
| Battle Types |
|---|
| Hill Control |
| Inflict Enemy Casualties |
| Conditions |
|---|
| Off-board Artillery |
| Randomly-drawn Aircraft |
| Reinforcements |
| Severe Weather |
| Terrain Mods |
| Scenario Requirements & Playability | |
|---|---|
| Eastern Front | Counters |
| Guadalcanal | Counters |
| Power of the East | Base Game |
| Road to Berlin | Maps |
| Introduction |
|---|
|
"Tanks and planes spoke their mighty words and the infantry put the punch line with the bayonet!" In such martial colors a Soviet song described the final fighting over Zaozyornaya. The Russians reported that after recapturing the height they repelled 20 Japanese counterattacks, and the fighting remained very fierce for the remainder of the week. |
| Conclusion |
|---|
|
"In a heroic assault our glorious Red Army pushed the enemy back across the border. Not a single meter of our Soviet Fatherland will ever be yielded to an aggressor!" Soviet newspaper accounts of the battle ran along these lines, though writers did not mention the comparatively heavy Soviet casualties or the Red Army's numerous deficiencies. In the aftermath, the Chief of the Soviet Far East Military District Marshal Blücher was imprisoned and executed, while the military district itself was fundamentally reorganized. Despite their defeat the Japanese leadership sought to challenge the Red Army only a short time later. This led to an even larger conflict, this time along the Mongolian border. |
| Additional Notes |
|---|
|
Scenario has variable ending turn and variable number of counters. |

|
|
|---|
| AFV Rules Pertaining to this Scenario's Order of Battle |
|---|
|
| Imperial Japanese Army |
|---|
|


| Army (RKKA) |
|---|
|


| 2 Errata Items | |
|---|---|

|
The reduced direct fire value in Kursk: Burning Tigers is 4-4. (plloyd1010
on 2015 Jul 31)
|

|
Kommissars never get morale or combat modifiers. Ignore misprints. (Shad
on 2010 Dec 15)
|
| Are We There Yet? |
|---|
|
This scenario is relatively unique in the PG universe in that one player doesn't know what reinforcements he will get and neither player knows how long the game will last. As a result, this one is a real blast. The Japanese start out holding onto some hills in Soviet territory and the Soviet goal is merely to wear down the Japanese until their initiative drops to zero. The Japanese have to hold off the initial Soviet attack and try to grind the Soviets off of the hilltop. They receive reinforcements on turn one and then each time their initiative drops. The Soviets meanwhile get reinforcements each third turn but the actual reinforcements are variable and could be just air support or OBA. In my play the Soviets were on their back heel for the entire game. They were able to establish a strong position on the northern hilltop and tried like crazy to clear the Japanese off of the southern hilltop to no avail. The turn 1 Japanese reinforcements ran straight onto the center of the hill, chased the Soviet company that was there and the reinfrocing company. They then split up and supported attacks on both hilltops. The Japanese attacks began to lose steam as the losses mounted but the second set of reinforcements arrived as they lost their first initiative point and their weight was sufficient to carry the rest of the hill and win the day. The Soviets were unlucky in their reinforcements as what was needed were troops and 2 of the five rolls resulted in air support. This was a very engaging scenario as the scenario requires the Japanese to attack and gives the Soviet player the opportunity to cause losses through opportunity fire and assault which wear away the Japanese. If the Soviets can cause thirty total losses before the Japanese can chase them off the 40/60 meter hills they win. My Soviets had some terrible dice and lost on turn 16 or so but they had already caused 19 losses. All in all a very good time and a very fun mechanic. This one is well suited for any type of play, solo or ftf. |
| 0 Comments |
| Punched & punched & punched some more | ||||||||||||||
|---|---|---|---|---|---|---|---|---|---|---|---|---|---|---|
This scenario appears pretty good. Generally it played out well. It is a race versus a delicate balance of casualties. A very interesting situation indeed, and it appears to be the best balanced so far. The Japanese mission is to take the hill. The Soviets are interested in inflicting casualties on the Japanese, but don't want to do it too fast. The wrinkle being that the Japanese reinforcements arrive as the Japanese initiative falls. The dilemma being to withstand the Nipponese assault, but not cause so many casualties as to trigger an overwhelming response. We are playing with FoW. We also have a house rule that the hill penalty does not apply when shooting down hill, We decide that the Soviets should be able to start dug in, as they have been there since the previous night. (It also takes the edge off the Japanese advantage.) We also play with a rule that prevents shooting down the far slope of a hill. I setup in the pass and on the southern slope of the northern peak. My leadership draw has not been very good, mostly EFD leaders, and the junior officers are the poorer ones at that. Still I intend to hold the hill with a grim fatalism. (That seems appropriately Russian, now that I think about it.) My left flank reserve is within rifle range of near slope of the southern hill. My north flank is similarly exposed, but as I am on higher ground, I am less concerned. The Japanese attack comes across the NW part of the board. The battle sways both ways in, or in front of the foxholes. So long as the battle is a gunfight, I have the better. When it is a knife-fight, the advantage is with the Japanese. My biggest problem is that in 3 reinforcement rolls, I've gotten artillery twice. The "King of Battle" is good to have around, but I need many more pawns. I do manage to hold the north side of the hill pretty well for quite some time. Eventually luck catches and kills my major. His death, followed by some very poor back-to-back shooting rolls, give the Japanese a wide window of opportunity. My opponent, not being any sort of fool, seizes his chance to deal a crippling blow. With my northern flank crumbling, the second Japanese group arrives. Most got south flank to pin those troops in place. The rest reinforce the success in the north. We play on a little more, and call the game on turn 22. Luck did play a very important roll in this encounter. Of the 7 reinforcement rolls I got, 4 were artillery. Apart from that, I got 2 infantry companies and a tank. The first company was very useful, but the tank was too little and far too late. Despite defeat, I think this is a well balanced scenario. It appears quite dynamic. For an infantry fight it seems very fluid without any great advantage to either side. |
||||||||||||||
| 0 Comments |