
|
Zaozyornaya in Flames Power of the East #3 |
||
|---|---|---|
| (Defender) Japan | vs | Soviet Union (Attacker) |
| Formations Involved | ||
|---|---|---|
| Japan |  |
19th Infantry "Tiger" Division |
| Soviet Union |  |
29th Guards Rifle Division |
| Soviet Union |  |
40th Rifle Division |

| Total | |
|---|---|
| Side 1 | 1 |
| Draw | 0 |
| Side 2 | 0 |


| Overall Rating, 2 votes |
|---|
|
2.5
|
| Scenario Rank: --- of 913 |
| Parent Game | Power of the East |
|---|---|
| Historicity | Historical |
| Date | 1938-08-06 |
| Start Time | 17:00 |
| Turn Count | 30 |
| Visibility | Day |
| Counters | 186 |
| Net Morale | 1 |
| Net Initiative | 2 |
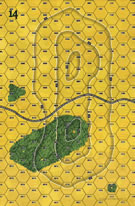
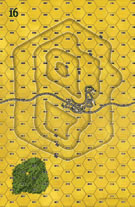
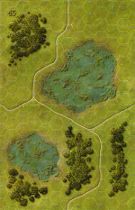
| Maps | 4: 14, 16, 45, 49 |
| Layout Dimensions | 86 x 56 cm 34 x 22 in |
| Play Bounty | 212 |
| AAR Bounty | 171 |
| Total Plays | 1 |
| Total AARs | 1 |
| Battle Types |
|---|
| Ambush |
| Hill Control |
| Inflict Enemy Casualties |
| Rural Assault |
| Scenario Requirements & Playability | |
|---|---|
| Eastern Front | Counters |
| Guadalcanal | Counters |
| Power of the East | Base Game |
| Road to Berlin | Maps + Counters |
| Introduction |
|---|
|
With the heights "Bezymyannaya" and "Zaozyornaya" in enemy hands for several days now and Tokyo about to declare victory, the whole affair threatened to turn into a great international disgrace for the Red Army and the Soviet Union. The heights had to be retaken at all costs with the next attack. This time the Soviets prepared themselves properly, assembling a huge armada of tanks, aircraft and heavy artillery for the main offensive on August 6th (coincidentally the ninth anniversary of the foundation of the Far East Military District). When the dense fog typical for this region finally lifted at 1700, a hail of lead and explosives rained down upon the Japanese positions - the decisive attack had begun. |
| Conclusion |
|---|
|
The Soviet attack fared much better than before, as the quantitative and qualitative Soviet superiority in heavy arms finally told. The Russians overwhelmed the defenders and recaptured the heights, but the fighting continued for the next several days. |
| Additional Notes |
|---|
|
Maps 45 and 49 come from the non-series game Infantry Attacks: August 1914. Corrections from Konstantin Lubsky: 1. The 40th Soviet division should appear in hexes 1309-1311 on board 45. 2. Use additional leaders from "Road to Berlin". The note is incorrect and should read: "This scenario uses boards from Infantry Attacks, pieces from Guadalcanal and Eastern Front and boards and pieces from Road to Berlin." 3. During the first 8 turns the Soviet player doesn't have to spot the hex he wants to attack with his off-board artillery, due to pre-battle reconnaissance. |

|

|
|---|
| AFV Rules Pertaining to this Scenario's Order of Battle |
|---|
|
| Imperial Japanese Army |
|---|
|


| Army (RKKA) |
|---|
|


| 2 Errata Items | |
|---|---|

|
The reduced direct fire value in Kursk: Burning Tigers is 4-4. (plloyd1010
on 2015 Jul 31)
|

|
Kommissars never get morale or combat modifiers. Ignore misprints. (Shad
on 2010 Dec 15)
|
| ... or at least Bezymyannaya smoldering | ||||||||||||||
|---|---|---|---|---|---|---|---|---|---|---|---|---|---|---|
The reason for the 2 rating is again because the scenario fails on the playability side. I maintain that to be an effective scenario, both sides need to have credible chances of achieving their victory conditions. This is another scenario where if you imagine the Soviets can win according to the scenario definition, forget it! Ain't gonna happen. Fortunately we don't play to win so much as to make something happen. The Soviets start with a long march, between the lakes, to the hills where the Japanese are waiting for them. Modified the strategic movement rule to move the Soviets up a little faster. We adjusted Soviet artillery availability to account for the delay in Soviet spotters getting close enough to call fire missions. I did inform Konstantin of the modifications we made and other typo error found in the scenario. His corrections have been added to the scenario page. The Japanese infantry formed a solid wall on the 20m line on board 14, mortars, AA & IG guns were on the north summit for support. The Japanese deployment on board 16 was similar, but somewhat longer line, weighted in the north corner of the hill. There was liberal use of 3-stacks in the defense. The board 16 support weapons were on the south peak. The 40th & 32nd divisions began their marches between the lakes, being harassed by Japanese artillery.. Japanese spotters from the heights had a clear view of most of the map. The Soviet field guns ducked into the woods on board 45 and setup. The infantry & mortars deployed in front of the hills. The woods on board 49 compelled another split attack.by the 32nd division. The right flanked angled to force the gap between the lake and Bezymyannaya (I think that is the board 16 hill). The left marched around the hill going toward the northern woods. The 40th deployed in front of the Japanese line, weighting the ends for a double envelopment. The artillery fire began falling on the Japanese about turn 5, that is the point when we started the clock on Soviet artillery availability. Soviet aircraft occasionally went for the Japanese support weapons on the heights. The south wing of the 40th division attack made some progress. After a few turns it faltered due to Japanese defensive fire. The right flank closed with the enemy and did a little better. The right wing of the 32nd division reached the woods fairly intact. The left wing was have a slow start, but was doing the best of all. Here’s when the light-bulb came on. I knew I couldn’t drive the Japanese away. Since one hill couldn’t help the other, perhaps I could take one hill. As night began to fall, the 40th abandoned its attack and shifted to support the left wing of the 32nd. Things began to go better for the Soviets after that. As night fell, the field guns & mortars limbered and used strategic movement to get into central woods on board 45. The infantry forces disengaged from the Japanese on board 14 and moved to the middle of the map. They were just forming a line as the Japanese reinforcements engaged their eastern end. A desperate fight ensued for the valley between the hills. The Japanese trying to destroy the north-eastern end of the Soviet line, the 32nd division trying to keep the pressure off of the 40th. The Japanese from the board 14 hill attacked the south-west end of the 32nd’s new line as best they could under the scenario restrictions. Elements of the 32nd, which were disorganized from their earlier attack on the hill, regrouped and rushed to aid of their comrades in the valley. Meanwhile the 40th division is pressing both ends of the Japanese line. The north end is making little headway, but defenders are suffering some attrition and having difficulty maintaining the situation. The southern attack force is chipping away quite steadily with massive small arms fire and some artillery support. The Japanese position is reminiscent of being in a vise, operated by a ratchet. The Japanese attack in the valley ends in failure. The Soviets have a local victory, despite the 2 column advantage the Japanese have in close combat. Rotating troops out of the assault hexes, interdicting follow on troops with artillery fire, and some luck have brought the success. We play a more couple turns, but the result is fairly clear. Japan will retain southern hill, the northern hill will fall (probably after the 30th turn), Japanese relief has been defeated. The Motherland has lost 39 steps and 3 lieutenants. The Emperor is down by 42 steps (including most of the heavy weaponry), 3 lieutenants, and 2 captains. I think the scenario would balance better with some changes. It would also be more consistent with the introductory narrative.
|
||||||||||||||
| 0 Comments |