
|
"Maybe Comrade Marshal Doesn't Understand..." Power of the East #2 |
||
|---|---|---|
| (Defender) Japan | vs | Soviet Union (Attacker) |
| Formations Involved | ||
|---|---|---|
| Japan |  |
19th Infantry "Tiger" Division |
| Soviet Union |  |
118th Rifle Regiment |
| Soviet Union |  |
119th Rifle Regiment |
| Soviet Union |  |
120th Rifle Regiment |

| Total | |
|---|---|
| Side 1 | 2 |
| Draw | 0 |
| Side 2 | 0 |


| Overall Rating, 3 votes |
|---|
|
2.67
|
| Scenario Rank: --- of 913 |
| Parent Game | Power of the East |
|---|---|
| Historicity | Historical |
| Date | 1938-08-02 |
| Start Time | 07:00 |
| Turn Count | 18 |
| Visibility | Day |
| Counters | 145 |
| Net Morale | 1 |
| Net Initiative | 0 |
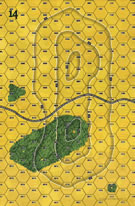
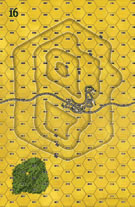
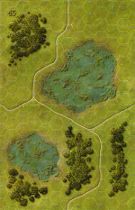
| Maps | 4: 14, 16, 45, 49 |
| Layout Dimensions | 86 x 56 cm 34 x 22 in |
| Play Bounty | 197 |
| AAR Bounty | 171 |
| Total Plays | 2 |
| Total AARs | 1 |
| Battle Types |
|---|
| Ambush |
| Hill Control |
| Inflict Enemy Casualties |
| Rural Assault |
| Scenario Requirements & Playability | |
|---|---|
| Eastern Front | Counters |
| Guadalcanal | Counters |
| Power of the East | Base Game |
| Road to Berlin | Maps |
| Introduction |
|---|
|
With the heights now in enemy hands, the Soviets mulled their only two options: either back down under the force of arms and accept the Japanese fait accompli, or counterattack and restore the status quo. The Chief of the Soviet Far East Military District, Marshal Vasily Blücher, a former hero of the Russian Civil War, hesitated to react. He doubted the viability of the Soviet claims on the border territory, and the bad weather prohibited any air strikes to assist his troops. "Maybe Comrade Marshal just doesn't understand the situation" opined Josef Stalin, when he heard of Blücher's hesitation. This phrase expressed by the Great Leader often equaled a death sentence for the target general. Nevertheless, Blücher ordered an attack under the pressure from the Soviet high command. It did not save him from fatal consequences for uttering his doubts concerning the operation. |
| Conclusion |
|---|
|
The precipitous and ill-organized Soviet attack on the heights ended in a bloody defeat without having achieved any objectives. Commanders failed to position their troops at their starting positions by the planned kickoff time for the offensive, and the artillery commander completely omitted pre-fight reconnaissance and fire planning for the heavy artillery due to time pressure. Heavy rains over the next few days prevented any fighting, so the Soviets spent the time reconsidering their course of action. |
| Additional Notes |
|---|
|
Maps 45 and 49 come from the non-series game Infantry Attacks: August 1914. |

|

|
|---|
| AFV Rules Pertaining to this Scenario's Order of Battle |
|---|
|
| Imperial Japanese Army |
|---|
|


| Army (RKKA) |
|---|
|


| 1 Errata Item | |
|---|---|

|
The reduced direct fire value in Kursk: Burning Tigers is 4-4. (plloyd1010
on 2015 Jul 31)
|
| Hills are for Heros | ||||||||||||||
|---|---|---|---|---|---|---|---|---|---|---|---|---|---|---|
... but doesn't end as well as the Combat! episode.Firstly, if you are the Soviet player, you will not win. The scenario falls completely flat in regards to play balance. That said, I'm a history nut and I got a good historical feel from it. The game opens with a long march to assault hills on board 14 & 16. The attack is poorly supported. It will be close-in attack against an enemy who specializes in assault combat. Indeed an march of doom. I began marching up between the lakes, planning to attack about turn 8 or 9. My southern column was harassed by Japanese artillery all the way. Fortunately, only being 12 points the effect was small, though some disruption did occur. The troops arrived before the hills pretty much on time. The northern column split around the trees of board 49. As the wings deployed, the follow-on troops occupied the woods to form a secondary fire base. The weight of the attack went to the northern flank. The southern column moved up and deployed in the center of the plain. I attacked in a largely linear formation. This mostly due to a lack of time. The first advance spread the Japanese forces out, but otherwise failed to get a lodgement on the hill. Follow on troops were able to get close and largely pin the Japanese line. The northern forces enveloped the Japanese line via the southern wing. The north part of the northern column had some success in the firefight. Eventually I assaulted the corner of the hill. The assault surprising lasted 3 turns, mostly due to the tenacity of a reduced squad which kept recovering. The southern column partly gained the hill with its south wing. After multiple direct fire attacks, an assault opportunity presented itself. A failed moral check by the accompanying leader prevent the execution. The north wing was driven back a second time. It had regrouped and would have tried again, but for the end of the game. The final body count was 19 steps against the Soviets, the Japanese had lost 2. Comrade marshal did understand the situation. |
||||||||||||||
| 0 Comments |