
|
Aussie Initiative Parachutes Over Crete #34 |
||
|---|---|---|
| (Defender) Germany | vs |
Australia
(Attacker)
Greece (Attacker) |
| Formations Involved |
|---|

| Total | |
|---|---|
| Side 1 | 0 |
| Draw | 0 |
| Side 2 | 1 |


| Overall Rating, 1 vote |
|---|
|
5
|
| Scenario Rank: --- of 913 |
| Parent Game | Parachutes Over Crete |
|---|---|
| Historicity | Historical |
| Date | 1941-05-21 |
| Start Time | 05:15 |
| Turn Count | 14 |
| Visibility | Day & Night |
| Counters | 69 |
| Net Morale | 0 |
| Net Initiative | 1 |
| Maps | 2: 96, 97 |
| Layout Dimensions | 56 x 43 cm 22 x 17 in |
| Play Bounty | 165 |
| AAR Bounty | 171 |
| Total Plays | 1 |
| Total AARs | 1 |
| Battle Types |
|---|
| Airfield Control |
| Hill Control |
| Conditions |
|---|
| Off-board Artillery |
| Terrain Mods |
| Scenario Requirements & Playability | |
|---|---|
| Parachutes Over Crete | Base Game |
| Introduction |
|---|
|
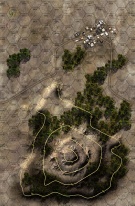
While the New Zealanders at Maleme dithered and allowed the Germans to consolidate their positions and capture the airfield, the Australians around Rethymnon acted immediately to crush the airborne landings. The first day's fight left Hill A, as the Australians had labelled the easternmost height in their defense zone, disputed between the Australians and Germans. Lt. Col. Ian Campbell, the sector commander, was determined to drive the enemy off with a dawn attack, just as Major Hans Kroh of the German battalion was determined to push past the hill and take the landing strip. |
| Conclusion |
|---|
|
The Australians struck first, but the Germans held firm and within minutes had inflicted heavy casualties on the attackers. An hour later the Germans launched their own attack and had much more success, threatening to take Hill A. Campbell personally led his reserve company in a counter-attack that drove the Germans completely off the hill, greatly easing the threat to the airstrip. |

|

|
|---|
| Army |
|---|
|


| Luftwaffe |
|---|
|


| Army |
|---|
|


| 2 Errata Items | |
|---|---|
| Scen 34 |
The Australians set up in hex row 09xx or higher on board 97. (rerathbun
on 2021 May 23)
|

|
Reduce strength direct fire value be came 5-5 in Army at Dawn. (plloyd1010
on 2015 Jul 31)
|
| King of the Mountain | ||||||||||||
|---|---|---|---|---|---|---|---|---|---|---|---|---|
Although this scenario has only 69 countries, it plays like a larger game. However, I realized during the game that only a half map area was being utilized within the two board playing area. The victory conditions stipulate possession of an airfield on the opposite map from the map featuring Hill A, the set up area for both adversaries. The scenario calls for the occupation of both Hill A and the airfield for both the Allies and the Germans. The set up positions of the opposing forces leaves no doubt as to what will happen in the 14 turn game. The 3rd Regiment paratroopers have the opportunity to set up one hex from the 80m heights of Hill A. So do the Allies. A contingent of Greek Army regulars have the option of setting up on one side of the Pigi Wadi or the other, but can not cross the wadi. The Creforce area commander (Lieutenant Colonel Ian Campbell here) decided to attack the heights if the Allies won the initiative on turn one. They did and subsequently captured the three hexes unopposed on turn one. This was the single most important action pof the entire scenario. The Germans were never able to capture the heights. Both sides had very good draws of leaders, and the Germans had more leaders than necessary, and in many cases were able to double up in their stacks. The Australians had less leadership, but adequate coverage. I purposefully gave Ian Campbell a 10-2-1 rated piece because of his reputation. However, he never went into the front lines. 9ther than grabbing the heights, the Australians had no aggressive intentions, except improving their lines. They didn’t have to dig-in, as the terrain was rocky on Hill A. They did, however, put as many troops as they could into the front line on top of the Hill. The Germans also had their ownheeavy hittimg firepower In the form of two 40mm batteries. They were rendered uses; one was destroyed and the other was caught up in an assault. (I played that the 75rcl retains full fire capability because I don’t see any statement about artillery in the row.) This unit survived all 14 turns. Thx assault was never concluded for the entire game. This mini battle tied up over three Australian infantry platoons and up to 20 points of German direct fire. , The German attack was starting to show promise toward the 12th turn, but suffered a blow when Logistics hit, and Critical Logistics on the very next turn. Ind the end, the Australians retained control of the airfield. Minor Victory for the Allies. Final loss total = Allies, 8; Germany, 12. |
||||||||||||
| 0 Comments |