
|
East of the Airfield Parachutes Over Crete #30 |
||
|---|---|---|
| (Attacker) Germany | vs |
Australia
(Defender)
Britain (Defender) Greece (Defender) |
| Formations Involved |
|---|

| Total | |
|---|---|
| Side 1 | 3 |
| Draw | 0 |
| Side 2 | 0 |


| Overall Rating, 1 vote |
|---|
|
3
|
| Scenario Rank: --- of 913 |
| Parent Game | Parachutes Over Crete |
|---|---|
| Historicity | Historical |
| Date | 1941-05-20 |
| Start Time | 16:00 |
| Turn Count | 20 |
| Visibility | Day & Night |
| Counters | 72 |
| Net Morale | 0 |
| Net Initiative | 1 |
| Maps | 2: 96, 97 |
| Layout Dimensions | 56 x 43 cm 22 x 17 in |
| Play Bounty | 168 |
| AAR Bounty | 171 |
| Total Plays | 3 |
| Total AARs | 1 |
| Battle Types |
|---|
| Airfield Control |
| Hill Control |
| Paradrops |
| Conditions |
|---|
| Off-board Artillery |
| Randomly-drawn Aircraft |
| Terrain Mods |
| Scenario Requirements & Playability | |
|---|---|
| Parachutes Over Crete | Base Game |
| Introduction |
|---|
|
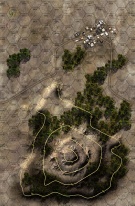
German intelligence vastly underestimated the number of Allied troops on Crete and were particularly low on the number stationed around Rethymnon. Thinking the area was lightly defended only two battalions dropped there and part of this force was detailed to advance on Suda Bay. Unfortunately for the Germans two battalions ofAustralian infantry were waiting for them on two hills that overlooked the airfield with two Matilda tanks. Two battalions of Greeks plus Australian artillery, engineers and machine-gunners stood ready nearby. |
| Conclusion |
|---|
|
A poorly-coordinated airlift brought the German groups to their landing zones at different times, with a large part of the force dropping too far to the east of be of immediate help. The remaining two companies landed on the eastern end of the airfield and immediately came under heavy fire. The battalion commander, Major Hans Kroh, quickly led the two companies that landed with him to the airfield, with two more joining him along the way. The Australians on Hill A would have to be overcome before the German could reach the airfield. Kroh led his paratroopers up the hill, and after hard fighting they forced the Australians to fall back. A counter-attack led by the two Matilda tanks restored the situation. When darkness fell the Australians held the west side of the hill with the Germans on the east side of the hill and the crest empty. |

|

|
|---|
| AFV Rules Pertaining to this Scenario's Order of Battle |
|---|
|
| Army |
|---|
|


| Army |
|---|
|

| Luftwaffe |
|---|
|


| Army |
|---|
|


| 1 Errata Item | |
|---|---|

|
Reduce strength direct fire value be came 5-5 in Army at Dawn. (plloyd1010
on 2015 Jul 31)
|
| Aussie Sandwich! |
|---|
|
In a reverse twist from the previous Crete scenario I played, A Sad Tale #7, East of the Airfield #30, found a weak Allied force trying to hold two major geographical points against a fairly strong German attack from west of Rethymon (Yes, east of the airfield at Pigi) and a small German paratrooper drop just south of the airfield. This air drop was a bold and risky move, but it worked beautifully. The problem with solo games is that the air drop can’t be written down very well ahead of the enemy ground force setup because it doesn’t matter. You know where your opponent’s going to set up, since you are the opponent! But still surprises happen more than not. The paratroopers usually come down all over the place. Unlike the real battle, the recreation went according to plan. Only one paratrooper stick went off-course out of six drops. This put severe pressure on the Australian 2/1 Battalion, which had positioned itself well, but could not get good shots at the Germans, in part because they had to settle for low odds attacks. The Germans came down almost on top of a stack of three Greek platoons. The Greeks immediately assaulted and took out one step of Germans. But the German st tack recoverred, and by turn 7 all 10 st eps of Greek troops were wiped out. Unfortunately, the Greeks don't count for any VPs in this scenario, but they couldn't be left in the German rear area on board #96. At the opposite end of board #96, the Germans hit right on target between the 2/1 and the airfield, which prevented the Australians frrom moving to the airfield. Two Matilda tanks, stationed at the lower west slopes of Hill A, tried to move towaards the airfield on turn 2 but on the very first move became stuck in the rough terrain resulting in their loss. On the east side of Hill A, GGerman reinforcements finally appeared on turn 5. with 11 platoons of paratrooper infantry, five MGs and threee mortars, this was an overwhelming match against Lt. Col. (called Colonel in the game setup) Ian Campbell could not hold the hill. The Germans were able to outflank the Australians, even they met w stiff opposition. The 2/1 did manage to destroy five German steps, but lost the Matildas, five steps of 2/1 troops and 10 steps o Greeks. The Germans captureed all three 80 meter hexes of Hill A and all four hexes of the airfield for a Major Victory. |
| 0 Comments |