
|
A Sad Tale Parachutes Over Crete #7 |
||
|---|---|---|
| (Defender) Germany | vs |
Britain
(Attacker)
Maori (Attacker) New Zealand (Attacker) |
| Formations Involved |
|---|

| Total | |
|---|---|
| Side 1 | 0 |
| Draw | 1 |
| Side 2 | 1 |


| Overall Rating, 2 votes |
|---|
|
5
|
| Scenario Rank: --- of 913 |
| Parent Game | Parachutes Over Crete |
|---|---|
| Historicity | Historical |
| Date | 1941-05-22 |
| Start Time | 03:30 |
| Turn Count | 20 |
| Visibility | Day & Night |
| Counters | 118 |
| Net Morale | 0 |
| Net Initiative | 2 |
| Maps | 3: 97, 98, 99 |
| Layout Dimensions | 86 x 56 cm 34 x 22 in |
| Play Bounty | 190 |
| AAR Bounty | 165 |
| Total Plays | 2 |
| Total AARs | 2 |
| Battle Types |
|---|
| Airfield Control |
| Hill Control |
| Inflict Enemy Casualties |
| Urban Assault |
| Conditions |
|---|
| Off-board Artillery |
| Randomly-drawn Aircraft |
| Reinforcements |
| Scenario Requirements & Playability | |
|---|---|
| Parachutes Over Crete | Base Game |
| Introduction |
|---|
|
Having secured Maleme airfield, the Germans began to land mountain troops brought in by airlift from Greece. Fifth Brigade commander James Hargest planned an attack with four battalions, assuming that one of them would be relieved by an Australian unit to become available for his attack – but Creforce headquarters had not actually promised that this could be done in time. Hargest’s attack finally moved out hours later than planned. |
| Conclusion |
|---|
|
While some did better than others, none of the attacking battalions, even the fierce Maoris, reached their objectives. Intense German air attacks help drive off 20th Battalion, while 21st Battalion and the Maoris were stopped by German resistance on the ground. When both tanks were put out of action the attack lost its steam. Attacking under the cover of darkness as planned, when the German planes couldn’t make their presence felt, might have yielded a better result. |
| Additional Notes |
|---|
|
Gebirgsjäger leaders in Parachutes Over Crete use conventional named ranks. The library was setup using German rank references. The production print of map 98 is missing 3 town hexes, Avalanche press has created a Map 98 overlay to correct this oversight. Philippe Leonard has also created a very nice overlay for map 98 on Board Game Geek. |

|

|
|---|
| AFV Rules Pertaining to this Scenario's Order of Battle |
|---|
|
| Army |
|---|
|

| Heer |
|---|
|


| Luftwaffe |
|---|
|


| 28th "Maori" Infantry Battalion |
|---|
|

| New Zealand Army |
|---|
|


| 2 Errata Items | |
|---|---|

|
Reduce strength direct fire value be came 5-5 in Army at Dawn. (plloyd1010
on 2015 Jul 31)
|

|
INF unit 1112 has full firepower printed on the front and back of the counter. Back should be 4-2. (garbare83686
on 2022 Feb 08)
|
| A Victorious Day for the Maoris! | ||||||||||||
|---|---|---|---|---|---|---|---|---|---|---|---|---|
I waited for the Luftwaffe to appear before the game was stopped in the 14th turn of 20 turns. The advent of the German Air Force in. the 12th turn is crucial because the paratroopers will have an extremely tough time defeating half of a Maori battalion (12 platoons infantry). The Maoris were up for the fight here. For one thing, they drew very powerful leaders using the ILS, Including the wicked 11-2-2 lieutenant (I named him 1st Lieutenant Willy Woggly). He was put at the front of the Maori spearhead to circle wide behind the Germans, ultimately outflanking them and trapping them in Pythgos, a victory objective and largest town on board 99. The strategy would prove to be excellent. Woggly was given two infantry platoons and a HMG. With this contingent of troops, he personally had 22 DF points under his leadership. He would not be touched by the host of German DF or BF attacks on him (no Assaults; the enemy wouldn’t dare). He eventually got his hands on the senior German commander and decapitated him. At that point, German continuation of the scenario was futile. Unfortunately for the Germans, the planes that appeared put in a very weak showing. There were no results in air attacks over three turns. At that point the Commonwealth had the Germans beat. The Maoris were largely responsible. They couldn’t be destroyed in the least. They lost two steps. Their close in fighting completely eviscerated the Assault Regiment in Pythgos. Another Assault outside of Pythgos was an extremely hard fought affair, with the Germans finally being destroyed by the Maoris (who lost their leader) after 10 turns! That battle cost the paratroopers six steps and ultimately three leaders.The NZ force played more of a blocking role in the front and flanks of the Germans on board 99. Board 98 was more of an equal fight. Here, a lucky bombardment almost killed the senior commander of the 21st NZ Infantry contingent. The final tally was at least 23-5 in favor of the Commonwealth with Pythgos completely captured.When the Assault Regiment lost its Lieutenant Colonel, game was stopped, even though major objectives remained to be captured. Technically the Germans had more points at this time, but all the Commonwealth had to do was to walk into board 97 with the airfield and the adjoining town of Vlaheritossa. Only Hill 107 may have been left in German hands. Thus the potential final score would have been 43-11 in favor of the Commonwealth; an overwhelming victory. If these recreated events would have really happened, it’s my opinion that Crete would have remained in Allied hands. I think Mike Perryman or Dr. B named the scenario well: A Sad Tale. This connotes the fact the battle was crucial for the Allies to win. It has been said that Creforce commander Freyburg let the beaten German force slip away during the night of May 20/21 and lost the battle of Crete. This scenario points to the same conclusion: The Commonwealth was so close.... |
||||||||||||
| 0 Comments |
| Trouble from Above |
|---|
|
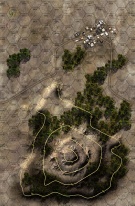
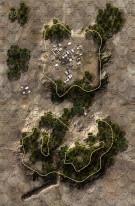
I'm finally getting around to recording my playthrough of the first battle game in Parachutes Over Crete. Scenario 7 covers the New Zealanders counterattack on Meleme airfield and the surrounding towns. By PoC standards its a big scenario, about 120 units combined. Setup: The Germans are on defense and are covering a unique L-shaped area. The airfield is in the NW corner, with the town immediately east. Another town and a couple villages are on the board to the east, and to the south is another town held by mountain troops. The Germans use a basic setup, placing units in and around the towns and digging in on the 80m hill south of the airfield. Recap: The main Kiwi force comes in from the east onto board 99, and are required to divide their force north and south of the main road. The force to the north takes on the town to the west, while the southern force rushes the village on the road and starts picking its way through the rough country around it. The Germans holding the village are overwhelmed and one platoon survives to fall back, but in the town they put up stiffer resistance, and here the New Zealand force spends the entire game trying to pry them out. Eventually the NZ force takes all but one town hex, which remains contested by a stubborn German HMG platoon. Two groups of New Zealand reinforcements are available. One is a follow-up to the intial assualt and arrives on Turn 9, while the other heads onto the board to the south (98) and heads for the town there. This attack goes well, with the good guys winning the initial assaults, flanking the town, and holding one town hex and contesting the other two by game's end. The German mountaineers had a bad morning. Meanwhile, the Kiwi force that took the village at the start works its way through the woods and emerges into a hail of opportunity fire from Germans atop the 80m hill and surrounding areas. They keep coming on, but eventually the NZ attack is stopped before reaching the summit. The Germans hold their hill. While all of this is going on German aircraft start appearing after sunrise. The scenario rules allow for the possibility of up to 3 German air units showing up per turn, and this happens about four times, and they pummel any NZ unit not under cover. This proved decisive as numerous Kiwi advances were cut down by disruptions and demorailizations. Even the Maoris took it on the chin, as they lost about 1/3 of their force by the final turn. At the end the Germans had lost 9 steps to the New Zealanders 18. The NZ troops gained quite a few points due to town control, but the German grip on the big hill made the difference. Final score Germany 24, New Zealand 20. Since at least a five point lead is needed for a win, this one goes down as a draw. Analysis: Parachutes Over Crete scenarios play differently than many other PG games, due to the high morale and relatively low firepower of both sides. As a result little things can make the difference, and here it was the German aircraft negating the NZ advantage in numbers. It's hard to see the New Zealanders reaching the airfield without a lot of luck on their side. |
| 0 Comments |