
|
Misinterpreted Intentions Panzer Lehr #11 |
||
|---|---|---|
| (Attacker) Germany | vs | United States (Defender) |
| Formations Involved | ||
|---|---|---|
| Germany |  |
130th "Lehr" Panzer Division |
| Germany |  |
5th Fallschirmjäger Regiment |
| United States |  |
3rd "Spearhead" Armored Division |
| United States |  |
47th Infantry Regiment |
| United States |  |
899th Tank Destroyer Battalion |

| Total | |
|---|---|
| Side 1 | 2 |
| Draw | 0 |
| Side 2 | 0 |


| Overall Rating, 3 votes |
|---|
|
4
|
| Scenario Rank: --- of 913 |
| Parent Game | Panzer Lehr |
|---|---|
| Historicity | Historical |
| Date | 1944-07-11 |
| Start Time | 04:45 |
| Turn Count | 18 |
| Visibility | Day & Night |
| Counters | 114 |
| Net Morale | 0 |
| Net Initiative | 2 |
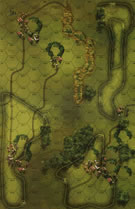
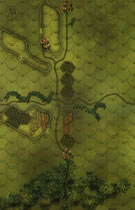
| Maps | 2: 26, 33 |
| Layout Dimensions | 56 x 43 cm 22 x 17 in |
| Play Bounty | 172 |
| AAR Bounty | 165 |
| Total Plays | 2 |
| Total AARs | 2 |
| Battle Types |
|---|
| Delaying Action |
| Exit the Battle Area |
| Inflict Enemy Casualties |
| Urban Assault |
| Conditions |
|---|
| Hidden Units |
| Off-board Artillery |
| Reinforcements |
| Severe Weather |
| Smoke |
| Illumination |
| Scenario Requirements & Playability | |
|---|---|
| Battle of the Bulge | Counters |
| Elsenborn Ridge | Counters |
| Fall of France 1 | Maps |
| Panzer Lehr | Base Game |
| Introduction |
|---|
|
Over the previous few days the Americans had consolidated their defenses protecting St. Lo. Intelligence determined that SS Reich was stretched too thin to properly respond to the American pressure, and that a retreat was imminent. Therefore, when increased enemy activity was noted opposite the 9th Infantry Division, the U.S. First Army Headquarters concluded the Germans were pulling out. |
| Conclusion |
|---|
|
Long after American artillery units far to the rear reported German intrusions, First Army Headquarters still refused to believe that the Germans were not pulling out. Not until a battalion headquarters was overrun did they start to take the matter seriously. Luckily, the front-line soldiers recognized the gravity of the situation and responded accordingly. Despite little outside help the American line units soon stabilized the situation, and by noon Panzer Lehr had shot their bolt. |

|
|
|---|
| AFV Rules Pertaining to this Scenario's Order of Battle |
|---|
|
| 130th "Lehr" Panzer Division |
|---|
|


| Heer |
|---|
|


| Luftwaffe |
|---|
|


| Army |
|---|
|


| 3 Errata Items | |
|---|---|

|
All SPW 251s have an armor value of 0. (Shad
on 2010 Dec 15)
|

|
Reduce strength direct fire value be came 5-5 in Army at Dawn. (plloyd1010
on 2015 Jul 31)
|

|
The M18 has a special rule in Battle of the Bulge but it applies globally: "A two-step M18 unit can fire one anti-tank shot and move half its movement allowance (retain fractions) in a single impulse. The order in which it does these two actions is the player's choice." (Shad
on 2010 Dec 15)
|
| Pz Lehr 11 Misinterperted intentions |
|---|
|
The Allies spot the Axis the 5 southern most village hexes. The Axis paras enter across the swamp and the Axis armor force was divided into two columns. The Paras got bogged down in the eastern most village after coming on late. The left column also got on late but the center column making a dash for the cross roads at bd 33 hex 0606 eliminating the Allied blocking force with just one Lt. escaping. They then exited 6 armor steps and a Lt. a gren and two half-tracks. The left hand column never exited any steps but caused numerous armor and halftrack casualties to the Allies. All this added up to a major axis victory. I'll give this a four because it was so much fun to play but I think the Axis have a definite advantage. This scenario is actually a combination of the two historical attacks Pz Lehr launched vs the US 9th and 30 Inf Divisions on July 11, 1944. I think I might try to rework them into two separate scenarios. The Attack vs the 9th should be on the Airborne board and the attack vs the 30th should be on the BoB hill/village bd. and another with partially open terrain for the approach. The 30th was reinforced by elements of the 3rd armored div. while the 9th used local assets to repel the attack. In addition a 3rd scenario could be created to simulate the situation just a few days before when the area was covered by a US Cav. Squadron. The reason Pz Lehr was not there earlier were the savage and constant allied air attacks which caused delays and casualties. So to simulate those problems for the Axis, the Allies should get to roll once or maybe even 2 or 3 times on the air strike table before the scenario begins. The axis would set up their units in "road march order" (That is stacked, or not, in a column just as if they were entering the board traveling along a road.) The Allies would then strike a random (1st to roll a 6 in one die.) Axis unit. After these air strikes play would begin normally. I just love these lazer cut pieces. |
| 0 Comments |
| Satisfyingly Slaughtered | ||||||||||||||
|---|---|---|---|---|---|---|---|---|---|---|---|---|---|---|
Two evenly matched forces lock horns in a battle. The Americans start out undermanned at night and around daylight expect a strong armored reinforcement. The Lehr force is augmented by a battalion of Luftwaffe troops (the good ones, not the field divisions). They arrive on board with four platoons of Panthers, four of IVHs and two of IVF2s. My defense showed a huge hole on the west which wasn't there at all. I had two INF platoons blocking the road in the immeidate front. In the town beyond the woods I had a force including INF, HMG and M18s. I managed to delay a large portion of the Lehr advance for well over an hour by sequentially revealing the hidden units. I had only one bump in the road as a Fog of War roll and the rising sun left an M18 exposed to Panther fire (never a good choice I assure you). I was causing losses and had stalled the Luftwaffe advance completely. As time wore on, Daniel was able to wear down my troops in the western town and the delay of my reinforcements until turn 7 resulted in the loss of many of the town hexes that I needed to hold to have a chance to win the scenario. I can't complain as three turns to roll of 5 or 6 certainly isn't excessive! The problem, however, was that Daniel was now able to advance his Panthers into a strong position that I had to respond to. He had waited for me to move my tank destroyers and his movement endangered them. I had to respond and we then entered into the tank battle portion of the battle, in which we learned that Shermans can hurt Panthers and Pz IVs but take losses at about a 2 to 3 to 1 rate. Given my repeated failures to deal with Panthers with the British tanks and tank destroyers (with the 17 pdr 8-8 AT fire weapons), having some success against the German tanks was gratifying. On the other hand, my armored force was heavily trashed after the tenth turn and we decided to take a quick look at the VP situation. The score was already 52-28 in the German's favor and they had a relatively easy run towards the exit points with at least three platoons of tanks (24 points) and I had a small chance of picking up 5-10 points in a counterattack against the Luftwaffe troops. We decided to call it at that point, given the unbalanced situation. I was quite pleased with the affect of my hidden troops. I was also pleased with my ability to hurt a number of Daniel's better armored units. I was stunned at the increasing unbalance of the victory point situation and the inability of the Americans to have any real chance at winning this one. This is a ton of fun to play but it has to be played in a shared situation. The hidden troops are of major importance to the success of the defense. On the other hand, at some point in the mid to late game the Germans will put the Americans into the possibility of either a tank battle or watching the Lehr tanks exit - either option resulting in a huge switch in victory points. I was very satisfied with my play but a well played defense simply cannot yield a victory on this one. It is a blast to play, but due to the imbalance I can only give it a "4". A very aggressive German player may take more losses than Daniel did but will be able to stretch the American defense to a breaking point and begin exiting units. There really doesn't seem to be a strong defensive approach for the Americans, but you will have fun pulling off surprises and ambushes while getting overrun. |
||||||||||||||
| 0 Comments |