
|
Through the Woods Panzer Lehr #6 |
||
|---|---|---|
| (Defender) Germany | vs | Britain (Attacker) |
| Formations Involved | ||
|---|---|---|
| Britain |  |
7th "Desert Rats" Armoured Division |
| Germany |  |
130th "Lehr" Panzer Division |

| Total | |
|---|---|
| Side 1 | 1 |
| Draw | 0 |
| Side 2 | 1 |


| Overall Rating, 3 votes |
|---|
|
3
|
| Scenario Rank: --- of 913 |
| Parent Game | Panzer Lehr |
|---|---|
| Historicity | Historical |
| Date | 1944-06-11 |
| Start Time | 13:15 |
| Turn Count | 14 |
| Visibility | Day |
| Counters | 36 |
| Net Morale | 0 |
| Net Initiative | 1 |
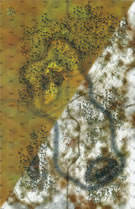
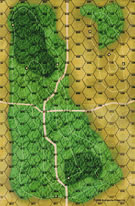
| Maps | 2: 25, 9 |
| Layout Dimensions | 86 x 28 cm 34 x 11 in |
| Play Bounty | 150 |
| AAR Bounty | 165 |
| Total Plays | 2 |
| Total AARs | 2 |
| Battle Types |
|---|
| Delaying Action |
| Exit the Battle Area |
| Inflict Enemy Casualties |
| Conditions |
|---|
| Hidden Units |
| Off-board Artillery |
| Smoke |
| Scenario Requirements & Playability | |
|---|---|
| Battle of the Bulge | Maps |
| Beyond Normandy | Counters |
| Cassino '44 | Counters |
| Elsenborn Ridge | Maps |
| Panzer Lehr | Base Game |
| Introduction |
|---|
|
The British attack on the Tilly-sur-Seulles area employed good planning, intending to extend the defenders to the breaking point. The plan encompassed the western wing taking Lingevres. In the woods just north of the village the two sides met to decide if the reality would conform to the plan. |
| Conclusion |
|---|
|
With the panzer grenadiers busy at Tilly and two companies of Panzer IVs tied up at Saint Pierre, there was little strength to deal with the British at Lingevres. The five Panthers that arrived that morning had already been committed at Tilly, so headquarters ordered the two remaining companies of Panzer IVs to gather up whatever grenadiers they could find and attack. With both sides short of infantry the tanks carefully engaged each other in a deadly game of hide and seek. The British tankers lost heart first after taking an undetermined number of losses, and retreated. |

|
|
|---|
| AFV Rules Pertaining to this Scenario's Order of Battle |
|---|
|
| Army |
|---|
|


| 130th "Lehr" Panzer Division |
|---|
|


| Heer |
|---|
|

| 6 Errata Items | |
|---|---|
| Scen 6 |
The Note should mention that the scenario also requires pieces from Cassino '44. (rerathbun
on 2012 Sep 03)
|

|
The "Optional Values" for the Achilles---and by extension the Archer---given in an Avalanche Press Daily Content piece on the 17-Pdr Anti-Tank gun (and printed on a replacement counter sheet Download) are now the Official Ratings, published in games like Cassino '44, Grossdeutschland 1946, and Indian Unity. These are: 8-5 / 8-8 Full Strength and 4-5 / 8-8 Reduced Strength. (caryn
on 2012 May 03)
|

|
The "Optional Values" for the Firefly given in an Avalanche Press Daily Content piece on the 17-Pdr Anti-Tank gun (and printed on a replacement counter sheet Download) are now the Official Ratings, published in games like Cassino '44, Grossdeutschland 1946, and Indian Unity. These are: 5-5 / 8-8 Full Strength and 3-5 / 8-8 Reduced Strength. (caryn
on 2012 May 03)
|

|
Ignore the direct fire values. (Shad
on 2010 Dec 15)
|

|
The morale and combat modifiers of German Sergeant #1614 should be "0", not "8". (Shad
on 2010 Dec 15)
|

|
All SPW 251s have an armor value of 0. (Shad
on 2010 Dec 15)
|
| Hidden Units Should Be Well Hidden | ||||||||||||||
|---|---|---|---|---|---|---|---|---|---|---|---|---|---|---|
Played face-to-face with Matt W in about 90 minutes. As the German commander, my primary goal should be to prevent the British from exiting too many units of the map. Whether it was is highly debatable. You can see pictures of our setup in Post #5 of this thread I set up my German troops forward to engage the British units early. This, I believe, was a mistake. The British sends two armored cards down the road to scout and find a hidden panzer. One armored car paid the price, suffering a step loss, but the other survived two shots (at +3 and +4) and made it through the German lines. I was disappointed with my poor shooting but did not make too much of it at the time. The British also sent their infantry forward and found another hidden panzer. One turn into the game and the Germans had only one hidden unit remaining. The British strategy was simple but also very effective. Move the powerful guns in light woods, in position to shoot at my panzers if I took a shot at one of his units moving forward. I took a few shots and made me pay for it. There is no fair exchange when you have less troops and must prevent the attacker from exiting the board. I fell back with my remaining assets and put my panzers in the best possible position to prevent a breakthrough while Matt moved his armor forward. A few shots were exchanged but without further German losses. That was the cue for the armored car that made it through on the first turn played a big role. Matt took advantage he had higher initiative and moved it close to one of my panzers late in a turn to set up cross fires the next if he won the initiative. Matt won the initiative by two and the armored shot. A miss (it needed a “12” to hit) but it set up a deadly crossfire. With only two armored units left, I gave up as there is no way I can prevent British armor from exiting en masse. British major victory. I gave this one a “3”. We played two scenarios that afternoon was the other scenario) and both deserved a “3.5” in my opinion but gave the “4” to Saipan #12 because I believe it’s more solitaire friendly. One thing to note is that I have yet to contain Matt’s force when he has a larger, more mobile armor pool than I have. Maybe I will write an article when I learn something useful! |
||||||||||||||
| 1 Comment |
| Panzer Lehr, scenario #6: Through the Woods | ||||||||||||
|---|---|---|---|---|---|---|---|---|---|---|---|---|
Note: first let me state, that you need to pull the British Daimler & Stag counters from Cassino ‘44 to play this scenario as they are not in the Beyond Normandy box. This looked to be an interesting small cat and mouse scenario with the new Panzer Lehr counters. Both sides score points for eliminating enemy steps and the British only get points for exiting units off the south end of the map. The British must advance to do this, so they are the aggressor, because if no one moves or engages it’s a draw and why play this? But to exit units, the British must get through the German lines with PzIVF2s, PzIVHs and small amount of Infantry & SPWs blocking them. The British have twice the Armor and AFV’s but about the same amount of infantry, not many! Lots of British Cromwells in this scenario. I didn’t use the hidden rule, as the Germans don’t need any more advantage. The Germans setup their armor in forward positions to engage the British right away and the British move forward with armor units of all types hoping to get by with sheer numbers. This plan didn’t work out as the British got hammered right away and their next best plan was to hope to activate first on the next turn and take out a few German steps, but that didn’t happen, the Germans activate first and hammered the British again. In the end, the British only exited a few units and took out a few steps but took such huge losses, that the Germans had and easy Major Victory! Maybe I need to give this scenario another try, as I was frustrated with all my blown-up Cromwells at one point in the game. |
||||||||||||
| 0 Comments |
One thing to note is that I have yet to contain Matt’s force when he has a larger, more mobile armor pool than I have.
LOL - Practice on the Westwall and Siegfried Line etc. You will soon learn your trade as the Germans ! (have not read it in ages, but maybe my post Westwall series completion synopsis that I wrote on the PG forum may allude to defence tactics in the situations of which you mention ?)
P.S - As always, love your fascination for defensive tactics and set-ups !