

| Total | |
|---|---|
| Side 1 | 2 |
| Draw | 3 |
| Side 2 | 3 |


| Overall Rating, 10 votes |
|---|
|
3.4
|
| Scenario Rank: 493 of 913 |
| Parent Game | Heraklion |
|---|---|
| Historicity | Historical |
| Date | 1941-05-23 |
| Start Time | 17:00 |
| Turn Count | 18 |
| Visibility | Day |
| Counters | 22 |
| Net Morale | 0 |
| Net Initiative | 0 |
| Maps | 2: 98, 99 |
| Layout Dimensions | 56 x 43 cm 22 x 17 in |
| Play Bounty | 157 |
| AAR Bounty | 141 |
| Total Plays | 8 |
| Total AARs | 6 |
| Battle Types |
|---|
| Delaying Action |
| Exit the Battle Area |
| Inflict Enemy Casualties |
| Road Control |
| Urban Assault |
| Conditions |
|---|
| Reinforcements |
| Terrain Mods |
| Scenario Requirements & Playability | |
|---|---|
| Heraklion | Base Game |
| Parachutes Over Crete | Maps + Counters |
| Road to Dunkirk | Counters |
| Introduction |
|---|
|
Shortly before midnight on May 18th, the British destroyer Glengyle dropped anchor 500 meters off Tymbaki on the south coast of Crete and the 1st Battalion of the Argyll & Sutherland Highlanders came ashore. They remained under cover on the 19th to avoid the ever-present German ground attack aircraft. The only exception was the Bren Carrier platoon under Lt. Guy Valentine, who went to see if the area south of Agioi Deka along the road across the island to Heraklion could be turned into an emergency airfield. Valentine reported that it could be and two companies moved up join him at Agioi Deka while another moved to Moires. On the 23rd the battalion marched northward to clear the area southwest of Heraklion of Germans, joined by the last two operational Matildas on Crete on their way to Chania. The first objective was to drive the Germans from Cheretis Farm. Once that was accomplished, they were to attempt to secure Stavromenos. |
| Conclusion |
|---|
|
Valentine’s Bren platoon reached Cheretis Farm at 1000 and it took an hour for them to determine that the enemy could be driven from the area with the forces available. Due to a lack of transport most of the battalion remained in Agioi Deka and only A Company arrived. It took an unusually long time to organize the attack and the Scots infantry didn’t go forward until late afternoon. They took Cheretis Farm rather quickly and the small force proceeded with the armored vehicles in the lead. |

|

|
|---|
| AFV Rules Pertaining to this Scenario's Order of Battle |
|---|
|
| Army |
|---|
|


| Luftwaffe |
|---|
|


| 3 Errata Items | |
|---|---|

|
All Bren carriers should have a movement value of 7. (Shad
on 2010 Dec 15)
|

|
Two British infantry have their full strengths printed on the back. They should both be "2-3" when reduced. (Shad
on 2010 Dec 15)
|

|
Reduce strength direct fire value be came 5-5 in Army at Dawn. (plloyd1010
on 2015 Jul 31)
|
| Heraklion, scenario #1: The Thin Red Line | ||||||||||||
|---|---|---|---|---|---|---|---|---|---|---|---|---|
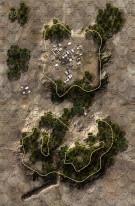
Heraklion, scenario #1: The Thin Red Line Most of the game was focused around the farm hex of hex number 0308, as it is worth 4 points and probably the game, there are some other points award for various things but Cheretis Farm is the key. The Germans started the game in control of Cheretis Farms with a reduced PARA and one leader. As the larger British force enters the map, a few turns later, they expel the Germans but the Germans roll well on their reinforcements and they enter the map on turn three. The German then assault the farm and have an engineer units to boot. Meanwhile the British are busy existing the Matilda tank unit off the northern edge of the map for 2 points. The Battle at the farm raged throughout the game, back and forth, pushed out, recover enter again. The British got lucky and were able to stay in the Farm hex but so did the Germans, so the Farm hex was contest and no points were awarded for it. Point totals; The Germans got 5 points for eliminated British steps and one leader as well. The British got 1 point for eliminated German unit and also a leader as well but got the additional 2 points for exiting the Matilda. So with a final score of Germans 5 point to the British 3 points this game was a Draw. Nothing special about this scenario but the fact it is a low unit count and only 18 turns so you can setup fast, play fast when you don’t have too much time, for this reason I gave it a 4 out of 5 but it should maybe be 3.5. |
||||||||||||
| 0 Comments |
| Red Line Holds | ||||||||||||
|---|---|---|---|---|---|---|---|---|---|---|---|---|
Lots of lucky dice rolls today, but the first rush with the Been and platoon escorted by the Matilda succeed ed in taking the farm in one assault. The German reinforcements didn't get on the board until turn 5, giving the British time to consolidate and deploy, with the major and 2 platoons in the woods to the east of the farm and the captain with mortar and infantry going to the Rocky ground to the west. I'm desperation, the Germans attempted an assault on the farm after a few turns of failure to inflict any casualties from direct and bombardment fire, and paid the price with more step losses. As darkness fell, German leaders wandered looking for their demoralized paratroops. British held the farm and caused 3 step losses for a major victory. I couldn't get the Matilda off with all the Germans wandering on the road. Fun little scenario. |
||||||||||||
| 0 Comments |
| Brits need t obe sneaky | ||||||||||||||
|---|---|---|---|---|---|---|---|---|---|---|---|---|---|---|
I advance the a couple units to gets points for exiting units. Took too much effort to capture the farm. Left it empty and naturally two para units went after the farm. It ended up being contested for no UK points. Somehow screen the the exiting forces and the farm. Getting a para losses to get more point for a win will help. |
||||||||||||||
| 0 Comments |
| Heraklion Scenario One: "Thin Red Line" — (Debut Panzer Grenadier Solo-Learning Play!) |
|---|
|
The Brits stumbled into a confusing situation, basically. They really didn’t know the Rules very well, and consequently forgot to do a lot of important things. Such is the nature of green troops. Plus, having read somewhere that the German infantry had nothing to counter the limping Matildas, they just “drove them up the road” right at the marching Luftwaffe platoons. Needless to say, they disappeared from the map in the first assault… So, imitating the enemy’s early success, Tommy moved right into Cheretis Farm and engaged the seemingly hapless half-platoon garrison stationed there with an able commander. There ensued many many, too many action segments and game-turns during which an approximation of the Founding Father’s conception of a properly executed Assault procedure was, let’s say, “bungled”. The outskirts of the farm also saw skirmish after inconclusive skirmish, disruption and recovery, recovery and disruption, &cetera, into the quickly descending darkness, which shortened up everyone’s range of vision, fire, and movement. Even the slopes, which had somehow magically overridden the strict scenario instructions, held little sway in terms of decisive advantage or obstacle. But eventually the Brits prevailed in the tiny one-hex hamlet, though they were stymied from any significant progress forward. However, actual losses were minimal—only that one aforementioned waltzing Matilda section. Whilst the small Luftwaffe contingent took something of bloody nose in their 7-step loss. It sure didn’t LOOK like a Major Victory as the night wore on, but the tally said otherwise. |
| 0 Comments |
| Buying the Farm | ||||||||||||||
|---|---|---|---|---|---|---|---|---|---|---|---|---|---|---|
The Brits have to take the farm, caused casualties and get on to the road to the north and if possible exit infantry and the 1/2 tanks platoon. They have a reinforced infantry company to do this with. The plans was to move the infantry up and have the mortar support by direct lay fire into the town while the AFVs move north to slow down the German reinforcements. This worked well as the infantry force got lucky and wiped out the German half strength parachute platoon in the farm. The Matilda's and Bren carrier went north to delay the Germans and gained some time doing so by falling back each time the Germans closed. Finally, the Germans assault the town but their suppressing fire was ineffective and the Brits managed to keep enough of the Germans disrupted or demoralized to prevent and assault. The Brits did move forward some infantry and the Bren carriers to assault the enemy mortar platoon and gain the road victory conditions. A fun quick scenario to play but it is a somewhat dicey. |
||||||||||||||
| 0 Comments |
| Penance in Crete | ||||||||||||||
|---|---|---|---|---|---|---|---|---|---|---|---|---|---|---|
This was a very quick, single session play-through with the thoughtful and aggressive, blackcloud6, on offense as the British Commander with orders to liberate the Cheretis Farm. I led the hapless German defenders to an ignominious 11-1 defeat in this decently balanced scenario. Highlights included, the British side deploying their armor very effectively as a blocking force to slow down the Jerry reinforcing column on the main road on Map 98. Also there were two lucky shots on either side: the German one managed to halve a single Scottish infantry platoon with a snake eyes throw; and the British managed to eliminate an entire German HMG outfit with another 2-throw. The farm quickly changed hands and a small contingent of the quick-thinking Scots ran up north to besiege Jerry's sole mortar platoon in the 3-hex town on Map 98 before nightfall - allowing them to hold a road hex at the end of play. While it was fun to play, this game was plagued by a combined 11, combat 7-die rolls that repeatedly caused well-setup-and-sequenced attacks to fail miserably. We plan on playing the second scenario in this 2-scenario battle set as our next play-through, which means that I will again be saddled with no AFVs, surly paratroopers, and a poorly-designed battle map. Oh well . . . no tanks = no fun! |
||||||||||||||
| 4 Comments |
Tragically, it's more like: "doomed-to-perpetually-throw-sevens-asaurus."
Tough to pick up & throw dice with those tiny, 3-clawed, forearms! Hmm, maybe I should use my teeth . . .
How come you hardly ever throw sevens when we play face-to-face? We should x-ray those crummy dice.