
|
On the Donnerberg North of Elsenborn #9 |
||
|---|---|---|
| (Attacker) United States | vs | Germany (Defender) |
| Formations Involved | ||
|---|---|---|
| Germany |  |
12th Infantry Division |
| United States |  |
3rd "Spearhead" Armored Division |

| Total | |
|---|---|
| Side 1 | 5 |
| Draw | 0 |
| Side 2 | 0 |


| Overall Rating, 6 votes |
|---|
|
3
|
| Scenario Rank: 714 of 913 |
| Parent Game | North of Elsenborn |
|---|---|
| Historicity | Historical |
| Date | 1944-09-21 |
| Start Time | 07:00 |
| Turn Count | 24 |
| Visibility | Day |
| Counters | 58 |
| Net Morale | 1 |
| Net Initiative | 2 |
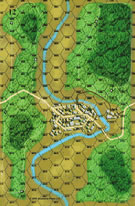
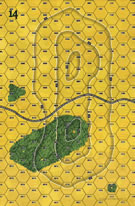
| Maps | 3: 12, 14, 23 |
| Layout Dimensions | 84 x 43 cm 33 x 17 in |
| Play Bounty | 153 |
| AAR Bounty | 159 |
| Total Plays | 5 |
| Total AARs | 3 |
| Battle Types |
|---|
| Rural Assault |
| Conditions |
|---|
| Hidden Units |
| Off-board Artillery |
| Randomly-drawn Aircraft |
| Severe Weather |
| Smoke |
| Terrain Mods |
| Scenario Requirements & Playability | |
|---|---|
| Airborne - IE | Counters |
| Battle of the Bulge | Maps |
| Elsenborn Ridge | Maps + Counters |
| North of Elsenborn | Base Game |
| Road to Berlin | Maps |
| Introduction |
|---|
|
Seeking to widen the breach in the German lines east of Aachen, 3rd Armored Division sent a depleted task force from its Combat Command B against Hill 287, known to the Germans as the Donnerberg. The height overlooked Stolberg, an important town now held by the Americans, and division command feared the Germans would use it to spot for artillery fire. With their remaining tanks and armored infantry, Task Force Mills charged up the hill. |
| Conclusion |
|---|
|
In a quick assault, Task Force Mills took the hilltop and cleared off the German defenders. The Germans had placed their anti-tank guns behind the hill's crest to shield them from the direct fire of the American tank destroyers and self-propelled artillery supporting the attack, and when the American tanks crested the hill the Germans knocked out half of them. The Americans had their objective, but had paid too much for it in the estimation of their division command, Maj. Gen. Maurice Rose. |

|
|
|---|
| AFV Rules Pertaining to this Scenario's Order of Battle |
|---|
|
| Heer |
|---|
|


| Army |
|---|
|


| 7 Errata Items | |
|---|---|

|
The reduced direct fire value of the Heer HMG became 5-5 starting with Fall of France. (plloyd1010
on 2015 Jul 31)
|

|
The morale and combat modifiers of German Sergeant #1614 should be "0", not "8". (Shad
on 2010 Dec 15)
|

|
Strongpoints are single step units and can be eliminated with X results like any other single step unit. (Shad
on 2010 Dec 15)
|
|
|
The standard mix of strongpoints may be downloaded from Avalanche Press: http://www.avalanchepress.com/German_Strongpoints.php This is the standard mix found in Airborne, Airborne-IE, and Edelweiss Expanded. The strongpoint mix in Cassino '44 is different from that of other PG games. (plloyd1010
on 2012 Feb 01)
|
|
|
Strongpoints are affected by the terrain in their hex just like any other unit.
Even though they can't move, they can attack using Assault Combat if an enemy unit moves into their hex.
They may not dig in or benefit from entrenchments.
(rerathbun
on 2014 Apr 21)
|

|
The movement allowance on the counters in Airborne is misprinted. It should be "3." (rerathbun
on 2012 Jan 30)
|

|
The M18 has a special rule in Battle of the Bulge but it applies globally: "A two-step M18 unit can fire one anti-tank shot and move half its movement allowance (retain fractions) in a single impulse. The order in which it does these two actions is the player's choice." (Shad
on 2010 Dec 15)
|
| North of Elsenborn, scenario #9: On the Donnerberg | ||||||||||||
|---|---|---|---|---|---|---|---|---|---|---|---|---|
*North of Elsenborn, scenario #9: On the Donnerberg *I was looking to play something from North of Elsenborn and something not too long and I ran across this scenario and it included a M12 155mm SP unit, which I have never pushed across a map board yet and the scenario looked interesting, so I went for it.
*The German setup on the big hill on map 14, with Infantry, support weapons, Strongpoints, AT-guns and dug-in with off-board artillery. The Americans Have Infantry, armor, SP’s, Mortars, APCs and Airpower but more important to this scenario, SMOKE! The M7, M12 & the Mortar can all fire it. In fact, without it, this would have been a difficult scenario to play offensively, as the Americans had to come out of the forest, right into the face of the large defended hill hexes. *The Americans were able to use the smoke as cover and close fast, the use direct fire of a powerful armor and Infantry force for it’s size, then throw in their on board SP fire (M12 24 points + M7 18 points = 42 points of Bombardment power) and with airpower, they were able to drive to Germans from the hills. They had to regroup a couple of times and took some losses but the Germans took more losses, and left the battlefield with the American in control with a Major victory. |
||||||||||||
| 0 Comments |
| Them boys jus' got their dander up! | ||||||||||||||
|---|---|---|---|---|---|---|---|---|---|---|---|---|---|---|
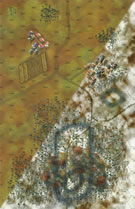
General play notesWe didn't play double-blind this time, but we did try an unknown leader idea. Apart from leader names we didn't know the stats initially. We used a modified random event table from BB and the fast mech rule. We decided that the wagons should also be allowed to setup hidden, if with a gun. Setting upThe Germans deployed on to hilltops, with an AT gun on each flank. The AT strongpoint (he got lucky there) and IGun were placed to form a cross fire between the hills. While my opponent was deploying, I suggested he use more of a reverse slope defense on the bare hilltop, advice which, to his later regret, he disregarded. The wooded hill was invested with most of the grenadiers. The Americans loaded up in the town. How it went downThe Americans drove up the road on broad 12, and cut though the light woods in before the bare side of the hill. A random event caused a German HMG to break from the woods, he got mangled by artillery and small arms before he got back in position. U.S. infantry dismounted and started up the hill. Their objective was to root out the AT guns which may have been waiting. (As implied in the setup narrative, there was one.) The infantry lost a step on the way up the slope, but did their job. The AT gun was found and winkled by the SPAs. The armor and halftracks advanced in 2 large formations and moved up the south slope. The Germans were quickly blasted from their foxholes. That half of the hill was cleared by turn 7. The US SPAs moved onto the spur facing the wooded hill. Infantry to the front and tanks to back. The best US officer, John @ 1-9-1, seems to have not had a full bowl of Wheaties for breakfast (he is demoralized and keeps failing recovery rolls). The rest of the army prepares without him. The infantry crossing the gap is almost stopped. As there is only the strongpoint for AT defense in the gap, the SPAs blast it. The armor moves up through the infantry and starts working the grenadiers. Doug, a good combat officer but not inspiring, leads a couple platoons around the woods on reconnaissance. They find the second AT gun on the north side of the woods. The Germans put up a heroic defense. In the end massive US firepower decides the day. There are simply not enough, and never were, German bodies to fill the gaps. The Americans have lost 8 steps, including 3 halftracks. The Germans are down by 15, most of the survivors are disrupted or demoralized. SummaryIt was fun for the first 3 or turns. Once the Americans were on the hill, the end was in sight. It took another 12 turns or so, but once the Americans were in the amongst the Germans on the southern peak, the outcome was clear. |
||||||||||||||
| 1 Comment |
| A Knight's Cross for the Heer 12th Infantry Forward Artillery Observer | ||||||||||||
|---|---|---|---|---|---|---|---|---|---|---|---|---|
America's 3rd Armored wins a Major Victory (by controlling 40+ meter elevation and causing more German step loses than suffered), but the Heer 12th Infantry a Minor Victory by inflicting 18 step losses on The Spearhead. US forces mounted up; approached the Donnerberg's foothills and swung north attempting to effect a north to south cleansing of the twin heights. An uncovering German 75/41 killed a loaded M3 forcing the rest to dismount in a hurry. A combination of Heer OF and OBA (the latter of which ultimately accounted for six steps of US infantry) gave the US a bloody nose upon approach up the forested northeast slopes. The hasty scramble left the US approach in a bit of a shambles taking a few turns to reorganize. Meanwhile, the Germans moved the other ATG whilst the US took advantage of liberal smoke to block spotters on the southern hilltop. During middle game, the US combination of M3's + armor + HMGs destroyed significant German dug-in positions. The US forces, continued to be hurt by distressingly accurate fire (including two leaders) from the OBA and 81mm whilst US counter-fire was consistently scattered. LTC Stupendous (11-1-2) was quite busy encouraging his troops in the face of the battering: a future bird colonel soon-to-be. The US was in such a state with its INF and D/DD that it risked a three-tank assault vs. a GREN + 75/41 (which simply would not go away) on the southern peak (0707). This assault was quite effective. The counter-assault, lead by Heer Major 10-1-1 (posthumous award of the Oakleaves), with an HMG + GREN firing (both) panzerfausts destroyed three steps of US armor in 15 minutes whilst themselves being decimated. US reinforcing M3's and HMG cleared the assault. The remainder of the game was a moping up operation to repel the last Heer GREN step and the mortars from the high ground, and destroy a strongpoint. At game end the US had remaining: 4xINF(reduced) 1xINF 2xHMG 5xM3 2xM4/76 1xM4 + 1xM4(reduced) 1xM18(reduced) and the M7 + M12 + 81mm for a total of 18 countable step losses; a savaged mechanized infantry contingent; and a lot of burning armor in hex 0707 atop the Donnerberg. The Germans had lost a battalion of determined defenders; a brave Major in command; a key mountain position; but gained a new "Knight" in the regiment's forward artillery observer. |
||||||||||||
| 0 Comments |