
|
Okinawa: The Last Japanese Paratroopers Nihon Silk #9 |
||
|---|---|---|
| (Attacker) Japan | vs | United States (Defender) |
| Formations Involved | ||
|---|---|---|
| Japan |  |
1st Glider Tank Unit |
| Japan |  |
1st Raiding Brigade |
| United States |  |
6th Marine Division |
| United States |  |
96th "Deadeye" Infantry Division |

| Total | |
|---|---|
| Side 1 | 0 |
| Draw | 0 |
| Side 2 | 2 |


| Overall Rating, 2 votes |
|---|
|
4
|
| Scenario Rank: --- of 913 |
| Parent Game | Nihon Silk |
|---|---|
| Historicity | Historical |
| Date | 1945-08-30 |
| Start Time | 08:00 |
| Turn Count | 36 |
| Visibility | Day |
| Counters | 77 |
| Net Morale | 0 |
| Net Initiative | 0 |
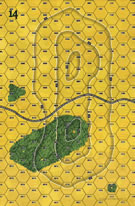
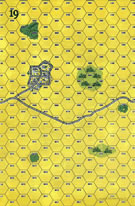
| Maps | 2: 14, 19 |
| Layout Dimensions | 56 x 43 cm 22 x 17 in |
| Play Bounty | 170 |
| AAR Bounty | 165 |
| Total Plays | 2 |
| Total AARs | 2 |
| Battle Types |
|---|
| Airfield Control |
| Paradrops |
| Conditions |
|---|
| Hidden Units |
| Terrain Mods |
| Scenario Requirements & Playability | |
|---|---|
| Battle of the Bulge | Maps + Counters |
| Guadalcanal | Counters |
| Nihon Silk | Base Game |
| Introduction |
|---|
|
The Japanese planned a much bigger airborne and glider assault with large bomber-towed Ku-7 and Ku-8 gliders. Forces included Type 95 light trucks, a jeep-like vehicle usually used for unarmed liaison duties but specially equipped with a 20mm automatic cannon for this mission. The gliders were also to carry 47mm anti-tank guns and 75mm field pieces to support the attack. The large Ku-7 Glider was developed to carry light tanks, and the Type 2 Ke-To light tank completed the attacking force. As the war continued, only two Ku-7 Gliders and 34 Type 2 tanks were produced and the war ended before this last raiding force could attack. For players who like armor and weird units, this should hit the spot! |
| Conclusion |
|---|
|
As defeat loomed, Japanese plans veered ever deeper into insanity - an alternative to this strike called for an airborne landing in the Marianas to destroy B-29 bombers on the ground. Even if the Japanese had won a tactical victory in this Okinawa operation it would have been short-lived, but it is interesting to see what these different types of units might have accomplished. |

|
|
|---|
| AFV Rules Pertaining to this Scenario's Order of Battle |
|---|
|
| Imperial Japanese Army |
|---|
|


")

| Army |
|---|
|


| Marine Corps |
|---|
|


| 1 Errata Item | |
|---|---|

|
This unit should not be treated as a transport unit, rather it is gun armed reconnaissance car. It should exist in the game as an unarmored "armored" car. Refer to the forum post at http://www.pg-hq.com/comms/showthread.php?tid=491 for more details. (plloyd1010
on 2013 Mar 11)
|
| Nihon Silk, scenario #9: Okinawa: The Last Japanese Paratroopers | ||||||||||||
|---|---|---|---|---|---|---|---|---|---|---|---|---|
Posting #1 *I have played all my scenarios to some degree but not since AP updated them with a few rule changes to Para-Drops & Glider Landings, also a few map changes on scenario #8 & #9 and some minor victory condition changes to a few scenarios as well, not to mention they add a few hidden units rules on a few of the scenarios. Mostly the game is intact but I must play them all again to see the effects and to judge myself once again, but also for the fun of it. *In this scenario AP changed out my Afrika Korp map for some Road to Berlin maps, which is fine by me and I am using the new Glider Landing rules, so this should be fun to play again. *I used some Glider counters as markings for my three drop zones I picked. These counters I found from another game magazine and I knew they would be useful someday. AP choose not to use actual gliders counters for this download supplement and drop my counters from the mix, which is fine, as the new rules cover this. I picked three drop areas, but I should have maybe used four or five and I think after seeing the results of my landings, I picked my assembly points too close to the enemy units and the American will now have a bigger advantage but I will go ahead and play it out this way instead of resetting as this is more like the fog of war scenario the Japanese would most likely have faced in this scenario. Also, this is my only hypothetical scenario out of the 10 scenarios, not that it’s that hypothetical, as it was planned at one point but the war ended. Besides it has some interesting Japanese units never tried out before. *The Japanese do not have a lot of luck on their coordinated drop timings and the units will now drop on turns ranging from 1-4. This hurts especially when some will end up demoralized, disrupted or worst. But it will be turns 5 or 6 before all of them are in action to some degree. Coming in piecemeal is not what I wanted for the Japanese. The American Marines & Army units will have a field-day with early attacks. Next time, I will land my gliders farther back from the airfields and regroup to attack as one battle-group but for now I must organize and take some airfields from the Americans. The later drops will just have to reinforce the turn one group. Posting #2 *I am sticking to my guns and not resetting this scenario, even if the Japanese have taken a beating. The Sherman tank unit has already taken out a Japanese Type 2 tank unit and the 57mm gun took out half a step of Japanese 95/20 jeep units. A Japanese 47mm AT gun and truck unit that landed on an American Marine group is gone as well, not to mention half a step of Japanese PSMG Infantry that also landed too close. There are currently about 9-10 other Japanese units that are demoralized or disrupted but the Japanese finally have all their units on the board and should be able to fire back and have a few small attacks of their own but the next 5-6 turns will tell if it’s too little, too late or not, as they do not have that higher morale of scenarios taking place in 1942, but only a 8/7 for this scenario, which is pretty much equal to the American units. *Reminder to myself, never land too close the enemy airfields or enemy units, or it is game over very early. Well back the battle! Posting #3 *The Japanese managed to pull off two attacks after I thought it to be hopeless. The first one was repulsed again but one last push in the center on the second attack wave, managed to my surprise to take three airfields, as the American were still occupied to some degree from the first attack. The Americans however, were too strong and managed to take back all three airfields lost to the Japanese and there was nothing more for the scattered and too weak remaining Japanese to do, but head for the hills and fight as guerrillas. Both side lost units but the Japanese lost about twice as many and this was an American victory. *The new late war Japanese PSMG unit has some nice power compared to the traditional Japanese Infantry but they only have a range of one hex and must get adjacent or assault to be effective against Allied units. I am I didn’t throw in the towel in the very begin, as the Japanese manage to pull together for some exciting attacks and work with the odd vehicle types was challenging was well. *As I stated before, if I would have drop farther way from the American with closer linked drop zones, I would have given the Americans a better run for their money in this scenario but would it have been enough? *There are some subtle changes in this scenario from the original that could have changed the balance a small bit. One was the map change from the larger Afrika Korp map to two smaller Road to Berlin maps, also the Marines & Army units starting Dug-In and lastly the Air-drop & Glider rules changes are a bit harder in the Japanese then the original version. To balance this out, I recommend taking out 3-4 Allied Infantry units, and this will be a much closer match. If not, just don’t drop too close to the airfield in this scenario, as the American have too much fire-power to go in piecemeal. |
||||||||||||
| 0 Comments |
| Nihon Silk 9 The last Japanese Paratroopers or Going out with a flourish! |
|---|
|
The Axis have a nicely rounded force. They have a little bit of every thing. The Allies also have a powerful force. This was a fun play. The Allies set up dug in around the airfield. The mortars and 2 platoons were in the woods on bd 19 in hexes 0208 and 0308 and dug in hex 0309. The Engineers and the armor set up in 0303 and 0403 on bd 19. I can't imagine the Allies doing anything too too differently unless they can dig in right on the runway hexes. The rules do not prohibit it. But to me that does not make too much sense if it is a working airfield. If it is not, why would the Axis attack in the first place? The Axis decide against a coup de main vs the airfield. Landing directly on the runway and in the hexes right around it, in the heart of in the Allied position, would be just suicidal.... Oh yeah, that's right. The Axis are here to do just that. Sorry, what was I thinking? Well anyway the Axis opted to land on bd 19 with the assembly point at 0612. They would land and then attack to the south out of their airhead. The Axis landing was fair over all. They lost one ATG platoon and a truck that scattered off board and landed bad. In addition three other PSMG steps were lost on landing. Amazingly three whole PSMG platoons landed in the swamp on bd 19 in hexes 0907 &0906. Even more amazing they lost only one step there. What is more amazing than that is that none of them ever got into the battle! Incredible. (See below) The Axis attack slammed into the north side of the Allied position gobbling up a Allied position in hex 0609 on bd 19. This decapitated the Allied force. No movement now for a number of units for the rest of this turn and the next. All of this by 0845. The fact that the Allies could not move turned out not to have been such a burden. They were not going anywhere anyway. It turned into a really wild melee with both sides feeding units into the maelstrom. Both sides suffered for it. Eventually superior Allied point blank and bombardment fire bested Axis Bushido in assault. As the Axis were being ground down at 0945 THEY were decapitated! The Allies then counter attacked in force using fresh units that had been dug in on the south end of the runway and the two platoons, an Inf & HMG, which had been guarding the mortar position. None of these had been in assault yet. By 1100 the Axis had only 11 steps left on the entire board. Five were demoralized, another three were next to the airfield but surrounded on 4 sides with a weak Lt. in command. The other three had been struggling to get out of the swamp since the landing! This was a really fun scenario. Lots of options for everyone. Next time I'll try a direct glider assault on the airfield hexes. The Axis certainly could not loose more steps, that's for sure. I'll give this a 4. I really liked the counter mix for both sides and the no hold barred type of fast and furious attack that is required. |
| 0 Comments |