Panzer Grenadier Battles on April 27th:
Arctic Front Deluxe #40 - Children's Crusade Broken Axis #14 - Târgu Frumos: The Second Battle Scenario 3: Sledge Hammer of the Proletariat
Army Group South Ukraine #6 - Consternation Road to Berlin #73 - She-Wolves of the SS
Errors? Omissions? Report them!
The O-3 Line Objective
Marianas 1944 #24
(Defender) Japan vs United States (Attacker)
Formations Involved
Japan 321st Independent Infantry Battalion
Japan 322nd Independent Infantry Battalion
Japan 48th Independent Mixed Brigade
Japan 9th Tank Regiment
United States 9th Marine Regiment
Display
Balance:


Overall balance chart for MARI024
Total
Side 1 0
Draw 0
Side 2 4
Overall Rating, 4 votes
5
4
3
2
1
4.25
Scenario Rank: --- of 913
Parent Game Marianas 1944
Historicity Historical
Date 1944-08-05
Start Time 10:00
Turn Count 20
Visibility Day
Counters 48
Net Morale 0
Net Initiative 1
Maps 2: 100, 82
Layout Dimensions 86 x 28 cm
34 x 11 in
Play Bounty 150
AAR Bounty 165
Total Plays 4
Total AARs 2
Battle Types
Inflict Enemy Casualties
Conditions
Caves
Entrenchments
Off-board Artillery
Reinforcements
Scenario Requirements & Playability
Marianas 1944 Base Game
Saipan 1944 Maps + Counters
Introduction

After the 9th Marine Regiment reached the vicinity of a new objective area called O-3, Companies B & C received orders to begin the second phase of the operation, securing the O-3 line and linking up with the 21st Marine Regiment. This task, if successful, would open the RJ 177 road as a supply route through the thick jungle. However, since the 4th of August enemy 75mm and 105mm gun positions and heavy foot presence in the thick brush retarded progress in the dangerous thick foliage. In one case, 15 yards was all that separated a Sherman tank from an unseen Japanese medium tank, but the assault went forward anyway.

Conclusion

Company B ran into heavy opposition immediately and called for help. By noon Company C attempted to flank the strongly-defended area. The accompanying tanks received heavy anti-tank fire and the general advance slowed. The Marines had destroyed one enemy 75mm gun position, but Battalion committed Company A to close the gap between Companies B and C. The tired units stopped in the area of a road junction in the vicinity of Liguan for the night, but still Japanese artillery rained shells on the Marine positions into the next day.

Additional Notes

American morale and initiative are transposed.


Display Relevant AFV Rules

AFV Rules Pertaining to this Scenario's Order of Battle
  • Vulnerable to results on the Assault Combat Chart (7.25, 7.63, ACC), and may be attacked by Anti-Tank fire (11.2, DFT). Anti-Tank fire only affects the individual unit fired upon (7.62, 11.0).
  • AFV's are activated by tank leaders (3.2, 3.3, 5.42, 6.8). They may also be activated as part of an initial activating stack, but if activated in this way would need a tank leader in order to carry out combat movement.
  • AFV's do not block Direct Fire (10.1).
  • Full-strength AFV's with "armor efficiency" may make two anti-tank (AT) fire attacks per turn (either in their action segment or during opportunity fire) if they have AT fire values of 0 or more (11.2).
  • Each unit with an AT fire value of 2 or more may fire at targets at a distance of between 100% and 150% of its printed AT range. It does so at half its AT fire value. (11.3)
  • Efficient and non-efficient AFV's may conduct two opportunity fires per turn if using direct fire (7.44, 7.64). Units with both Direct and AT Fire values may use either type of fire in the same turn as their opportunity fire, but not both (7.22, 13.0). Units which can take opportunity fire twice per turn do not have to target the same unit both times (13.0).
  • Demoralized AFV's are not required to flee from units that do not have AT fire values (14.3).
  • Place a Wreck marker when an AFV is eliminated in a bridge or town hex (16.3).
  • AFV's do not benefit from Entrenchments (16.42).
  • AFV's may Dig In (16.2).
  • Open-top AFV's: Immune to M, M1 and M2 results on Direct and Bombardment Fire Tables, but DO take step losses from X and #X results (7.25, 7.41, 7.61, BT, DFT). If a "2X" or "3X" result is rolled, at least one of the step losses must be taken by an open-top AFV if present.
  • Closed-top AFV's: Immune to M, M1 and M2 results on Direct and Bombardment Fire Tables. Do not take step losses from Direct or Bombardment Fire. If X or #X result on Fire Table, make M morale check instead (7.25, 7.41, 7.61, BT, DFT).
  • Closed-top AFV's: Provide the +1 modifier on the Assault Table when combined with infantry. (Modifier only applies to Germans in all scenarios; Soviet Guards in scenarios taking place after 1942; Polish, US and Commonwealth in scenarios taking place after 1943.) (ACC)
  • Tank: all are closed-top and provide the +1 Assault bonus, when applicable
  • Anti-Tank Gun Carrier: half-track with anti-tank gun, NOT a Tank Destroyer

Display Order of Battle

Japan Order of Battle
Imperial Japanese Army
  • Mechanized
  • Motorized
United States Order of Battle
Marine Corps
  • Mechanized

Display Errata (1)

1 Errata Item
Overall balance chart for 1466

The 8-3 Marine Infantry counter appears in most of the Saipan 1944 and Marianas 1944 scenarios, replacing the 10-3 DF valued Marine counters for those scenarios and is currently published in the most recent Saipan printing.

(JayTownsend on 2015 Dec 26)

Display AARs (2)

Leaders Without Troops
Author thomaso827
Method Solo
Victor United States
Play Date 2015-05-20
Language English
Scenario MARI024

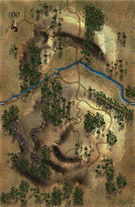
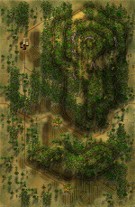
This was an interesting scenario to work with. Japanese have 4 full strength infantry platoons and 3 reduced to defend 2 board lengths and try to defend 3 gun positions, along with 2 HMGs, 2 FLMs, 2 81mm mortars and 2 10factor OBA elements against 2 full strength Marine infantry companies, each supported by a Sherman platoon and the second platoon also having an M-3/75, and the Marines OBA is a column better with 2 18 factor elements. Marines got the cream of the crop leadership with every one but the SGT having at least a 1 in both DF and MM factors, with several having a 2 in one or the other. I set up the Japanese with the 105mm guns entrenched with it's truck in the southern-most big hill along with an HMG where it could start raining down fire on the first Marines to appear just about anywhere along the west edge, with a full and reduced platoon in the heavy jungle blocking any direct attempt to assault the guns. One 75mm gun was in jungle east of the smaller hill mass on board 100, again directly supported by an adjacent stack of one full and one reduced Infantry. The last 75mm gun was set up in the eastern town hex on board 82 with the other HMG, and the last stack of Japanese infantry was in the jungle just south of the highest peak of the big southern hill on board 82 where he could either stop a force heading through the jungle or fall back to offer support to the northern 75mm gun. The first company of Marines enter immediately at the start of the game, the second comes on or after turn 8 by a die roll of 5 or 6.

The Marines won the initiative and chose to enter so that the jungle screened them from direct observation from the hill top, which kept them safe from the 105s and HMGs there, as well as from the Japanese infantry. The Marines moved in 2 groups, with the Captain, HMG and Mortar and the 3 LTs each with an infantry platoon, the best of the LTs also having the Flame element, and started up the hill with one stack heading south and east to try to flank the defenders. This worked well, with the Marines being able to spot the entrenchment just as the Japanese were also able to see one stack of Marines. An OBA exchange left a bunch of dead and demoralized Japanese infantry while Japanese fire had no effect on the Marines, and the Marines were able to take both the Japanese infantry and the entrenchment inside of 5 turns with no losses to themselves. The only survivors of this first engagement for the Japanese was their Major, who had commanded the gun position, and a 9-0-0 LT who had commanded the infantry. While this element was heading up the south half of the board, the Marine LTC and Sergeant, each with an infantry platoon, accompanied the Sherman east along the road until the tanks stopped on the road in light jungle for the foot Marines to scout around through the jungle in search of anything that could hurt them, and that was where they found the 37mm AT gun and eliminated it in assault. They moved forward just a bit so that the Shermans could trade fire with the Japanese Type 97 reduced platoon that was just north and east of the bridge in light jungle, the Type 97 rolling a 3 and the Shermans rolling a 12, finishing off the Japanese tanks. The southern Marine force, having eliminated all Japanese defenders in their path and having chased the Japanese officers away, moved north and crossed the bridge outside where jungle again masked their movement from the central Japanese 75mm gun, while the Marine LTC called in OBA that killed the gun and demoralized the HMG element. Tank and infantry fire eliminated the last Japanese infantry threat on the southern board. And just about the time that the southern board was being cleared and troops were getting to a point to observe the Japanese town to their north, the second company began entering the board, the armor heading inland along the trail with the full infantry company and support moving in as a chain of command block. The Japanese troops on the hill top decided the best place for them to be was closer to the town where they could at least prevent the town from being encircled. Marine armor pulled up from both sides at 3 hex range and started firing at the town with little effect, but the last of the Japanese 75s fired and killed a step of the M-3/75s, demoralizing the other step, which in later turns, moved back along the trail out of sight to lick it's wounds, unsuccessfully as it turned out for the rest of the game. The Marines from the south succeeded in calling in OBA on the town while the Marines from the new force moved slowly through the jungle over the hill, and both Marine forces succeeded in getting into assault range, one with the town (the assault force being a Sherman platoon, Infantry and a Flame unit) and the other coming from over the hill onto the Japanese infantry force initially with 1 infantry and the other Flame unit. Both assaults took at least one step, with the town seeing the loss of the last of the Japanese guns while the Japanese infantry lost a full platoon, leaving a demoralized leader but a good order single step of infantry to attack back. The HMGs in the town fired but did no damage and were destroyed in the next round of assault, as the Marines on the hill added a fresh infantry unit and overwhelmed the Japanese infantry there. Trying to prevent one of the surviving Japanese officers from calling in OBA, the Marines that were not directly involved with assaults chased down the Japanese Major, finally chasing him off the board as the town fell. Even though the Marines won immediately when they got the last of the 3 guns, I wanted to play out the 2 assaults to the bitter end. And in that bitter end, the US won with only the single halftrack step loss to the Japanese loss of 20 points (tank counted double and the truck didn't count). Great game. Played with the 10-3 Marine counters. I have the new ones but haven't broken them out yet.

0 Comments
You must be a registered member and logged-in to post a comment.
Marianas 1944, scenario #24: The O-3 Line Objective
Author JayTownsend
Method Solo
Victor United States
Play Date 2018-08-22
Language English
Scenario MARI024

Marianas 1944, scenario #24: The O-3 Line Objective

The Marines have one objective, to eliminate both Japanese 75mm guns and the 105mm gun by the end of 20 turns. The Japanese have two caves and one entrenchment counters to help protect their assets. The Americans have two similar forces but one doesn’t attempt to enter the battle until rolling a 5-6 starting on turn 8 but in my game don’t enter until turn 14. Both sides have off-board artillery and the Japanese decided to setup all their forces on the more difficult terrain on map 82 in three locations.

The Marines after four turns of movement close in with the first Japanese blocking position in a town along the road with a reduced step of Type 97 Medium tanks and two Infantry steps and one leader, The Americans make the arrogant mistake of pulling their Sherman tank adjacent to the Type 97 tank feeling invincible, but the Japanese tank rolls a 11 on the dice and gets one 1 point for their small AT Gun value and another modifier of +1 for being adjacent, for a total of 13 modified AT points and tank step loss for the Americans which are able to pass their morale check and eliminate the Japanese tank as well but lesson learned.

The Drive was slow in climbing the mountain to eliminate some of those Japanese guns and the American reinforcements would have to deal with the other Japanese gun position on the other side of the map. The Marine reinforcements didn’t show up until turn 14 which put a lot of pressure on the Americans to achieve their victory condition and in fact didn’t complete that task until the last turn and just barely. Without the reinforcements and the good dice rolls on the last turn, the Americans wouldn’t have won this one, so a very good scenario to play. The Japanese lost 12 steps and three leaders and the Americans lost 7 steps and one leader in this small but blood contest.

0 Comments
You must be a registered member and logged-in to post a comment.
Errors? Omissions? Report them!
Page generated in 0.573 seconds.