Panzer Grenadier Battles on April 27th:
Arctic Front Deluxe #40 - Children's Crusade Broken Axis #14 - Târgu Frumos: The Second Battle Scenario 3: Sledge Hammer of the Proletariat
Army Group South Ukraine #6 - Consternation Road to Berlin #73 - She-Wolves of the SS
Errors? Omissions? Report them!
“Hello, Where Are Your Machine Guns?”
Leyte '44 #34
(Attacker) Japan vs United States (Defender)
Formations Involved
Display
Balance:


Overall balance chart for Leyt034
Total
Side 1 1
Draw 0
Side 2 0
Overall Rating, 0 votes
5
4
3
2
1
0
Scenario Rank: of
Parent Game Leyte '44
Historicity Historical
Date 1944-12-06
Start Time 18:00
Turn Count 34
Visibility Night
Counters 100
Net Morale 0
Net Initiative 3
Maps 4: 100, 101, 82, 83
Layout Dimensions 86 x 56 cm
34 x 22 in
Play Bounty 193
AAR Bounty 171
Total Plays 1
Total AARs 1
Battle Types
Airfield Control
Paradrops
Conditions
Off-board Artillery
Randomly-drawn Aircraft
Reinforcements
Smoke
Terrain Mods
Illumination
Scenario Requirements & Playability
Leyte '44 Base Game
Marianas 1944 Maps
Saipan 1944 Maps + Counters
Introduction

As the Americans recovered from the excitement of Makino’s attack and awaited their dinner, Japanese planes appeared over several of Leyte’s American-occupied airfields. Some of them attacked the airfields, but 49 of them dropped paratroopers bent on causing as much destruction as possible. Seeking to sow confusion, many shouted nonsensical English-language phrases as they attacked.

Conclusion

By early morning the Japanese controlled Buri Airfield and contested Bayug and San Pablo airfields. They did not find the fields teeming with aircraft that they expected, but blew up a handful of liaison planes that used the soggy strips and destroyed some small supply dumps. The Americans began a concerted counter-attack the next morning.


Display Relevant AFV Rules

AFV Rules Pertaining to this Scenario's Order of Battle
  • Vulnerable to results on the Assault Combat Chart (7.25, 7.63, ACC), and may be attacked by Anti-Tank fire (11.2, DFT). Anti-Tank fire only affects the individual unit fired upon (7.62, 11.0).
  • AFV's are activated by tank leaders (3.2, 3.3, 5.42, 6.8). They may also be activated as part of an initial activating stack, but if activated in this way would need a tank leader in order to carry out combat movement.
  • AFV's do not block Direct Fire (10.1).
  • Full-strength AFV's with "armor efficiency" may make two anti-tank (AT) fire attacks per turn (either in their action segment or during opportunity fire) if they have AT fire values of 0 or more (11.2).
  • Each unit with an AT fire value of 2 or more may fire at targets at a distance of between 100% and 150% of its printed AT range. It does so at half its AT fire value. (11.3)
  • Efficient and non-efficient AFV's may conduct two opportunity fires per turn if using direct fire (7.44, 7.64). Units with both Direct and AT Fire values may use either type of fire in the same turn as their opportunity fire, but not both (7.22, 13.0). Units which can take opportunity fire twice per turn do not have to target the same unit both times (13.0).
  • Demoralized AFV's are not required to flee from units that do not have AT fire values (14.3).
  • Place a Wreck marker when an AFV is eliminated in a bridge or town hex (16.3).
  • AFV's do not benefit from Entrenchments (16.42).
  • AFV's may Dig In (16.2).
  • Closed-top AFV's: Immune to M, M1 and M2 results on Direct and Bombardment Fire Tables. Do not take step losses from Direct or Bombardment Fire. If X or #X result on Fire Table, make M morale check instead (7.25, 7.41, 7.61, BT, DFT).
  • Closed-top AFV's: Provide the +1 modifier on the Assault Table when combined with infantry. (Modifier only applies to Germans in all scenarios; Soviet Guards in scenarios taking place after 1942; Polish, US and Commonwealth in scenarios taking place after 1943.) (ACC)
  • Tank: all are closed-top and provide the +1 Assault bonus, when applicable

Display Order of Battle

Japan Order of Battle
Imperial Japanese Army
United States Order of Battle
11th "Angels" Airborne Division
Army
  • Mechanized

Display AARs (1)

Leyte 1944, Scenario Thirty-Four: “Hello, Where Are Your Machine Gun?”
Author JayTownsend
Method Solo
Victor Japan
Play Date 2020-12-20
Language English
Scenario Leyt034

Leyte 1944, Scenario Thirty-Four: “Hello, Where Are Your Machine Gun?”

In 2010 or 2011 I wrote this scenario for Nihon Silk, called The Burauen Raid, Wa Operation. Now ten years later, I got to do it better and correctly, as now Panzer Grenadier has all the counters and maps to do this scenario “Hello, Where Are Your Machine Gun?” properly in the Leyte supplement.

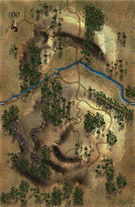
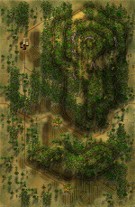
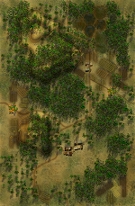
The Japanese start things off with their parachute/airborne drop, which is a really fun section of every scenario with actual parachute landings in it. The Japanese had one of their best landings to date, as they rolled and landed well with only one unit disrupted and another one shot at with opportunity fire. After a bloody fight the Japanese controlled all three airfields before the American reinforcements arrived. In fact the far airfield in the northwest corner on map 83 needed the Japanese reinforcements to arrive on turn 12 before they could control that one. Right or wrong I defended all three airfields with equal forces for the American and divided my Japanese attacking forces the same way. It was like having three battles going on at the same time with some transfer of forces as needed. By turn 15, the Japanese had dug-in around all three airfields like the Americans before them. Turn 15 also brought into play a pretty large American reinforcement group which decided to all attack the closest Japanese airfield to their entry point on map 100. It looked at first to be easy but it wasn’t and took me about 15 turns to pry the Japanese out of that airfield, as the Americans had used all their artillery on the earlier turns defending. The Japanese had some successes with their rare air-support on turns 1-2. At about turn 30 the Americans had their eyes on a second Japanese airfield but were in such a bad shape and scattered a bit, there was no way to even group together again and dig-out another group of Japanese defenders. The American 5 values Direct Fire Airborne Infantry are not exactly the fire power wonders, there maybe be good for surprise offenses of defending but not so great for digging out Japanese dug-in Paratroopers with a high Morale.

The Japanese win a minor victory, controlling two out of three airfields. Talk about a bloody scenario with both sides getting to attack and defend. The Japanese lost 21 steps and 4 leaders, while the Americans even more, 30 steps and 4 leaders. Both sides have some reduced steps to start with, so calculation has to be careful, not that losses matter in this scenario for victory points.

This is a very fun scenario to play and a unique one at that, as not many games model a late war Japanese para-drop! You will need all 34 turns to play this one out but I highly recommend this scenario!

0 Comments
You must be a registered member and logged-in to post a comment.
Errors? Omissions? Report them!
Page generated in 0.28 seconds.