
|
Violet Beach Leyte '44 #10 |
||
|---|---|---|
| (Defender) Japan | vs | United States (Attacker) |
| Formations Involved |
|---|

| Total | |
|---|---|
| Side 1 | 0 |
| Draw | 0 |
| Side 2 | 1 |


| Overall Rating, 0 votes |
|---|
|
0
|
| Scenario Rank: of |
| Parent Game | Leyte '44 |
|---|---|
| Historicity | Historical |
| Date | 1944-10-20 |
| Start Time | 08:00 |
| Turn Count | 22 |
| Visibility | Day |
| Counters | 94 |
| Net Morale | 0 |
| Net Initiative | 1 |
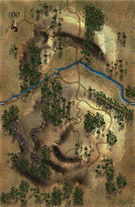
| Maps | 2: 100, 80 |
| Layout Dimensions | 56 x 43 cm 22 x 17 in |
| Play Bounty | 177 |
| AAR Bounty | 171 |
| Total Plays | 1 |
| Total AARs | 1 |
| Battle Types |
|---|
| Amphibious Landing |
| Exit the Battle Area |
| Inflict Enemy Casualties |
| Entrenchment Control |
| Conditions |
|---|
| Entrenchments |
| Off-board Artillery |
| Reinforcements |
| Scenario Requirements & Playability | |
|---|---|
| Leyte '44 | Base Game |
| Marianas 1944 | Maps |
| Saipan 1944 | Maps + Counters |
| Introduction |
|---|
|
The beaches in front of Dulag Airfield were an obvious invasion site, and the Japanese had built improved positions including concrete pillboxes to defend them. But with only a single division to cover the entire island, the Japanese would by necessity be spread thin almost everywhere. The beaches at Dulag were the one place where they were not. |
| Conclusion |
|---|
|
The invaders met increasing resistance as they moved inland, but Sherman tanks from the 767th Tank Battalion arrived to aid the advance. A Japanese anti-tank gun destroyed one Sherman and knocked out another’s main gun, but the Americans managed to push the Japanese out of their prepared positions. The resistance kept the Americans from meeting their A-Day objectives, but the Japanese had paid a heavy price. |

|

|
|---|
| AFV Rules Pertaining to this Scenario's Order of Battle |
|---|
|
| Imperial Japanese Army |
|---|
|


| Army |
|---|
|


| Marine Corps |
|---|
|


| Navy |
|---|
|

| 3 Errata Items | |
|---|---|

|
LVT 4 is a one step open-topped APC. Any scenarios where units and leaders start loaded on LVT 4's and enter the board via ocean hexes do not activate in the regular manner. While at sea, all LVT 4's activate like AFV's with leaders, and move toward beach hexes. While moving toward the beach hexes they don't need to use all MPs or move in a straight line. Once they are on the beach, they must follow standard activation rules for both land and water hexes. LVT 4's that are destroyed at sea do not trigger leader decapitation. (Shad
on 2013 May 06)
|

|
The A1 has an inherent leader and two combat steps. Its counter should have been given an amphibious armor symbol. (Shad
on 2013 May 06)
|

|
The A4 has an inherent leader and two combat steps. Its counter should have been given an amphibious armor symbol. (Shad
on 2013 May 06)
|
| Leyte 1944, Scenario Ten: Violet Beach | ||||||||||||
|---|---|---|---|---|---|---|---|---|---|---|---|---|
Leyte 1944, Scenario Ten: Violet Beach This one is good learning amphibious scenario as the Japanese aren’t too strong at the beach with their first group of Japanese units but heavier with their second group of units further west. So the Americans can eliminate the smaller speed bump of Japanese on the beach map fairly easy before meeting the heavy concentration of Japanese troops and get their beach landing skills down. The American landed on map 80 and with heavy naval and air-support sweep the Japanese unit there away and then charged into map 100 where the Japanese had some nasty 47mm anti-tank guns in entrenchments waiting for them. The Americans charged forward with their armor and the Japanese rolled well on the dice and over a few turns eliminated one step of M4 Sherman Tanks, two steps of LVT (A)-4s and two steps of LVT (A)-1s which all count as double before the guns were taken out. In the end the Americans controlled all three entrenchments, exited 13 steps off the west edge of the map and just barely had a two to one step advantage in steps lost. The Japanese lost 22 step to the Americans 11, very close for that last objective. In fact, the Americans lost 10 steps of armor and only one step of Infantry after the dice and dust settled. A Major American Victory! The Japanese defensive were kind of poorly setup strategically and should have been more concentrated in hindsight. |
||||||||||||
| 0 Comments |