
|
Operation Bluecoat: One of the Best Liberation 1944 #30 |
||
|---|---|---|
| (Defender) Germany | vs | Britain (Attacker) |
| Formations Involved | ||
|---|---|---|
| Britain |  |
2nd Northamptonshire Yeomanry |
| Britain |  |
4th King's Shropshire Light Infantry |
| Germany |  |
21st Panzer Division |

| Total | |
|---|---|
| Side 1 | 0 |
| Draw | 1 |
| Side 2 | 4 |


| Overall Rating, 5 votes |
|---|
|
3.8
|
| Scenario Rank: 217 of 913 |
| Parent Game | Liberation 1944 |
|---|---|
| Historicity | Historical |
| Date | 1944-07-31 |
| Start Time | 15:30 |
| Turn Count | 18 |
| Visibility | Day |
| Counters | 70 |
| Net Morale | 0 |
| Net Initiative | 2 |
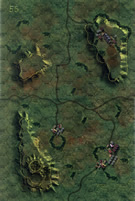
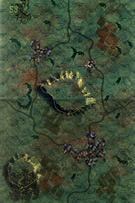
| Maps | 2: 56, 58 |
| Layout Dimensions | 56 x 43 cm 22 x 17 in |
| Play Bounty | 150 |
| AAR Bounty | 171 |
| Total Plays | 5 |
| Total AARs | 1 |
| Battle Types |
|---|
| Delaying Action |
| Exit the Battle Area |
| Inflict Enemy Casualties |
| Urban Assault |
| Conditions |
|---|
| Hidden Units |
| Off-board Artillery |
| Smoke |
| Scenario Requirements & Playability | |
|---|---|
| Liberation 1944 | Base Game |
| Introduction |
|---|
|
General “Pip” Roberts commanded the 11th Armoured Division with style and flair. Historians also consider him one of the best British armor commanders of the war. Lesser commanders would have lamented the failure to take St. Martin des Besaces on the previous day, and let the overall advance stall until it was taken. Instead, he detailed a mixed force to take the town and sent his spearhead units on a sweeping right hook maneuver to cut them off and make way for an exploitation once the town fell. The 4th King’s Shropshire Light Infantry did indeed capture St. Martin des Besaces, then advanced to Le Beny Bocage catching up with the rest of the spearhead and reversed directions to take the bridge over the Souleuvre River from the south. Few German troops were situated to oppose them but others rapidly approached from the east. |
| Conclusion |
|---|
|
The British pushed through the opposition and secured the bridge (just off the map to the north). This greatly compromised the region’s defenses as the Vire-Caen road served as the major logistics artery for the Germans to move men and material around. Operation Bluecoat was off to a good start. However, the British missed the chance for a major coup when they didn’t continue their penetration of the German rear as the 21st Panzer Division Headquarters lay just past the bridge, virtually undefended. |

|
|
|---|
| AFV Rules Pertaining to this Scenario's Order of Battle |
|---|
|
| Army |
|---|
|


| Heer |
|---|
|


| 8 Errata Items | |
|---|---|

|
The "Optional Values" for the Achilles---and by extension the Archer---given in an Avalanche Press Daily Content piece on the 17-Pdr Anti-Tank gun (and printed on a replacement counter sheet Download) are now the Official Ratings, published in games like Cassino '44, Grossdeutschland 1946, and Indian Unity. These are: 8-5 / 8-8 Full Strength and 4-5 / 8-8 Reduced Strength. (caryn
on 2012 May 03)
|

|
All Bren carriers should have a movement value of 7. (Shad
on 2010 Dec 15)
|

|
The reduced direct fire value of the Heer HMG became 5-5 starting with Fall of France. (plloyd1010
on 2015 Jul 31)
|

|
All SS PzIVH tanks should have a movement of 8. (Shad
on 2010 Dec 15)
|

|
The morale and combat modifiers of German Sergeant #1614 should be "0", not "8". (Shad
on 2010 Dec 15)
|

|
The SK 7/2 appearing in 1940: Fall of France is actually a SK 6/2, but misprinted by APL. Hence it should be unarmored in that game. The SK 7/2, which appears in other games is correctly printed with an armor of 0. (plloyd1010
on 2022 Apr 28)
|

|
All SPW 251s have an armor value of 0. (Shad
on 2010 Dec 15)
|

|
One Wespe (ID# 1201) should have an armor value of 1 on the front and back of the counter. (Shad
on 2010 Dec 15)
|
| Liberation 1944, scenario #30: Operation Bluecoat: One of the Best | ||||||||||||
|---|---|---|---|---|---|---|---|---|---|---|---|---|
Liberation 1944, scenario #30: Operation Bluecoat: One of the Best Liberation has some good scenarios, the only reason I don’t play it more, is the dark maps. With that said, I setup and played this scenario as it looked interesting on paper. The British get a boatload of armor and a good amount of Infantry as well to try and take the city of Le Beny Bocage and exit 15 steps or more off the north edge along the road. The Germans get two smaller forces, one with a small amount of Infantry, armored cars and halftrack of various types and setup just outside of Le Beny Bocage and must try and rush in there before the British get too big of a foothold in it. The other German force consist of again of a small amount of Infantry and PzIVs of various sorts as well as a Wespe self-propelled gun unit that enter from the northeast on turn one. The British have a higher Initiative and rolled well to get a good foothold into the major city causing the German to try and fight it out with their weaker armored/infantry forces. The British have a ton of Cromwells, three types in fact and an Achilles unit to boot and dispatch the German Armored Cars and Halftracks without too much difficulty and their large group of Infantry later battle for but conquer Le Beny Bocage. That freed up British armor to make contact with the second German Armored group and both sides take some casualties but the British numbers are tell and they eliminate this group of blocking German armor as well. By the scenario’s end, the British have achieved both of their victory objectives and have lost only 12 steps, preventing the Germans from achieving any of their objectives, and the Germans have also lost 29 steps. This one was a Major British Victory. With that said, I still enjoyed playing this scenario. |
||||||||||||
| 0 Comments |