
|
Operation Goodwood: A Little Help From Above Liberation 1944 #21 |
||
|---|---|---|
| (Defender) Germany | vs | Britain (Attacker) |
| Formations Involved | ||
|---|---|---|
| Britain |  |
8th Rifle Brigade |
| Britain |  |
l3th/18th Hussars |
| Germany |  |
125th Panzergrenadier Regiment |
| Germany |  |
346th Static Infantry Division |
| Germany |  |
503rd "Feldherrnhalle" Heavy Panzer Battalion |

| Total | |
|---|---|
| Side 1 | 3 |
| Draw | 1 |
| Side 2 | 0 |


| Overall Rating, 4 votes |
|---|
|
4
|
| Scenario Rank: --- of 913 |
| Parent Game | Liberation 1944 |
|---|---|
| Historicity | Historical |
| Date | 1944-07-18 |
| Start Time | 10:30 |
| Turn Count | 27 |
| Visibility | Day |
| Counters | 145 |
| Net Morale | 0 |
| Net Initiative | 2 |
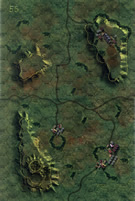
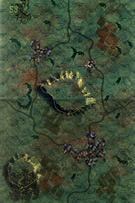
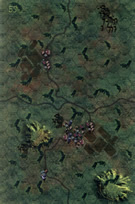
| Maps | 3: 56, 58, 59 |
| Layout Dimensions | 84 x 43 cm 33 x 17 in |
| Play Bounty | 178 |
| AAR Bounty | 165 |
| Total Plays | 4 |
| Total AARs | 2 |
| Battle Types |
|---|
| Inflict Enemy Casualties |
| Urban Assault |
| Conditions |
|---|
| Hidden Units |
| Minefields |
| Off-board Artillery |
| Randomly-drawn Aircraft |
| Reinforcements |
| Smoke |
| Scenario Requirements & Playability | |
|---|---|
| Liberation 1944 | Base Game |
| Introduction |
|---|
|
British plans called for armor to spearhead Operation Goodwood, with infantry guarding the flanks. To anchor the left flank the planners tasked 3rd Infantry Division to secure Troarn to the east while rapidly pushing southward at the same time. These Brits caught a big break in this endeavor when Field Marshal Erwin Rommel ordered the 100th Panzer Regiment into the front lines at Sannerville (1.5 miles west of this penetration) over the division’s objections. And also of direct utility, earlier in the morning a strike by British heavy bombers left less than 10 panzers of the 40 or more stationed Troarn fit for duty. When the attack came they could do little but join the panzer grenadiers at Emieville. |
| Conclusion |
|---|
|
To compensate for their manpower shortage the British masked Troarn rather than assault it, saving untold casualties. This allowed the bulk of the division to concentrate on the southward drive. It still wasn’t enough this day as the panzer grenadiers could not be driven from Emieville. |

|
|
|---|
| AFV Rules Pertaining to this Scenario's Order of Battle |
|---|
|
| Army |
|---|
|


| Heer |
|---|
|


| 9 Errata Items | |
|---|---|

|
The "Optional Values" for the Achilles---and by extension the Archer---given in an Avalanche Press Daily Content piece on the 17-Pdr Anti-Tank gun (and printed on a replacement counter sheet Download) are now the Official Ratings, published in games like Cassino '44, Grossdeutschland 1946, and Indian Unity. These are: 8-5 / 8-8 Full Strength and 4-5 / 8-8 Reduced Strength. (caryn
on 2012 May 03)
|

|
All Bren carriers should have a movement value of 7. (Shad
on 2010 Dec 15)
|

|
The "Optional Values" for the Firefly given in an Avalanche Press Daily Content piece on the 17-Pdr Anti-Tank gun (and printed on a replacement counter sheet Download) are now the Official Ratings, published in games like Cassino '44, Grossdeutschland 1946, and Indian Unity. These are: 5-5 / 8-8 Full Strength and 3-5 / 8-8 Reduced Strength. (caryn
on 2012 May 03)
|

|
The reduced direct fire value of the Heer HMG became 5-5 starting with Fall of France. (plloyd1010
on 2015 Jul 31)
|

|
The Pz IVe appearing in the original Panzer Grenadier game had an Anti tank value of 4-7. As of Afrika Korps (2002), continuing onward through the 3rd and 4th edition games, the anti tank value has been 4-4. (plloyd1010
on 2016 Jul 25)
|

|
All SS PzIVH tanks should have a movement of 8. (Shad
on 2010 Dec 15)
|

|
The morale and combat modifiers of German Sergeant #1614 should be "0", not "8". (Shad
on 2010 Dec 15)
|

|
The SK 7/2 appearing in 1940: Fall of France is actually a SK 6/2, but misprinted by APL. Hence it should be unarmored in that game. The SK 7/2, which appears in other games is correctly printed with an armor of 0. (plloyd1010
on 2022 Apr 28)
|

|
The movement allowance on the counters in Airborne is misprinted. It should be "3." (rerathbun
on 2012 Jan 30)
|
| Another hard slog for the Brits | ||||||||||||
|---|---|---|---|---|---|---|---|---|---|---|---|---|
Played solo over three longish session this three mapper has a elements of a British infantry division with strong armour, air and reasonable OBDA trying to break through the German lines. The Germans are at regimental strength but have some armour and other AFV to give good on board artillery, also two platoons of Tigers will enter the fray at some stage. The German set up was on the northern board was a hedgehog defense around the main town on that board, then a linear defense centered on the two ridges on the middle board, with a minefield covering the gap in the centre. The third board had one company in reserve with two platoons of STUG's. The Brits advanced on both flanks with RIF and WPN units in the lead, the numerous AFV's initially staying behind cover until ATG's had been neutralized. The first phase of the battle centred on the northern town which fell fairly quickly but with some losses to the attacking force and one of the Croc's running out of juice. (it never reentered the fray). The attack on the ridge line was much harder being over open ground and although smoke was used it soon dispersed at the most convenient times for the German artillery spotters and HMG gunners. With RIF losses mounting the SHERMANS were thrown into the fray and acquitted themselves well taking out a MARDER and a PZIV for the loss of two steps, however the defenders managed to retire from the ridge line in good order on the eastern side of the battle to set up yet another defensive line to the south. This line would not be breached today. The arrival of the TIGERS was met by the howl of Typhoons who attacked as they entered taking out 1 step, the SHERMAN's and single FIREFLY unit moved bravely forward to engage the remaing good order TIGER while a 3 troops of ACHILLES's waited on over watch on a nearby hill (good old 3rd edition rules). The TIGER took the bait and destroyed the FIREFLY but was in turn eliminated by the tank destroyers. In the west the British attack and run out on momentum and although there was bitter fighting and losses were now fairly equal the Germans still held most of the town hexes on the map. The British commander seeing that a gap through the centre was open moved the ACHILLES's through it in a bid to take some town hexes and seal a win. It was not to be the surviving MARDER took out one ACHILLES and the final German AFV reserve a old SPG on a Czech tank chassis took out another. After the final turn losses were British 79 steps German 72 but enough French towns were still in the Boche hands for the final result to be a minor German win. The compact battlefield makes this a bit of a slugfest but there are lots of unusual toys to play with on both sides. A solid enjoyable scenario. |
||||||||||||
| 0 Comments |
| Maneuver, Hold & Counter Attack if Practical | ||||||||||||||
|---|---|---|---|---|---|---|---|---|---|---|---|---|---|---|
This was an 13-session play-through with the formidably-aggressive & clever, NBGB, as the British Commander of the attacking Tommies of the 8th Infantry Brigade and 13th/18th Royal Hussars. I led the defending German force, consisting of an outnumbered – but dug-in – combined arms battle group on this 3-Map battlefield. We played with the FOW (beginning in game turn 13), smoke/illum, extended assault, consolidation, tank riders and excess initiative optional rules. Both sides drew decent sets of leaders. We also experimentally used the following four house rules: 1) Road Movement for Mechanized & Foot Units All FOOT & MECHANIZED units may move on roads at the rate of 1/2 a Movement Point (MP) per road hex, just like MOTORIZED units; 2) Standard Movement for Mechanized Units All mechanized units may move through clear hexes at a movement cost of only 1 movement point (MP) per hex, instead of 1 1/2. Add one to this cost if moving up or down slopes hexes; 3) Enhanced Anti-Tank (AT) Gunnery Unless prohibited by special scenario rules, ALL dedicated, dug-in, entrenched, or town-occupying AT gun units including Self-Propelled AT guns may fire in opportunity fire (OPFIRE) TWICE just like tanks in the standard rule set. For example: dug-in, German PaK 36 (37mm); PaK 38 (50mm); or British 6-pdr towed AT gun platoons would therefore be able to fire TWO times per unit in OPFIRE situations. In addition, towed, or self-propelled, AT guns are HIDDEN (see Optional Rules for Hidden Units; Plotting Position; Revealing; and No Hidden Units Specified on Page 37), if allowed to dig-in, or are entrenched, or town- occupying; and 4) Tank Leader Forward Observation Efficient tank leaders (full strength only) may spot for ALL artillery & air strikes in accordance with the normal spotting rules (8.0, page 19). Just as in the case of leader units spotting, this action does not require an activation. Nonefficient tank leaders may also attempt to spot for ON BOARD ARTILLERY ONLY by throwing a single die per attempt to spot a target. This action does require an activation. They spot the intended target on a die roll of 4-6. The first session (game turn 1, and a portion of turn 2) featured a large- scale British, combined arms movement-to-contact along the eastern half of the north margin of Map 59, veering in the direction of the 5-hex town. This was accompanied by an unsuccessful air strike by a B-26 Marauder, and a significant amount of OBA designed to soften up the town garrison. German counter battery fire was surprisingly accurate, and they drew first blood by eliminating a platoon of advancing Tommy riflemen. A number of long-range bombardment and AT shots were exchanged as well. This was followed by the Tommies close assaulting the northern fifth of the town (Hex 59-0911) in what proved to be a bloody nose for the intrepid Brits, with the loss of a Crocodile Churchill tank unit, as well as a step of Sherman tanks in fierce fighting. Our second session (end of game turn 2 and the beginning of 3) was a grim one for the advancing Tommies with many armored casualties in the hedgerow-splattered terrain immediately east of the 5-hex town on Map 59. The updated step loss tally was: 25 for the bold, British side; and 2 for the German defenders. A third, unsuccessful RAF air strike was recorded, this time by a flight of Typhoon fighter-bombers. A second slice on the east edge of the 5-hex town was invested by a full company of British Sherman tanks. Counting the Axis-controlled town hexes, the victory point count was 47 for the Germans and 2 for the Brits at this early point in the battle. A combined total of SEVEN combat 7-die rolls were recorded this session! The third session (game turn 3 & part of 4) featured the continued British movement to contact in the northwest quadrant of Map 59, accompanied by Allied OBA strikes and another unsuccessful air strike. The Brits secured one hex (59-0812) of the 5-hex town by close assault, while their other assaults stalled in the face of fierce German fire. Also, a very lucky German OBA barrage caught the Tommies in that same hex in a 3-stack formation resulting in casualties and mass disruptions. An exchange of long-range AT fire resulted in the destruction of another step of German STGIII assault guns, as well as the elimination of an entire platoon of British Achilles SPAT guns. By the end, the updated step loss tally was: 32 for the bold, British side; and 7 for the German defenders, resulting in both sides losing an initiative level. The Germans threw THREE combat 7-die roll, all at crucial moments. Counting Axis-controlled town hexes, the victory point count was now 54 for the Germans and 8 for the advancing Brits. Our action-packed and exciting fourth session (part of game turn 4 and all of 5) featured the British right wing contingent tightening & expanding their grip on the northeast quadrant of the battle map, accompanied by multiple exchanges of close-range direct and bombardment fire, as well as long-range anti-tank fire. Highlights included a successful German ambush of a left flank British probe into the northwest corner of Map 56, just west of the large, 20-meter hill mass, as well as a continuing gunfight between an Achilles SPAT and a stubborn STGIII assault gun. By the end of game turn 5, the updated step loss tally was: 38 for the British side; and 10 for the defending Germans. A combined total of THREE combat 7-die roll were thrown. The updated victory point tally was now 58 for the Germans and 10 for the rapidly advancing Tommies. The exciting fifth session (game turns 6-7) mostly consisted of continued urban fighting in two of the 3 towns on Map 59 as the British left flank (fiddler crab assault) attack grew in strength. A hilltop, tank-versus-assault gun close assault (Hex 59-0512) resulted in both of the Tommies’ Sherman platoons losing steps. An eager, but ill-fated, British right flank probe was eliminated by long-range German AT fire, when a fully-loaded Bren carrier with a leader and a 6-pounder in tow was eliminated. In all, 2 more British Lieutenants were lost this session, bringing the total Allied leader loss to 4. The revised step loss tally was now: 44 for the advancing British, and still 10 for the Germans, consequently the Allied initiative fell a level to a 1. The new victory point tally was: 64 for the Germans and 10 for the intrepid Tommies. A combined ELEVEN combat 7-die rolls were thrown. Our fast paced sixth session (game turns 8-9) included the British capture of the easternmost of the 2-hex towns on Map 59 by close assault. This was a generally upbeat, consolidation & limited maneuver session for the surging British force. Fierce fighting continued in the largest of the 3 towns on that map board, as the Tommies tightened their grip on the large town and the last German armored unit on the adjacent 20-meter hill to the south was eliminated. Some accurate long-range Nazi AT fire resulted in the Allied initiative level falling to zero. A pair of successful RAF air strikes reduced the volume of German artillery and mortar support for the now-trapped garrison of the large, 5-hex town as the tide of battle shifted. The updated step losses are: 16 for the Germans and 50 for the encroaching Tommies. Victory points were at: 69 for the Germans and 18 for the British. A combined SIX combat 7-die rolls were thrown. The action-packed, seventh session (game turns 10-11) was a superb showing for the British side as most of the large 5-hex town on Map 59 was now in their hands, or contested, at the cost of a step of Crocodile flame tanks. In addition, the sole remaining German STGIII platoon on the map lost a step to a precision RAF air strike. The Brits moved up their supporting mortar platoons to seek sheltered positions in the newly-liberated sections of the town. The slightly-delayed, company of German Tiger I tanks showed up during game turn 11 and began making their ponderous way across the battle map. The revised step loss tally was: 19 for the Germans, plus 2 leaders; and 52 steps, plus 5 leaders for the surging British force. Victory points were now: 70 for the Germans and 24 for the Tommies. The German side threw FOUR combat 7-die rolls this session! Our enjoyable, but frustrating, eighth session (game turns 12-13) was less bloody than the previous encounter, and featured more maneuver actions across the vasty fields of Normandy, as well a tightening of the British grip on the now-infamous 5-hex town on Map 59. Highlights included some very ineffective OBA from both sides, and unsuccessful Allied air strikes. Multiple 3-unit assault stacks in the large town and surrounding hills were not under German observation, as the cagey Tommies took advantage of limiting terrain hexes and tall hedgerows. The updated victory point tally was now: 73 for the defending Germans, and still 24 for the advancing Tommies. A combined NINE combat 7-die rolls were thrown! The high-maneuver & fun, ninth session (game turns 14-15) was a costly one for the Germans in which they lost an additional 9 steps, to a mere 3 steps for the advancing British side. Among the numerous Germans losses this session were a trio of crucial losses: a demonic 50mm AT gun platoon in the 5-hex town, another German tank platoon that got too close to a batch of angry Tommies armed with PIAT launchers in a close assault, and a platoon of dug-in, 120mm mortars. Also, the final section of Teutonic assault guns was eliminated in another brave close assault. During game turn 15, the British encountered a second minefield on the road west of the 5-hex town, while the very few remaining members of the German garrison still held out in 2 of the 5 town hexes. The updated victory point tally was now: 32 for the surging Tommies and 76 for the defending Germans. Only a combined 2 combat 7-die rolls were thrown this time. Our consolidation of effort, ninth session (game turns 16-17) featured SIX, useless combat 7-die rolls by the frustrated Germans side, as well as a fine example of a 2nd echelon movement to contact by the advancing British infantry on to the northwest quadrant of Map 56. There were two ineffective RAF air strikes, as well as an excellent British OBA artillery concentration that eliminated 2 German 81mm mortar platoons, and a Major. Only a pair of steps were lost for both sides in this session. Remarkably, there were still two contested hexes in the 5-hex town where the battered remains of the Axis garrison still held out in the face of greatly superior British close assault firepower. The updated victory point tally was now: 78 for the Germans, and 34 for the re-invigorated Tommies. The tenth session (game turns 18-19) featured additional consolidation by both sides and the opening of the full-throated British invasion on Map 56 aimed at the 3-hex, eastern town. The Tommies came on in two waves under a pair of well-placed smoke screens. The town was rapidly invested and there were a brutal series of adjacent-hex firefights on the north and east margins. Most of the first British wave was either eliminated outright, demoralized, or pinned and delayed in a pair of covered minefields. However, the Tommies were able to establish a close assault lodgment in town hex 56-1114, where they effectively pinned one of the German Tiger platoons, a leader and some infantry. The other Tiger tank unit managed a counter move that resulted in a number of British infantry step losses and the collapse of an intended close assault movement, adjoining the main north-south road. By session end, the step loss tally was at: 29 for the defending Axis side (3 more steps lost), and 77 steps (that is 15 more casualties during this session) for the high-morale & exuberant British force. Unexpectedly, there was still a contested hex in the 5-hex town on Map 59 where a single Axis garrison step still held out in the face of greatly superior British firepower. The updated victory point tally was now: 92 for the Germans, and 37 for the fast-approaching Tommies. A combined EIGHT, utterly useless, combat 7-die rolls were thrown! Our costly, but fun-filled, tenth session (game turns 20-21) featured a great deal of close assault, adjacent-hex DF, accurate German AT fire and much Allied maneuver as the British “Fiddler Crab,” e.g., a super, strong left flank, attack made steady progress surrounding the eastern, 3-hex town on Map 56. Highlights included: 1) a pair of probing, British Sherman tank platoons that included a lethal Firefly unit were halved by long-range Tiger tank fire in the northwest quadrant of the battle map; while 2) another Sherman platoon was eliminated, just beyond the eastern margin of the 3-hex town in the flat; and 3) a second, British Crocodile platoon was eliminated in a close assault in the 2-hex town on Map 59. Excellent Allied air support, coupled with accurate OBA eliminated a demonic, 88mm AT gun platoon and immobilized a Tiger platoon on the western ridge of Map 56. The final German Pz-IVE platoon was destroyed by assaulting infantry using their spring-loaded & short-range, PIATs in the same eastern 3-hex town on Map 56. The revised step loss tally was now: 39 for the embattled Germans, and 94 steps (that is, another 15 steps lost this session) for the higher-morale & more confident, Tommies. The victory point score increased to: 108 for the Germans, and 48 for the British side. A combined SEVEN, combat 7-die rolls were thrown this session. The fun-filled, 11th session (game turns 22-24) was a relatively dismal one for the defending Germans with the loss of an additional 8 steps and multiple town hexes thanks to a series of successful British close assaults on the 3-hex, eastern town on Map 56. In spite of the Landsers having the initiative advantage in 2 of the 3 game turn this session, most of their defensive fire attempts were utter failures. Only a single town hex on Map 59 remained in German hands by the end of game turn 24, and the Tommies experienced a string of exceptional morale recovery rolls. A right flank movement of a Sherman tank company brushed against the 2-hex hilltop town on their way to seek better firing positions against dug-in Tiger and Grille platoons in overwatch positions on the east margin of the same hill. This advance resulted in the troublesome German Maultier platoon having to flee the area, where it was promptly victimized by an RAF air strike. By now, the victory point score was: 105 for the Germans, and 61 for the British side. A combined FIVE, combat 7-die rolls were thrown this session. Our 12th session (game turns 25-26) was a very rough go for the advancing Tommies, who lost an additional 16 steps, due primarily to the Germans winning the initiative roll to begin game turn 25. The darn Tiger tank platoons and the remaining, dug-in Pz-IV unit were able to eliminate an entire company of Sherman tanks with armor piercing shots, as well as a brave AVRE platoon in close assault. The Tommies discovered the final Axis minefield in a 3-way, road junction in the middle of Map 56 with no losses sustained. No additional German-held town hexes were liberated in this session. The updated victory point score was now around: 123 for the Germans, and 62 for the British. This time there were a combined FIVE, combat 7-die rolls thrown. Our 13th and last session (game turn 27) was rather, anti-climactic as the Allied advance grown to a halt. The final victory point score was: 133 for the Germans, and 72 for the British. The result was a hard-won, German victory. Surprisingly, there were only 4 FOW-shortened turns of 27 played. We gave this scenario an enthusiastic rating of 4, and recommend it for both SOLO or SHARED play. |
||||||||||||||
| 0 Comments |