
|
Seeds of Defeat Liberation 1944 #8 |
||
|---|---|---|
| (Attacker) Germany | vs | Britain (Attacker) |
| Formations Involved | ||
|---|---|---|
| Britain |  |
2nd Royal Ulster Rifles |
| Britain |  |
East Riding Yeomanry |
| Germany |  |
21st Panzer Division |
| Germany |  |
25th SS Panzergrenadier Regiment |

| Total | |
|---|---|
| Side 1 | 4 |
| Draw | 0 |
| Side 2 | 1 |


| Overall Rating, 5 votes |
|---|
|
3.4
|
| Scenario Rank: 488 of 913 |
| Parent Game | Liberation 1944 |
|---|---|
| Historicity | Historical |
| Date | 1944-06-07 |
| Start Time | 14:45 |
| Turn Count | 24 |
| Visibility | Day |
| Counters | 66 |
| Net Morale | 0 |
| Net Initiative | 1 |
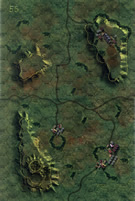
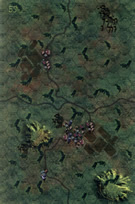
| Maps | 2: 56, 59 |
| Layout Dimensions | 86 x 28 cm 34 x 11 in |
| Play Bounty | 150 |
| AAR Bounty | 165 |
| Total Plays | 5 |
| Total AARs | 2 |
| Battle Types |
|---|
| Delaying Action |
| Exit the Battle Area |
| Meeting Engagement |
| Road Control |
| Urban Assault |
| Conditions |
|---|
| Off-board Artillery |
| Randomly-drawn Aircraft |
| Smoke |
| Scenario Requirements & Playability | |
|---|---|
| Liberation 1944 | Base Game |
| Introduction |
|---|
|
Though the German plan called for a strong counterattack to drive the Allies back into the sea once they landed in Normandy, due to indecision and Allied airpower only the 21st Panzer Division had attacked as planned with mixed results. With the SS Hitler Youth Division arriving during the night, both panzer divisions would attack in the morning. That was the plan anyway. |
| Conclusion |
|---|
|
The Canadians attacked first, preempting the German plan. Commanders decided to let the Canadians over-extend themselves before launching their own attack. During the waiting the battle sucked in more and more of the 21st Panzer Division against the Canadians leaving a lone panzer platoon to support the Hitler Youth’s effort. According to German accounts the SS troops managed to take Cambe anyway, and then drove the British back before pulling back themselves. This rings true as the British declined to follow when the Germans withdrew. In the long run, it made little difference. The piecemeal commitment of available panzers on the defensive doomed the envisioned grand offensive, likely sowing the seeds of later defeat. |

|
|
|---|
| AFV Rules Pertaining to this Scenario's Order of Battle |
|---|
|
| Army |
|---|
|


| Heer |
|---|
|

| Schutzstaffel |
|---|
|


")
")
")
")


| 2 Errata Items | |
|---|---|

|
All Bren carriers should have a movement value of 7. (Shad
on 2010 Dec 15)
|

|
The reduced direct fire value of the SS HMG is 5-5 in Beyond Normandy and Road to Berlin. (plloyd1010
on 2015 Jul 31)
|
| Seeds of defeat......really? | ||||||||||||
|---|---|---|---|---|---|---|---|---|---|---|---|---|
After a considerable break from PG, so many games so little time, I fancied a reasonable small game and turned to the much maligned Liberation (1st Edition). Why so despised well the maps are in dark green shade which makes for not easy viewing and even worse hard to distinguish hedges/woods etc. Add to that ultra thick poorly laser printed counter and you have overall a very poorly produced game. Apart form the scenarios which appear to be of a very good standard. This scenario is a meeting engagement between a smallish Commonwealth force with Sherman's, Bren's with infantry support against a much larger SS force with fewer tanks but better artillery support. Although this is a meeting engagement in fact it s the Germans who are very much on the attack, as they have to capture a town, get steps off the board and clear the main road. A little twist to the standard rules is that after GT20 the German player can declare the game over after any action segment. The game started with both sides racing onto the board, the Commonwealth forces taking possession of the town required for the German VC and also pushing up the road with their tanks in a bid to disrupt the SS attack. The Germans using smoke to cover the advance come forward in three distinct waves the German commander seeking to avoid a pitched battle at least initially and get the required 10 steps off the board. However its superior German OBDA which pave the way for eventually victory. Every barrage seemed to result in step losses for the enemy, even when dug in or in town hexes. The German attack using both flanks to stretch the Commonwealth forces meant the forces holding Cambe (the VC town) became very meagre and when the German commander used mass HMG units to suppress the town they quickly became disrupted. By GT20 enough German forces had exited the board to fulfil the first part of the VC and it only remained for a final assault to clear the one reduced disrupted RIF unit left in the town to claim a major victory, this took two turns to do and the German commander could indeed radio back to HQ that all objectives had been achieved. This rather one sided scenario was still enjoyable, I think the problem for the Allied player was not recognising earlier that a much more defensive mindset was more appropriate for this battle coupled with the amazing accuracy of the German artillery made it fair easy for thee SS to triumph in my solo game. |
||||||||||||
| 0 Comments |
| SS Burn out |
|---|
|
This battle pits a reinforced battalion of tough, high morale SS scum against a few companies of British defending the northern end of a long North-South board. The SS had enough mechanized transport to send a company of grenadiers ahead of the rest of the force to try to quickly seize the first town on their road to the northern board edge, while their platoon of motorcycles raced on even farther to enter the last town before the edge. Meanwhile, the Brits were marching on as well, and got into an early clash with the motorcycles in town. At first it looked like the SS cycles would be a big problem for the British but superior weight of numbers overcame them. At the same time, the British Shermans had raced ahead and managed to ambush the mechanized company of SS as they arrived outside their town objective, wiping out most of them in their transports. At this point the battle really developed around this first town. The SS HMGs, formed into a company, took up positions on the west flank of town and provided cover fire for the two companies of SS grenadiers that advanced into the fields on the east side. A few British reinforcements filtered forward to support the tank and infantry defenders of the town. SS losses were steady and high as they pushed aggressively to get into assault positions, their rock solid morale and excellent leaders keeping them in action even as the step losses added up. After three hours of combat the SS had not succeeded in doing much damage to the British, and a local counterattack wiped out the HMGs west of town, leaving the SS in a very precarious position. They were ultimately unable to achieve any of their objectives. Major British victory. |
| 0 Comments |