
|
One-Two Punch Liberation 1944 #6 |
||
|---|---|---|
| (Defender) Germany | vs | Britain (Attacker) |
| Formations Involved | ||
|---|---|---|
| Britain |  |
8th Infantry Brigade |
| Britain |  |
Staffordshire Yeomanry |
| Germany |  |
736th Infantry Regiment |

| Total | |
|---|---|
| Side 1 | 1 |
| Draw | 0 |
| Side 2 | 3 |


| Overall Rating, 5 votes |
|---|
|
4
|
| Scenario Rank: 104 of 913 |
| Parent Game | Liberation 1944 |
|---|---|
| Historicity | Historical |
| Date | 1944-06-06 |
| Start Time | 09:00 |
| Turn Count | 28 |
| Visibility | Day |
| Counters | 160 |
| Net Morale | 1 |
| Net Initiative | 2 |
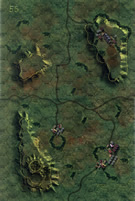
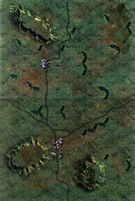
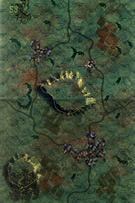
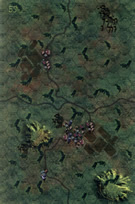
| Maps | 4: 56, 57, 58, 59 |
| Layout Dimensions | 86 x 56 cm 34 x 22 in |
| Play Bounty | 187 |
| AAR Bounty | 165 |
| Total Plays | 4 |
| Total AARs | 2 |
| Battle Types |
|---|
| Breakout |
| Delaying Action |
| Inflict Enemy Casualties |
| Urban Assault |
| Entrenchment Control |
| Conditions |
|---|
| Entrenchments |
| Hidden Units |
| Minefields |
| Naval Bombardment |
| Off-board Artillery |
| Randomly-drawn Aircraft |
| Reinforcements |
| Smoke |
| Terrain Mods |
| Scenario Requirements & Playability | |
|---|---|
| Liberation 1944 | Base Game |
| Introduction |
|---|
|
The plan called for the British 3rd Infantry Division to land on Sword Beach and secure Caen by the end of the first day. Led by the respected Scotsman Major General Tom Rennie, the division would give their all in pursuit of this tall task (probably not feasible from the outset). The 8th Infantry Brigade spearheaded the landing supported by a battalion of duplex-drive Sherman tanks. As soon as possible after the landing 1st South Lancashires received the task to clear Hermanville sur Mer and press southward. |
| Conclusion |
|---|
|
With 31 of the 40 Shermans making it ashore in addition to a number of “Hobart’s Funnies,” the British cleared Hermanville sur Mer rather easily. By 0945 they’d opened six of the eight exits from the beach and anticipated the second wave of commandos who would relieve the paratroopers holding two bridges to the east. By 1030 the next infantry brigade and General Rennie had assembled ashore. Unfortunately, although the Brits quickly cleared Hermanville sur Mer, the Command Post for the 736th Grenadier Regiment (Codename Strongpoint Hillman) held out until late afternoon complicating British efforts to advance inland. |

|
|
|---|
| AFV Rules Pertaining to this Scenario's Order of Battle |
|---|
|
| Army |
|---|
|


| Heer |
|---|
|


| Luftwaffe |
|---|
|

| 7 Errata Items | |
|---|---|
| Scen 6 |
It,s not clear from the rule book but thee German Grille is open topped. (waynebaumber
on 2014 Aug 13)
|

|
All Bren carriers should have a movement value of 7. (Shad
on 2010 Dec 15)
|

|
Ignore the direct fire values. (Shad
on 2010 Dec 15)
|

|
Two 105mms (ID#s 1204, 1205) have "16-31" fire values in black (direct fire), when they should be in white (indirect fire). (Shad
on 2010 Dec 15)
|

|
The reduced direct fire value of the Heer HMG became 5-5 starting with Fall of France. (plloyd1010
on 2015 Jul 31)
|

|
The morale and combat modifiers of German Sergeant #1614 should be "0", not "8". (Shad
on 2010 Dec 15)
|

|
The movement allowance on the counters in Airborne is misprinted. It should be "3." (rerathbun
on 2012 Jan 30)
|
| British attack falters and runs out of steam | ||||||||||||
|---|---|---|---|---|---|---|---|---|---|---|---|---|
Played solo in three longish sessions, this scenario has a large British battle group attacking a German defensive line. A good mix of units make this a most interesting scenario. In my game the Brits pushed up the middle of the board with their main force of RIF and WPN units, there was a small diversionary attack on the right flank, with another large force on the left flank containing most of the British "Funnies". The British armour was not fully committed until the various A/T guns had been located and dealt with. The German had also kept the STUGS in reserve along with a single GREN company but otherwise were in hedgehog defense around the main objectives. The attack started brightly with the dreaded 88's located and destroyed by Navel OBDA and the first town falling to the diversionary attack, and the second falling after a stiff fight to the main attack. However the German defense stiffened and soon accurate MG and small arms fire were taking a heavy toll of the Tommies. The British commander decided to throw in his Sherman platoons to stiffen the attack, the STUG's though soon responded and in the ensuing tank duel destroyed 9 steps of Shermans for the loss of just 1 step of STUG's, a 75 A/T gun also took out more Shermans and with excellent MTR fire the diversionary attack was stopped in its traks and sent reeling back to its start line. After 3 hours the British attack had been halted. The Brits though regrouped and launched further attacks, in these attacks the Brit flamethrower tanks excelled and pushed deep into the German lines, the AVRE tanks also proved their worth in the heavy street to street fighting on board 58, the STUG,s now had to move from their prepared dugout and were picked off one by one by the few surviving Shermans, the last STUG step being destroyed on the last turn by the only successful Typhoon attack of the day. At the end of the game I could not tell who had won until I added up all the VC which in fact resulted in a major German victory. Those heavy RIF losses (35 steps) were the difference. *An excellent scenario, in fact almost a 5, love to play this one FtF though I suspect with hidden units and our house rule of A/T guns also being hidden it would be even a harder task for the good guys.** |
||||||||||||
| 0 Comments |
| British Juggernaut |
|---|
|
I enjoyed this scenario for the massive wave of Tommies I got to lead in battle. I guess what would be an entire infantry brigade with almost a battalion of tank support were pushing out of their Normandy beachhead on June 6. Facing them were about two battalions of Germans with minimal armor support. The Germans were grouped in reinforced-company-sized strongpoints centered on towns and hilltops, with extensive minefields protecting their flanks and intended to channel the British into an artillery and AT kill zone. The British led off with 3 battalions of infantry and most of their tanks, with the balance of their forces arriving as reinforcements later in the game. Two battalions, supported by Shermans, a Crab platoon, and two platoons of Crocodiles assaulted the west side of the German position, while another battalion with an AVRE pushed into the eastern half. The Crabs were immediately shot up by a hidden AT gun as they tried to flail a path through one belt of mines. The following Shermans, noting the relatively sparse mines, plowed ahead, losing a step but getting beyond the minefield and turning to take the AT gun position. Crocodiles took out a MG nest and opened a hole for the infantry to flank the German's western strongpoint, which crumbled under steady assaults over the next hour. In the east, the AVRE platoon and some infantry cleared one small town while a company of their fellows cleared another. The British surged up a hill and got a look at the next line of German defense, a large town well-covered by AT guns on high ground behind it. The reinforcements began arriving, so the British formed up for an assault on the eastern town. British naval gunfire and airstrikes were devastating, with an abundance of Tempest fighter bombers delivering deadly attacks against key German units. While British casualties were not insignificant, the Germans were getting swept away. The final hours of the engagement saw the British clearing out the west, and along with the advancing reinforcements, driving a two-pronged attack at the German center that finished them off. I called the game as the British had a substantial victory point margin with nothing standing between them and more points. A smashing victory. |
| 0 Comments |