
|
Lost Victory Last Days of May #6 |
||
|---|---|---|
| (Defender) Germany | vs | France (Attacker) |
| Formations Involved | ||
|---|---|---|
| France |  |
4e Division Cuirassée de Réserve |
| Germany |  |
57th Infantry Division |

| Total | |
|---|---|
| Side 1 | 1 |
| Draw | 0 |
| Side 2 | 1 |


| Overall Rating, 2 votes |
|---|
|
3.5
|
| Scenario Rank: --- of 913 |
| Parent Game | Last Days of May |
|---|---|
| Historicity | Historical |
| Date | 1940-05-28 |
| Start Time | 17:00 |
| Turn Count | 16 |
| Visibility | Day & Night |
| Counters | 59 |
| Net Morale | 1 |
| Net Initiative | 2 |
| Maps | 2: 27, 33 |
| Layout Dimensions | 56 x 43 cm 22 x 17 in |
| Play Bounty | 176 |
| AAR Bounty | 165 |
| Total Plays | 2 |
| Total AARs | 2 |
| Battle Types |
|---|
| Hill Control |
| Inflict Enemy Casualties |
| Urban Assault |
| Conditions |
|---|
| Hidden Units |
| Minefields |
| Off-board Artillery |
| Reinforcements |
| Terrain Mods |
| Scenario Requirements & Playability | |
|---|---|
| Fall of France 1 | Maps + Counters |
| Last Days of May | Base Game |
| Road to Dunkirk | Counters |
| Introduction |
|---|
|
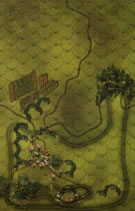
For twelve days the regiments of the Bavarian 57th Infantry Division marched into France. The second-wave division had fought in Poland but seen little action so far in the Western campaign and arrived on the Somme at full strength. “The bloody Somme” held an almost mythical status for soldiers of both sides, a fearful symbol of the slaughter of their fathers’ generation. The division’s regiments relieved the 2nd Motorized Infantry Division; not all of the division’s artillery had yet arrived but on the evening of 27 May Capt. Erich Kiel’s four 88mm guns of the 64th Flak Regiment reinforced the bridgehead. The wrecks of the British tanks destroyed the previous day became observation posts and machine-gun nests. Finally, when the rain stopped at 1645, the French artillery opened a violent bombardment and De Gaulle’s 4th DCR attacked. |
| Conclusion |
|---|
|
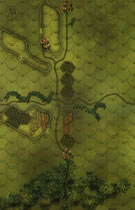
Two tank companies led the way through the eastern part of Huppy, destroying some anti-tank guns before overrunning the village. Capt. Maurice Dirand’s B1-bis named Jeanne d’Arc took 90 hits from German anti-tank guns, which eventually shot off all of his armament. Dirand’s tank kept rolling, squashing guns and gunners under its treads when it could no longer shoot them. Durand’s tanks progressed rapidly towards the crossroads of Les Croisettes, dragging along two infantry companies. But two 88mm guns posted on Hill 104 brought the main road under fire. Around 1715 a second wave of tanks attacked the village, supported by infantry. The Chasseurs Portés were caught by machine-gun fire hidden in the bocage, but at 1830 the French tanks reached Les Croisettes, a hamlet on the national road which served as headquarters for the German battalion. Four anti-tank guns defended this strategic point, along with some mines and a barricade. Huppy held for four hours and only at 2130 did the exhausted Germans give up. The 217th Infantry Regiment’s 10th company had been annihilated but it cost the French dearly. Only eleven tanks were available the next day. On the German side, part of the III/217 Infantry had to be disbanded as the battalion had no more than 75 men left in fighting condition. Victory was certain for the French if they had continued the offensive. Not knowing that the Germans had collapsed, the French did not resume the assault until the following day. |

|
|
|---|
| AFV Rules Pertaining to this Scenario's Order of Battle |
|---|
|
| Armée de Terre |
|---|
|


| Heer |
|---|
|


| Luftwaffe |
|---|
|

| 3 Errata Items | |
|---|---|

|
In 1940: Fall of France, the units show Direct Fire. All units are Indirect Fire. (rerathbun
on 2015 Jun 06)
|

|
The reduced direct fire value of the Heer HMG became 5-5 starting with Fall of France. (plloyd1010
on 2015 Jul 31)
|

|
The movement allowance on the counters in Airborne is misprinted. It should be "3." (rerathbun
on 2012 Jan 30)
|
| Germans narrowly hang on |
|---|
|
Played this scenario solitaire. Did not use the hidden set up for German units. This AAR will be more of a narrative of events as I remember them rather than a turn-by-turn replay, as I didn’t take notes as I went. Germany placed their 37mm ATGs near the cross roads, and the 88mm on hill 104 in the town hex with an infantry platoon and +1 morale leader to beef up protection. Mines were placed in the two hexes directly south of the town hex, with one more in the Crossroads hex (e.g. the VP location). The rest of the German troops were all arrayed in the town hexes on board 27, with the exception of a HMG, ENG, and a leader with a +1-combat modifier. These units set up dug-in in hex 0714, giving a good field of fire against troops approaching from the south. Combined, this stack could fire on the 16 column before any shifts. France opted to send everything they had to capture the village, hoping to crush the defenders quickly, and then move on to hill 104 and the crossroads. The 75mm artillery and ATGs entered on the road leading from the southern board edge, setting up shop in the woods, out of range of the 88mm (both AT fire vs trucks and indirect fire), since from their location they could spot up to 24 hexes against a spotted unit. The rest of the troops took the shortest path up the slopes and towards the village. The French were able to score a disrupted result against the defenders in the bocage around turn 4 or 5 (having 3 Char B1s stacked adjacent combining fire helped!), and the defenders decided to fall back into the village to get bonuses to rally. The French took some early demoralization results to units and leaders (but no losses), and this slowed their movement northward towards the village. Eventually though the French were able to get two stacks of two Char B1s + INF + leader to get on the 30 column of the assault table against two of the hexes of the village: 25 strength + Efficient Armor + Better morale + leader – 2 Town = +1 net shift. The Germans countered by consolidating their troops forward, also stacking three units per hex, hoping to make the attackers pay a price. The French never took much for casualties, but untimely demoralization results against Char B-1s forced these units to flee (following failed rally checks) and more time wasted for the French to bring up fresh forces to renew the assaults. Further, these assaults were weaker, using 2 INF platoons + 1 Char B1 at times, just to try to keep the pressure up. While the French started pilling up a big lead in step losses vs the Germans, the dice had other plans as the game continued into the later rounds. While Germans slowly started to melt away at the constant pressure (more due to compound demoralization or failed rally attempts for the AA and Infantry gunners), time and time again the dice came up ‘7’ or ‘8’ on the assault table. Rather than killing German units, they would disrupt or demoralize on an M2 result, and then often rally in the nick of time (with generous help from a +1 leader bonus and +1 town bonus), assuming they didn’t just pass the morale checks. The defenders were stubborn, clinging tenaciously to their territory. Around the 8th turn or so, the tide turned dramatically for the French, but not in the village under assault. The French decided to move their artillery and ATGs closer to the front, and the 88mm decided to (very foolishly) blow cover by taking a pot shot (that missed). The French artillery decided to take its own shot in response… and rolled an M2 result. The 88mm demoralized! Next turn, rally failed! The French artillery fired again, with another M2 result, which caused the 88mm to suffer compound demoralization. The only real defense of Hill 104 fled the battle. Unfortunately, I made a decision with the French that was ultimately the wrong strategy. Figuring the French would wear down the Germans and take the village, I had the DRG and Armored car zip north, staying out of range of the 37mm ATGs, and positioning themselves to take the Crossroads from the west. Two platoons of Char B1s also started lumbering that way. The better strategy would have been to take out the defenders of Hill 104. A lone infantry platoon + a leader was all that defended the hill. France didn’t even need to eject them; just keep them disrupted (or worse) until game end. In the end Germany barely hung on to the village on board 27, with a reduced strength engineer platoon being all that was left. This result made control of the Crossroads moot; France needed both the Village and the Crossroad to complete one of their VP objectives. Had they instead focused their forces on hill 104, it would have (probably) fallen easily, and then the attackers could have swung west to take the crossroad. In the end, it was a fun scenario, with a powerful French infantry & tank force getting a chance to show what they can do. But the German 88mm can shred those tanks easily, and there are not many turns to accomplish three tough objectives. I wanted to keep the Char B1s out of range of the 88mm as long as possible, and then have them charge hill 104 as a group. It didn't work out that way. I think Germany should have probably set up one ATG in the village, just to have the possibility of a high roll taking out a Char B1 step. The roadblock was set up in hex 33-0709 to create somewhat of a choke point between the hedgerow and grain fields. Ultimately, the Crossroads was a sideshow, as the French needed to clear the village on board 27 for it to matter, and the few units sent north to do the job saw no reason to subject themselves to fire from the 37mm ATGs (aka stayed in limiting terrain 4+ hexes away) until it was clear the village would fall (and it never did). The far better strategy would have been to send this small force to Hill 104 once the 88mm was eliminated. The Germans never inflicted many casualties on the French, but they did cause some timely demoralizations (including vs French tanks) that slowed the initial assaults. While I felt 14 turns would have been enough to get the job done, it was amazing how fast the clock went. Assaults in town hexes are really hard with that -2 column shift penalty to the attacker. France couldn’t afford to lose a turn or two making their assaults, and that exactly what happened. Final score was a Minor German victory, as the French only accomplished one of their objectives (more German steps eliminated than French). |
| 0 Comments |
| Last Days of May #6 - Lost Victory |
|---|
|
The Frogs overran the first objective, the town on map 27, there was a short intense firefight, but as the Frogs advanced down the road to the next objective, the crossroads at hex 0608, they come under heavy German mortar and OBA fire that did far too much damage (disruption/ demoralized) which strung out the Frog infantry supporting the Char B1s. The Chars came into range of a Flak88 battery which after a couple of shorts was able to eliminate a platoon of tanks but the Flak88 in turn was spotted and finally taken out by Frog 75s. |
| 0 Comments |