
|
Phoenix: Honour La Campagne de Tunisie #6 |
||
|---|---|---|
| (Defender) Italy | vs |
Britain
(Attacker)
France (Attacker) Morocco (Attacker) United States (Attacker) |
| Formations Involved | ||
|---|---|---|
| France |  |
7e Régiment de Tirailleurs Marocains |
| Italy |  |
92º Reggimento Fanteria "Basilicata" |

| Total | |
|---|---|
| Side 1 | 5 |
| Draw | 0 |
| Side 2 | 0 |


| Overall Rating, 5 votes |
|---|
|
4.2
|
| Scenario Rank: 45 of 913 |
| Parent Game | La Campagne de Tunisie |
|---|---|
| Historicity | Historical |
| Date | 1942-12-27 |
| Start Time | 08:15 |
| Turn Count | 35 |
| Visibility | Day |
| Counters | 60 |
| Net Morale | 1 |
| Net Initiative | 2 |
| Maps | 2: 87, 88 |
| Layout Dimensions | 86 x 28 cm 34 x 11 in |
| Play Bounty | 163 |
| AAR Bounty | 165 |
| Total Plays | 5 |
| Total AARs | 2 |
| Battle Types |
|---|
| Inflict Enemy Casualties |
| Urban Assault |
| Conditions |
|---|
| Off-board Artillery |
| Randomly-drawn Aircraft |
| Reinforcements |
| Severe Weather |
| Smoke |
| Terrain Mods |
| Scenario Requirements & Playability | |
|---|---|
| An Army at Dawn | Counters |
| Conquest of Ethiopia | Maps |
| La Campagne de Tunisie | Base Game |
| Introduction |
|---|
|
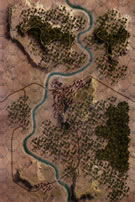
Following a failed Christmas Day attack the French XIX Corps asked for Anglo-American support. The new attack would be made by Moroccan infantry backed by American tanks, starting from the crossroads of Oum-el-Abouab up through the mountains toward the village of Bahalil. There was a large Kasbah half-way between Oum-el-Abouab and the top of the pass. The main attack would be flanked by advances by other battalions in direct support including a tabor of Goums. |
| Conclusion |
|---|
|
The attack began well enough with the French colonial troops full of confidence but yet another uncoordinated attack over rough terrain in awful weather resulted in failure. The American tanks without radios were unable to turn the tide; their commander was killed while desperately running from tank to tank giving directions and orders. They even lost several tanks to anti-tank fire. The dazed and demoralized survivors withdrew only to be fired on by their French allies! The French gunners, very tank-conscious and who had only a few weeks before been fighting the Americans around Oran, made short work of the surviving American tanks. With the loss of all the supporting tanks, the French attack melted away leaving the Axis in control of the hills. |
| Additional Notes |
|---|
|
Maps from Africa Orientale Italiana are the same as those from Conquest of Ethiopia, and thus may be used in there place. |

|

|
|---|
| AFV Rules Pertaining to this Scenario's Order of Battle |
|---|
|
| Army |
|---|
|

| Armée de Terre |
|---|
|


| Moroccan Ground Forces |
|---|
|

| Regio Esercito |
|---|
|


| Army |
|---|
|

| 1 Errata Item | |
|---|---|

|
In 1940: Fall of France, the units show Direct Fire. All units are Indirect Fire. (rerathbun
on 2015 Jun 06)
|
| Where are the Goumiers?! | ||||||||||||
|---|---|---|---|---|---|---|---|---|---|---|---|---|
On the morning of December 27, 1942, French troops of the 7e Régiment de Tirailleurs Marocains engaged Italian units from the 1st Battalion, 92nd Infantry Regiment in rough terrain between the villages of Bahalil and Oum-el-Abouab. The French advanced east with HMG/infantry units on the north flank, infantry in the wadi, and Allied Humber and Stuart platoons in the south; artillery and mortars were in the wadi and north woods. The Italians were situated in rocky areas north and east of the ruins, and in the village in the northeast (NEV). The armor group moved forward, but pulled back after being hit by unseen AT fire. French infantry moved out of the wadi and assaulted the Italian in the rocky area. Around 0930 hours, an SM.79 strafed and destroyed Lt. Parveau and his infantry. The Stuarts moved to the north flank joining the infantry and HMG units to move toward NEV; they finally cleared the Italian from the rocky ground around 1100 hours. The French Commandant was eliminated along with the 65mm gun unit around the same time putting Lt. Theirren in charge. Throughout the battle, the Italian OBA was deadly, eliminating mortar platoons, artillery and a wagon, while also slowing the advance of the infantry and HMG groups. As the French moved toward NEV, fire from the town destroyed the Humber platoon and slowed the advance of the foot units. Moroccan units finally arrived from the south at 1145 hours, but were too late to really help the beleaguered assault force in the north. Even though Capitane Leduc arrived with them to take command, Italian infantry in NEV held out and the French were forced to retreat. This is a 35-turn scenario carried out over rough terrain with mud rules in effect on two horizontal maps. To win, the French must control three villages and ruins, while not losing more than twelve steps. The latter situation with step loss creates tension, as tanks count double, and the Italians are well fortified with AT fire. In this case, step loss ended the scenario during the 18th turn, as the French lost their 13th step trying to take NEV, which is the difficult objective to control because of the distance from French lines. Closing that ground over mud and under bombardment from Italian OBA can result in significant casualties, but the French need to gain control. It is also difficult to soften the defenses in NEV, as the French don’t have much OBA or strong enough bombardment units considering the protection afforded by the town hex. At game end, the French were clearly in control of all ruins and town hexes except for NEV, which was being stormed with a pretty strong assault group. The Italians were reeling with many demoralized units and very little anti-tank capacity; had the French taken NEV without losing two steps in the process, they would most likely have prevailed. The late arrival of the Moroccan troops also hurt the French cause. Six fog-of-war rolls moved the game along, which favored the Italians, and some very handy die rolls against the strong French units helped them achieve victory. Total steps lost were 18 for the Italians to 13 for the French, but still an Italian victory. |
||||||||||||
| 0 Comments |
| La Campagne De Tunisie, scenario #6: Honour | ||||||||||||
|---|---|---|---|---|---|---|---|---|---|---|---|---|
La Campagne De Tunisie, scenario #6: Honour Now this scenario was more interesting than my last, as the Allies consisting of Britain/France/USA/Morocco all attacking an Italian positions, trying to conquer 6 town hexes, 1 village hex and 1 Ruins hex. This is 35 turns but you don’t need that many to figure out the outcome. With mud making Allies movement a crawl, the large Italian bombardment off-board artillery and air-support, not to mention defending in very difficult terrain, the Allies bit off more than they could chew. The Allies were able to control the one village & ruins hexes closest to them but the 6 town hexes and the approach did them in. Even when they were able to assault one of the town hexes, the Italians moved in the dreaded GUAS flame throwing unit and soon a lot of French were fried, or French Fried. Even when the French GOUM (Moroccan) reinforcements arrived, as luck would have, they were pounded by both Italian air and artillery. At the point I stop game play, the Allies had already lost 18 steps and three leaders trying to force their advance and were in total disarray. They had no chance at any of the 6 town hexes. The Italians took their bumps but in a much smaller dose, and lost 8 steps and 2 leaders but controlled Oum-el-Abouab and most of the surrounding battlefield. With that said, I enjoyed the play, and defensive setup it key for the Italians. |
||||||||||||
| 0 Comments |