
|
Phoenix: Audacity is not Folly La Campagne de Tunisie #3 |
||
|---|---|---|
| (Attacker) Germany | vs |
Britain
(Defender)
France (Defender) United States (Defender) |
| Formations Involved | ||
|---|---|---|
| Britain |  |
1st Derbyshire Yeomanry |
| Britain |  |
1st Parachute Battalion |
| France |  |
Groupement Le Couteulx |
| Germany |  |
5th Fallschirmjäger Regiment |
| United States |  |
175th Field Artillery Battalion |

| Total | |
|---|---|
| Side 1 | 1 |
| Draw | 0 |
| Side 2 | 7 |


| Overall Rating, 9 votes |
|---|
|
3.67
|
| Scenario Rank: 290 of 913 |
| Parent Game | La Campagne de Tunisie |
|---|---|
| Historicity | Historical |
| Date | 1942-11-19 |
| Start Time | 14:00 |
| Turn Count | 12 |
| Visibility | Day |
| Counters | 39 |
| Net Morale | 1 |
| Net Initiative | 2 |
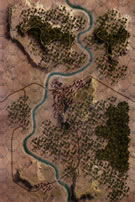
| Maps | 1: 87 |
| Layout Dimensions | 43 x 28 cm 17 x 11 in |
| Play Bounty | 142 |
| AAR Bounty | 159 |
| Total Plays | 8 |
| Total AARs | 3 |
| Battle Types |
|---|
| Bridge Control |
| Urban Assault |
| Conditions |
|---|
| Off-board Artillery |
| Smoke |
| Terrain Mods |
| Scenario Requirements & Playability | |
|---|---|
| An Army at Dawn | Counters |
| Conquest of Ethiopia | Maps |
| La Campagne de Tunisie | Base Game |
| Introduction |
|---|
|
Following Operation Torch, German troops landed at Tunis' El Aouina airfield. Both sides started a race to control key terrain in Tunisia and the former Vichy troops were still in the middle of them. One of these key points was the bridge over the Medjerda River and the road junction at Medjez-el-Bab. The motorized Groupement Le Couteulx reinforced by six Renault D1 tanks had orders to delay the Germans but avoid direct combat, and fell back gradually toward Medjez-el-Bab. German paratroopers were delayed by the French outposts which parleyed without fighting, while 300 British airborne troops dropped on Beja in the west. When German air support finally arrived, the German paratroopers moved out. |
| Conclusion |
|---|
|
This confrontation marked the first contact between the Allies and Germans in Tunisia and also the commitment of the French Army against Nazi Germany. The German paratroopers took the eastern side of the Medjerda and got as far as the bridge where they were stopped by heavy French machine-gun fire. An assault detachment under Oberleutnant Bundt went down the river, crossed, and then entered the western portion of the town. In a desperate fight, the assault detachment was practically wiped out. In the afternoon, Italian reinforcements arrived and the bold German commander bluffed the Allied forces into pulling back. |
| Additional Notes |
|---|
|
Maps from Africa Orientale Italiana are the same as those from Conquest of Ethiopia, and thus may be used in there place. |

|
|
|---|
| AFV Rules Pertaining to this Scenario's Order of Battle |
|---|
|
| Army |
|---|
|


| Armée de Terre |
|---|
|


| Vichy l’ Armee de l’ Armistice |
|---|
|

| Heer |
|---|
|


| Luftwaffe |
|---|
|


| Army |
|---|
|


| 3 Errata Items | |
|---|---|
| Scen 3 |
Ignore the river crossing numbers, the river may only be crossed at the bridge. They are superfluous anyway as there are no engineers in the scenario. (plloyd1010
on 2016 Sep 11)
|

|
HoSU and RW counters were incorrectly printed as 4-7 AT value. Per HoSU scenario book these should all be 4-8 (triangular_cube
on 2017 Oct 08)
|

|
Reduce strength direct fire value be came 5-5 in Army at Dawn. (plloyd1010
on 2015 Jul 31)
|
| LeBlanc's Last Stand | ||||||||||||
|---|---|---|---|---|---|---|---|---|---|---|---|---|
Less than two weeks after the Allied landings in North Africa, most of the Vichy French troops had switched allegiance to the Allied cause. In the town of Medjez-el-Bab, a key position for controlling the Medjerda River that opened the path north to the coastal ports, French troops remained in control. However, with the changing allegiance, a German diplomat delivered an ultimatum in the early hours of November 19, 1942, demanding that the French to leave the town. When the French commander rejected the demand, the French gathered their forces with the Allies to keep the Germans from taking control. A multinational task force made up of units from the Groupement Le Couteuix, USA 175th Field Artillery Battalion, British 1st Parachute Battalion, and 1st Derbyshire Yeomanry were situated in Medjez-el-Bab, while a small force consisting of Lt. LeBlanc, two French infantry platoons and a White-Laffly AMD 80 recon vehicle were south of town on a small hill east of the south bridge. Recently landed German units from the 5th Fallschirmjäger Regiment began their assault through the woods southeast of town and headed toward the south hill. Once they were spotted by the Allies, British paratroopers and a recon Humber platoon headed south along the road, followed closely by 2 Renault D1 platoons. Around 1430 hours, German vehicles transporting limbered artillery and a mortar platoon survived opportunity fire and moved west around the south end of the hill to establish a bridgehead by the south bridge. A US Jeep MG moved south from the town along the road but was destroyed by fire from the German paras. By 1515, a German para platoon had assaulted the D1 platoons in the central orchards; French infantry had blocked the central road, while the German convoy had unlimbered an 88mm gun and a mortar platoon on the hill west of the south bridge along with a 50mm gun and infantry platoon now set up east of the south bridge to complete the bridgehead. Over the course of the next hour, fierce fighting continued at the bridgehead, and both the Humber and Laffly 80 were destroyed by fire from the German 50mm gun. The D1 platoons finally dispatched the German resistance and moved south to assist in the assault by Lt. LeBlanc’s units at the bridgehead, and a French sniper barely missed killing the German captain commanding the Germans holding that position. A squad of Fw.190’s strafed the French HMG platoon halting its movement to join the fray. Sgt. Schultz moved the Fallschirmjäger mortar platoon onto the bridge to prevent any Allied movement from the bridgehead to the bridge itself and repositioned the 88mm gun to block the road that approached the bridge from the west. Lt. LeBlanc was killed in the final assault despite reinforcement by the D1 platoons, and the Germans held the bridgehead for a German minor victory. This scenario has all the elements necessary for a challenging battle for both sides, and it offers numerous strategic options with diverse units. The Allies have armor, infantry, artillery and recon vehicles, while the Germans have both artillery and infantry. The strong morale ratings for both sides make it difficult to eliminate units (the final step loss in this play was 7-1, Allies to German losses). It is a great scenario as it plays out on a single map, yet has all of the aforementioned options in a short 12-turn battle. The Allies have to essentially hold the town and bridges, while the Germans can gain a minor victory by controlling one bridge, or a major one by controlling at least one town hex and a bridge hex, or two town hexes. The Allies set up first, and their setup drives the German strategy since all German units start off map. Options for the Allies are to set up with primary strength in the town, or to spread their units between the town and the south bridge in some fashion. In this scenario, Allied strength was based in the town with a token force for spotting and skirmishing on the south hill. This led to the German forces entering from the east in the woods for both flexibility and protection, but a fast-moving convoy carrying mortar and artillery units entered from the southeast corner hexes. The latter was a gamble that the Germans could survive the opp fire from the units on the south hill, which they did until units could get around the hill and ultimately be unlimbered. The options in the scenario provide great replayability for such a small scenario. |
||||||||||||
| 0 Comments |
| Audacity means death | ||||||||||||
|---|---|---|---|---|---|---|---|---|---|---|---|---|
The combined French-British and American force chose to defend heavily the center town while having a French infantry company with defending the southern town and bridge. The southern force had the two armored car platoon on the hill east of the river set to delay. The Fallschirmjaegers decided to attack swiftly toward the southern town and bridge knowing that only their elan, due to their high morale, would carry the day. They attacked the hill driving off the two armored car platoons and hoped to gain the hill and bring up the guns, pound the town and move on to the bridge. They never progressed beyond the hill as the French moved their infantry and tanks from the center town and aggressively counterattacked the hill tying the Germans down in a life and death struggle for the hill. This prevented the Germans from having any chance to move on to their objectives. The Allies win. |
||||||||||||
| 0 Comments |
| Forlorn hope. | ||||||||||||
|---|---|---|---|---|---|---|---|---|---|---|---|---|
The immediate impact of the terrain is felt in that the Germans have to do a "hi diddle diddle, right up the middle!", except that the "middle" is directly in the bottleneck, so aptly adopted for a good defense. Given the time available to accomplish the mission the Germans did the best they could. With, say another Company of troops the Germans could have pulled it off. But, alas. |
||||||||||||
| 0 Comments |