
|
The Perfect Assault Pusan Perimeter #22 |
||
|---|---|---|
| (Attacker) North Korea | vs | United States (Defender) |
| Formations Involved |
|---|

| Total | |
|---|---|
| Side 1 | 2 |
| Draw | 1 |
| Side 2 | 0 |


| Overall Rating, 4 votes |
|---|
|
3
|
| Scenario Rank: --- of 913 |
| Parent Game | Pusan Perimeter |
|---|---|
| Historicity | Historical |
| Date | 1950-07-11 |
| Start Time | 06:30 |
| Turn Count | 20 |
| Visibility | Day |
| Counters | 104 |
| Net Morale | 1 |
| Net Initiative | 1 |
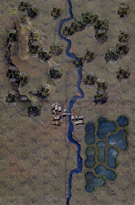
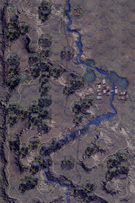
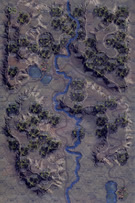
| Maps | 3: 92, 94, 95 |
| Layout Dimensions | 84 x 43 cm 33 x 17 in |
| Play Bounty | 176 |
| AAR Bounty | 159 |
| Total Plays | 3 |
| Total AARs | 3 |
| Battle Types |
|---|
| Exit the Battle Area |
| Inflict Enemy Casualties |
| Conditions |
|---|
| Minefields |
| Off-board Artillery |
| Smoke |
| Scenario Requirements & Playability | |
|---|---|
| Pusan Perimeter | Base Game |
| Introduction |
|---|
|
After ejecting the North Korean infiltrators from the American-dug foxholes, Jensen’s 3rd Battalion settled back into their positions for the night. After several probing attacks during the darkness, the North Koreans returned early in the morning with a full-scale, well-prepared assault – no doubt aided by their precise knowledge of Jensen’s positions. Jensen’s men found that their radios did not work, and as they watched in horror, North Korean T-34’s rolled sedately through the minefields carefully laid by the Americans the previous day, setting off no explosions. Either the North Koreans had removed the mines during the night, or more likely, the green Americans had failed to properly arm them. |
| Conclusion |
|---|
|
Skillful North Korean infiltration isolated the 3rd Battalion, which was then overrun with assaults on both flanks plus a frontal attack. The fighting continued for several hours, but by 1230 Jensen and many of his officers had been killed and only about 40 percent of his troops made it back to friendly lines. Of those, very few had their weapons, and many had cast aside helmets, canteens and even their boots. |

|
|
|---|
| AFV Rules Pertaining to this Scenario's Order of Battle |
|---|
|
| Chosŏn inmin'gun |
|---|
|


| Army |
|---|
|


| 1 Errata Item | |
|---|---|
| Scen 22 |
Scenario #22, The Perfect Assault: The NKPA setup should read: Enter any map edge on Board 92 and/or 95 on Turn One or later, but at least 10 units must enter on each map. (Not each edge, as there are not enough units for that)! (JayTownsend
on 2015 Jan 01)
|
| Korean War: Pusan Perimeter, scenario #22: The Perfect Assault | ||||||||||||
|---|---|---|---|---|---|---|---|---|---|---|---|---|
Korean War: Pusan Perimeter, scenario #22: The Perfect Assault After reviewing a few other gamer’s AARs I decided to study this scenario for a few days before playing it. I came up with a plan, where I setup my Americans on the south side of the river on map 92 in a kind of a V-formation or U-formation with some unit and Infantry types setup on the far right and left flanks to guard and delay the North Koreans which could do the most damaged coming in on the eastern and western sides of map 92. They will also give the units in the middle more time to load up in vehicles and move out of the center of V, hopefully unmolested but for the flanking units, if they get caught up into in prolonged combat they are dead or scarified for the good of the others but still have a fighting chance. I put all the minefields where I thought they would be most useful. The biggest concern was slowing down those fast moving T34/85s and SU-76s but my outer barrier flanks was doing a pretty good job but shifting more units into combat might have been a mistake. American units fought and died in place in a couple of areas while the middle section started to exit in numbers that worried the NKPA enough to push as fast as possible. The M24 tanks hung back to help in delaying a bit but after taking a shot from the NKPA 45mm AT Gun and losing a step of all things, the last step of M24s headed south for some victory points and to avoid the approaching North Korean armor. In the end, the NKPA eliminated 11 American steps and prevented another 15 steps from exiting, for a total of 26 points. The Americans on the other hand eliminated 5 NKPA steps and exited 26 steps for a total of 31 points and a 5 point difference, for a Draw. Had I not held back that M24 tank unit so long, I could have earned another 2 points and a minor victory, so it can be done but it was one of the hardest draws I have played for. |
||||||||||||
| 0 Comments |
| Stockyard | ||||||||||||||
|---|---|---|---|---|---|---|---|---|---|---|---|---|---|---|
In this scenario a full regiment of North Koreans along with a company of armor can get behind an American reinforced battalion. The North Koreans have morale, force size and armor support going for them. The Americans have good direct fire values and that's about it. To win the American player has to get off the south edge of the board, which is pretty darn close to impossible. In our play I entered in two groups on each side of the middle board, behind the Americans. Due to the setup instructions the Americans were not mounted and therefore could not make an immediate run for it. They were able to secure the town on the middle board but the North Koreans were able to establish a strong line blocking the exit to the south. After a couple turns of maneuver it became apparent that there was no way for the Americans to escape and 4 or 5 turns of grinding indicated that the Americans would not be able to stand up to the Korean attacks. In essence the Koreans set up a slaughter along the road. This is VERY historical and I would encourage anyone who wants to know the despair of the American retreat to try this one out, solo. It is not well suited to competitive play as there is simply no ability for the Americans to compete. I give it a "2" for face to face but I would go to a 3 or 4 as a solo exercise. |
||||||||||||||
| 0 Comments |
| Doomed from the Start | ||||||||||||||
|---|---|---|---|---|---|---|---|---|---|---|---|---|---|---|
Played face-to-face against Matt W in 3.0 hours. We ended the game before the midway point so it's probably best to play 6-7 hours if you do a full play. I believe this would be a very good scenario if the bulk of the North Koreans forces entered on board the Americans set up (maybe at least 5 hexes away from the middle board) and a small contingent could enter on the middle board. The large North Korean force would apply pressure on the Americans and the Americans would be forced to fight through a small blocking force to reach their lines. The victory conditions suggest this may have been the plan. Unfortunately the North Korean entry conditions allow them to enter everything on the middle board and set up as a blocking force. The Americans are forced to punch through a huge blocking force to score some VPs but it's unclear to me why this is necessary as the American front is not under any pressure. Punching through a hole through a much larger, higher morale force which also happens to have much better tanks is not an easy task. Let's just say I was not up to the task and resigned soon after it became clear that getting one unit off the map would be difficult. Not fun, at least from a competitive point of view. I gave the scenario a 2 because I felt the Americans never had a chance. Probably more interesting solitaire. |
||||||||||||||
| 0 Comments |