
|
Back Again! Pusan Perimeter #8 |
||
|---|---|---|
| (Attacker) North Korea | vs | South Korea (Defender) |
| Formations Involved |
|---|

| Total | |
|---|---|
| Side 1 | 0 |
| Draw | 0 |
| Side 2 | 5 |


| Overall Rating, 6 votes |
|---|
|
3.67
|
| Scenario Rank: 288 of 913 |
| Parent Game | Pusan Perimeter |
|---|---|
| Historicity | Historical |
| Date | 1950-06-27 |
| Start Time | 08:00 |
| Turn Count | 12 |
| Visibility | Day |
| Counters | 25 |
| Net Morale | 0 |
| Net Initiative | 1 |
| Maps | 1: 92 |
| Layout Dimensions | 43 x 28 cm 17 x 11 in |
| Play Bounty | 140 |
| AAR Bounty | 153 |
| Total Plays | 5 |
| Total AARs | 4 |
| Battle Types |
|---|
| Exit the Battle Area |
| Scenario Requirements & Playability | |
|---|---|
| Pusan Perimeter | Base Game |
| Introduction |
|---|
|
The NKPA seemed to regret giving the ROK 1st Division a nighttime reprieve, and in the morning sent twenty-five T-34’s rumbling straight for Seoul with only the under-gunned ROK 1st Division to stop them. The ROK artillery once again laid down a barrage of fire while the ROK Infantry braced for impact, having grown somewhat accustomed to the enemy armor and avoiding the fear that had gripped them on first contact. |
| Conclusion |
|---|
|
Facing a determined defensive combination of concentrated artillery fire, anti-tank fire, anti- tank teams and infantry the T-34’s could not breach the ROK lines. Some newly-arrived troops from the 15th Regiment joined in, the anti-tank teams climbing onto the T34’s in a desperate measure, and dying as heroes in a valiant display of dedication. The violent attacks continued but the mighty T-34s could not punch a hole through the lines. |

|
|
|---|
| AFV Rules Pertaining to this Scenario's Order of Battle |
|---|
|
| Chosŏn inmin'gun |
|---|
|

| Daehanminguk Yukgun |
|---|
|


| 1 Errata Item | |
|---|---|

|
These are single-step units. The back of the counters in Pusan Perimeter should be blank. (rerathbun
on 2014 Nov 04)
|
| Korean War: Pusan Perimeter, scenario #8: Back Again! | ||||||||||||
|---|---|---|---|---|---|---|---|---|---|---|---|---|
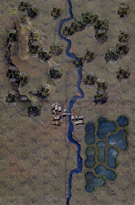
Korean War: Pusan Perimeter, scenario #8: Back Again! A short 12 turn scenario with NKPA armor trying to breakthrough a ROK infantry and support weapons line and exit south. The NKPA have 5 T34/85s counters or ten steps worth and have to exit 5 steps of those ten steps off the south edge of the map to win or the South Koreans win and they are blocking with 6 x INF, 2 X HMG, 1 x ENG, 2 AT Teams, 1 x 37mm and 2 x 105mm Shorts. The key for the South Koreans I believe in this one is to setup as far north as possible filling the gaps in that rough terrain, forcing the North Koreans to have to push their tanks through the woods and allowing the ROK units good assault combat opportunities as well as pot shots with their weak AT weapons. I am not sure why but after setup I bought my NKPA armor in on two locations, one stack of 3 units east of the river and one stack of two units west of the river hoping to slit the attacking ROK forces. But still the stack on the west side was assaulted right away and the AT Team made a successful roll and then rolled a 11 on the dice plus 3 for the AT Fire plus a 1 modifier for no NKPA Infantry Personnel in the hex, thus destroying one step right off the bat! The large NKPA armor stack on the east side of the river trying to void combat by going through the woods but got caught up adjacent to another group of ROK Infantry and were immediately assaulted. From here it went down-hill for the NKPA armor. I called the game after 10 turns, as the NKPA had lost 7 out of 10 steps of armor with no chance for victory, while the ROKs only lost 1 step of INF, 2 steps of Engineers and one leader. A ROK victory, no doubt! This was a surprise ending for me and a very fast playing scenario, next time I will send in all my NKPA armor on the same side of the river. Setup for the ROKs is key for their chances in this scenario; they must fill the holes in the terrain up north and be able to shift forces around, as the assault stacks need them, get AT cross-fire-shots in if possible and don’t forget to bring your AT Teams and Engineers with you for those assaults, to help with the modifiers. For the NKPAs, find the weakest spot in the ROK lines and try and punch through to the open terrain in the rear and off the map as soon as possible and avoid combat if possible and try to keep your forces together. Its fun playing these usual matchups and this was a really fast playing scenario as well, I recommend it if you don’t have a lot of time and like to solve PG puzzles. |
||||||||||||
| 0 Comments |
| Nothing But The Dead and Dying In Our Little Town | ||||||||||||
|---|---|---|---|---|---|---|---|---|---|---|---|---|
I wanted to get a game in on my first Veterans Day off in years, and until I saw Jay's AAR on this scenario I wasn't sure which game to go with. His review made up my mind for me. I'm afraid I set up the ROK forces a bit further north that was best, but the center force holding the town was in the perfect position to catch the T-34s at the end of their first move and pounced immediately on their own activation, taking out 1 step, demoralizing the surviving step and disrupting the other platoon stacked with it. Unable to do anything else, the ROK forces headed for the tangle on the north-south road to try to get one of the other tank units before they could get away. Turn 2 brought another NK initiative with 3 activations. I thought for sure it spelled an NK victory with the tanks being able to break away, but going from road to cross country speed slowed them down enough that the ROK troops were again able to catch up. The two elements having survived assault from turn 1 didn't make it through turn 2, losing 2 more steps and then failing a morale roll when the last step had to flee. ROK 4 to NKPA 0. Turn 3 and ROK got the initiative. They enveloped most of the T-34s and assaulted in 2 hexes, but didn't manage to do anything to the leading 2 platoons, while managing do demoralize the single platoon following along behind. The leading tanks were close enough to make it off the edge of the table, but the single demoralized platoon again failed a morale roll and got caught trying to flee for another step loss. ROK 5, NKPA 4. It was coming down to the wire and only 4 turns into the game. If the remaining step of tanks could manage to evade, regain it's morale and run for the edge, it would be an NKPA victory. But because of losses, NKPA initiative was down to 0, and with that, the luck ran out as well. The ROK Captain lead one last assault accompanied by one AT team and that last step of tanks died at their guns. AT was ineffective, as was the guns and at gun. One 105mm was in position to get a few turns of long range fire, but failed to get a hit. I don't see a lot in other AARs about using the edge half-hexes to get around blocking positions, but I use that tactic myself at times, so setting up the ROK forces, I made sure to cover those open outer hex rows, and as the NK side, I chose to do the old 'hey, diddle diddle, right up the middle' thing, trying to use roads to get as far across the board as possible. In setting up the ROK force a bit further forward than was probably wise, this NK move actually got the tanks nearly halfway across the board before anyone could do anything about them. Taking a chance seemed to be the NK way of doing business. It might have worked had a few assaults not gone the way they did. The only fire done by the NK was in defending in the assaults, and the return fire proved ineffective each time. In the end, the ROK force did well in defending their homeland. Great scenario and my first shot in the Pusan Perimeter game. |
||||||||||||
| 0 Comments |
| The Tanks don't go rolling along | ||||||||||||||
|---|---|---|---|---|---|---|---|---|---|---|---|---|---|---|
The South set up and choke points so I set up all of the NK Tanks on the East. I was planing on going up over the Hill then down the east side of the board. But the god of initiative was not with me and the south won. The south moved to block the opening over the hill. I shifted the axis of my attack to the west and made it down the board to the road. That is when he blocked me. I had no way to go forward. Looking at the situation I planned to attack with 2 T-34 and kill of the one squad blocking the way then move the other tanks down the board. Well the best laid plans an d all that. I assaulted the SK and got an M2 result. But the SK was tough and passed. On his attack he got an M2 result as well and disrupted one and disorganized the other. The rest of the game was just cat and mouse with the tanks being the mice. I manage to get on tank off the board but the lost 2 to Assaults and 2 turns from the last one I had the other tanks locked in Assault with no way to escape and make a break for the boarder. I called the game at that point. |
||||||||||||||
| 0 Comments |
| Channel the Tanks to the Chokepoints | ||||||||||||||
|---|---|---|---|---|---|---|---|---|---|---|---|---|---|---|
The ROK should setup midway in the paths among the woods hex. The AT guns in and 2 hexes NE & NW of the town along the river. More units on the small rise on the NW of the map. The wood s are 4 MP for the tanks. For got that when assaulting tanks in wood the tanks do not get firs fire as the ROK do not have armor. The ROK has to spread out and move east and west. The rice paddies will slow down NKPA. Remember half hexes are playable. The ROK have to assault. That way even if nothing happens, when the tank unit leaves ROK get the free shot. Move right back into the adjacent hex for another round of assault. 14 turns can go by quick if one is not careful. Going through the wood hexes or crossing the river will slow down the tanks. MP costs are as good as additional units. Thismay be a better solo game than face to face. The NKPA did get 2 steps off the board. Got lucky when two hexes with tank counters both demoralized. Got 2 shifts for that in assault. |
||||||||||||||
| 0 Comments |