
|
General Attack Pusan Perimeter #2 |
||
|---|---|---|
| (Attacker) North Korea | vs | South Korea (Defender) |
| Formations Involved |
|---|

| Total | |
|---|---|
| Side 1 | 6 |
| Draw | 0 |
| Side 2 | 1 |


| Overall Rating, 7 votes |
|---|
|
3.86
|
| Scenario Rank: 149 of 913 |
| Parent Game | Pusan Perimeter |
|---|---|
| Historicity | Historical |
| Date | 1950-06-25 |
| Start Time | 05:30 |
| Turn Count | 30 |
| Visibility | Day |
| Counters | 127 |
| Net Morale | 1 |
| Net Initiative | 1 |
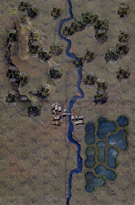
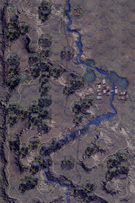
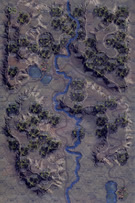
| Maps | 4: 92, 93, 94, 95 |
| Layout Dimensions | 86 x 56 cm 34 x 22 in |
| Play Bounty | 188 |
| AAR Bounty | 153 |
| Total Plays | 7 |
| Total AARs | 4 |
| Battle Types |
|---|
| Exit the Battle Area |
| Inflict Enemy Casualties |
| Conditions |
|---|
| Off-board Artillery |
| Randomly-drawn Aircraft |
| Smoke |
| Scenario Requirements & Playability | |
|---|---|
| Pusan Perimeter | Base Game |
| Introduction |
|---|
|
The main North Korean attack came down the Uijongbu Corridor coinciding with a general attack across the front. The 3rd Infantry Division accompanied by the 107th Tank Regiment marched down the Kumhwa-Uijongbu-Seoul road, often called the P’och’on Road, angling into Uijongbu from the northeast. The 4th Infantry Division supported by the 109th Tank Regiment drove straight south toward Tongduch’on-in from the 38th Parallel near Yonch’on. The ROK 7th “Seven Star” Division stood their ground, awaiting the initial blows of the NKPA. |
| Conclusion |
|---|
|
The Minister of Defense in Seoul received a radio message from an ROK officer requesting immediate reinforcements as the positions near the 38th Parallel were receiving heavy artillery fire and under general attack. At that time all ROK units found themselves engaged. Strong enemy armored columns gained both major roads heading south, and the townspeople in Uijongbu could hear the artillery fire just 20 miles north of Seoul. |

|

|
|---|
| AFV Rules Pertaining to this Scenario's Order of Battle |
|---|
|
| Chosŏn inmin'gun |
|---|
|


| Daehanminguk Yukgun |
|---|
|


| Textbook breakthrough and armored exploitation |
|---|
|
This is a lopsided but fun scenario. Two NKPA armor/infantry task forces attack in parallel against a RoK infantry battalion. All four maps are used, and you really appreciate just how rough and hilly the terrain is. The NKPA objective is to destroy at least 20 RoK steps and exit 60+ steps from the southern map edge in 30 turns. There is plenty of time to accomplish this task. One of my main tactical failings when I play PG is committing to an attack too early and trying to do everything too fast. I rarely take advantage of the full time allotment and use enough preparatory firepower before I get stuck in to assaults. In this game I committed to trying to use tactics that were more reflective of real world armies, in this case the infiltration/exploitation tactics that a NKPA army would use. The RoKs were concentrated in the towns that stood astride the two north-south roads, two companies reinforced with HMGs and engineers in the large town to the west, one company with HMGs to the east. Both towns are in the southern half of the board, so the RoKs would make the NKPA come to them. To harass them on their way through the rough northern terrain, each town had a forward outpost in the hills to the north, a company in the west and an HMG platoon in the east, along with forward observer officers. There were also 2 casemates in the east, and some artillery and AT posts in the center of the board between the towns, where they had good fields of fire. The NKPA attacked in parallel down both roads, leading off with a two-company attack down each road. I very patiently kept the bulk of my NKPA forces off the board for the first 8-10 turns, relying on these point companies to sweep the RoK forward positions and secure jumping-off points for the main armor/infantry forces to launch their assaults on the towns. In addition, I peeled a company-sized armored force with tank riders off the eastern attack force to occupy the artillery and AT positions in the center of the board, thereby cutting the RoK position in two and creating a breakthrough to sweep behind the towns. The attack went off like a dream. The eastern force seemed like it would bog down when a whole company was thrown into disarray by a RoK artillery strike, but the 2nd company neatralized the HMG nest and began engaging the casemates. Unfortunately this would be a futile effort that would last the remainder of the game, but the casemates were effectively taken out of the battle. The western attack was equally successful, rapidly occupying the 40m hill in front of the western town and evicting the RoK company that held it. In the center, the tank/infantry task force cleared the artillery and AT guns, then hooked behind the eastern town to completely isolate the defenders. The main bodies of the NKPA attack had been moving onto the board during this action, but a deliberately slow pace and fog of war kept them out of the attack until about 3 hours in. At that point the western attack burst forward, with tanks and tank riders exploiting the gap in the center to attack the western town on its eastern and southern flanks. In the east, the narrow valley approach slowed the progress of the attack somewhat, but the breakthrough force in the center, cutting the defenders off from behind, prompted them to begin a withdrawal into the rough wooded hills south of town. Unfortunately, effective fire from HMGs and assault guns of the NKPA main body kept them pinned long enough for the main infantry attack to develop. Only scattered RoK survivors pulled back. The western town was enveloped and defeated remarkably quickly. Having a battalion of tanks and assault guns ringing the town was most effective. Ultimately the NKPA were able to achieve all their objectives with time to spare, and with no significant casualties. While this sounds like too lopsided a scenario to be fun, it was a blast. I find that games that are very closely balanced, while tense and exciting, often devolve into disorganized brawls. Every once in a while its fun to play out a game that recreates how an attack is supposed to proceed in theory. It can be very instructive, as I found it. In this battle, patiently using an infiltration/reconnaissance-in-force to probe the enemy before committing a powerful main attack at the weakest points was completely successful. It was a perfect demonstration of how a Soviet-style combined arms attck would work. It reminded me of similar situations in Eastern Front Deluxe (An Awful Morning) and War on the Equator (#2 I think) where a powerful combined arms attacker blitzes a thinly-stretched defender. Hats off to Jay Townsend. Pusan and Saipan are my current favorites, and his designs are becoming my overall favorites in PG. |
| 0 Comments |
| Korean War: Pusan Perimeter, scenario #2: General Attack | ||||||||||||
|---|---|---|---|---|---|---|---|---|---|---|---|---|
Korean War: Pusan Perimeter, scenario #2: General Attack Ok started with scenario #2 for a number of reasons; it’s a large scenario, it’s the larger part of the day one invasion of South Korea with lots of NKPA armor but mostly it is the scenario that I was most worried about, balance wise as the NKPA (North Koreans) have a huge edge in unit numbers and strength over the ROK (South Koreans) in this scenario, so I was worried about it being a cake-walk for the NKPA. Keep in mind however the NKPA have two victory conditions they must meet; exit 60 steps off the south edge of the map and eliminate 20 ROK steps, so they can’t just blow 60 steps of the south end of the map or they won’t have enough strength to eliminate 20 ROK steps. The NKPA basically have two armies entering the map, one on the very rough map #95 and the other on the more open map #92. If the ROK player is smart he will clog up map 95 with just enough units to delay Elements of the NKPA 4th Infantry Division and 107th Tank Regiment to keep them at bay for many turns, as terrain on map 95 is terrible and just a few enemy units can make a mess of things. On map 92 they shouldn’t try and defend the whole map as the NKPA will find many holes in the open terrain on this map to blow through and exit south, so setup one very good defensive position and dug-in and use your terrain to your advantage and make the NKPA come to you. Unfortunately I did not adhere to this second part of the strategy but will in my next game as I spread-out my ROK units too much to support each other. In my game the NKPA on map #95 were bottlenecked in the rough terrain most of the game but the NKPA armies entering map #92 found open terrain and attacked the spread out ROK units on this map with some difficult but once they were free, they helped their sister armies breakout as well for a NKPA victory! I would say after playing this scenario that it will favor the NKPA 70% to ROK 30% unless you use my suggested strategy above. There are two fixes to make this a closer balanced scenario; one give the inexperienced player the NKPA side on this one or two simply shorten the turns to 20 instead of 30 turns which will put a lot of pressure on the NKPA to eliminate 20 steps and exit 60 steps. Either Way a fun scenario to play for my first Pusan Perimeter scenario on the finished version of the game and pushing all those invading T34/85s, SU-76s and BA-64s across the 4 maps with a horde of Infantry against an assorted ROK force was a blast, win or loss! |
||||||||||||
| 0 Comments |
| Cake-Walk | ||||||||||||
|---|---|---|---|---|---|---|---|---|---|---|---|---|
Played solitaire over 8 hours. After reading Scrane's excellent AAR for this one, I decided not to go into details in mine as my play was very similar to mine. The difference was I rated the scenario "3" while he gave it a "5". I suggest that anyone interested in this scenario reads Scrane's AAR carefully, especially his next to last paragraph. and decides for himself or herself how much you would enjoy a similar experience. For me, the experience was slightly below average and I gave it a "3". Recommended for solitaire play only because playing the ROK in an opposed match may be a depressing experience. |
||||||||||||
| 0 Comments |
| General Disaster |
|---|
|
Pusan Perimeter: Scenario #2 Background: Just about every Nork included in the box takes on a ROK force trying to cover four maps. This isn’t ending well. . . The Setup: I put the ROK troops mostly in villages and woods, trying to find places that the DPRK would be forced to fight. The mortars were set up near the center of the board to provide as much coverage as possible. Summary: The Norks hit in two groups, each advancing down a highway. The western force has little trouble, using the open terrain towards the middle to flank around the ROK. They make short work of a couple casemates and eventually push the ROK troops into the wooded hills in the southwest corner. The eastern force runs into a bit more trouble. The ROK put up stronger resistance and demoralized most of the SMGs. It took the T34s to come in and restore order, but by the end the DPRK was in the clear and rolling south. By the end the North had taken out 21 ROK steps and 89 steps exited the map, more than enough for an easy win. Analysis: This is a rough, one-sided fight. As a historical study it is very interesting, but if you want a competitive game, there are others that foot the bill much better. About the only hope for the ROK is to scatter and make the DPRK hunt you down, as one of their victory conditions is to eliminate a certain number of steps. But at 30 turns, the odds of that working are probably rather low. |
| 0 Comments |